Step 1 of 8

Learning path · Level 4 · Tutorial 2
Replace part of an image or extend its scene while checking that important details remain intact. Work with your own or authorized image in a tool you can access, or write a precise edit specification when editing features are unavailable.
 Choose the Right Editing Operation
2 min
 Define What Can Change and What Must Stay
Define a bounded editable area for a region replacement and name the visible details that must remain unchanged. 2 min
 Plan for a Seamless Boundary
Use visible perspective, lighting, edges, and texture to plan how a replacement or extension should connect to the surrounding scene. 2 min
 Write a Precise Edit Specification
Write a compact, testable specification that separates the requested change, protected details, continuity requirements, and acceptance checks. 2 min
 Replace a Selected Region
Carry out a bounded region replacement when your accessible tool supports it, or produce the complete specification needed to perform the same replacement later. 3 min
 Extend the Scene Without Stretching It
Plan a right-side scene extension from 1:1 to 16:9 while preserving the original image and continuing its surfaces, lighting, and layout. 3 min
 Inspect the Result and Request a Correction
Inspect before-and-after results for boundary failures and unintended changes, then write bounded correction requests with a recheck plan. 3 min
 Final Application: Specify, Review, and Decide
Consolidate one targeted image-editing task into a clear specification and an evidence-based review decision. 3 min
Step 1 of 8
An editing goal tells you which operation to choose.
Use region replacement (inpainting) when something already visible in the image must become something else. The new content belongs inside the current image boundaries.
Use scene extension (outpainting) when the image needs more surrounding scene beyond a current edge. The original image remains in place while new area is generated outside it.
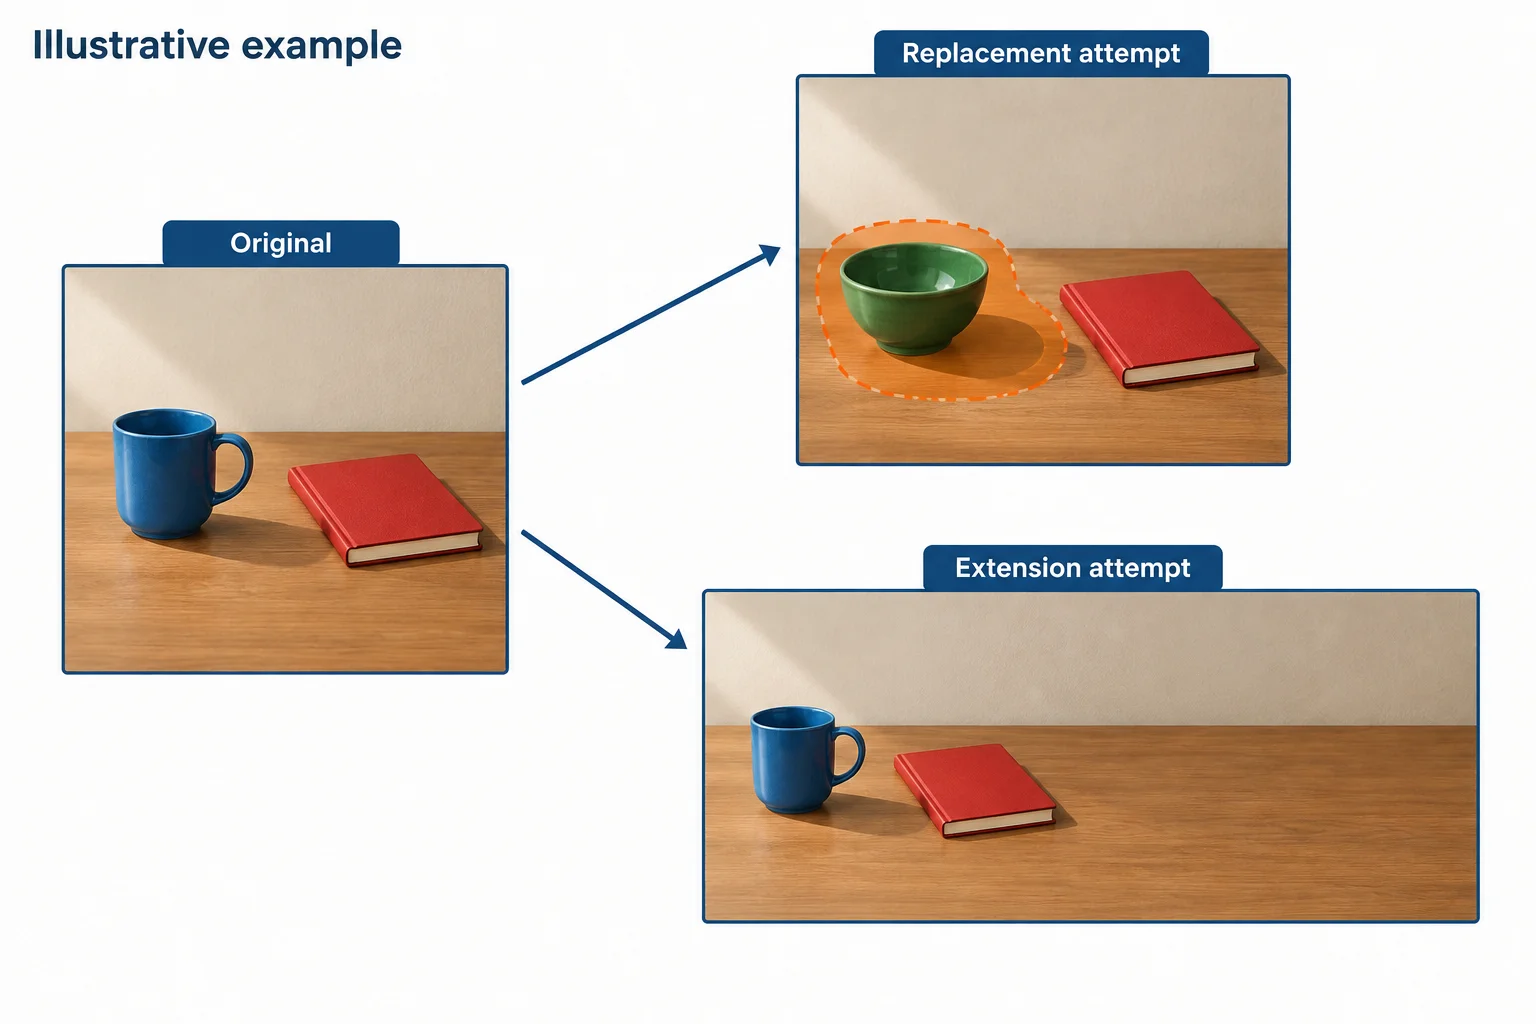
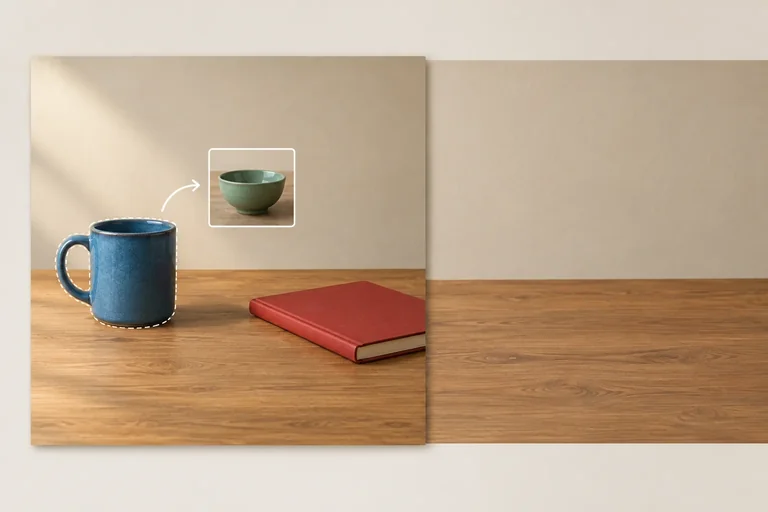
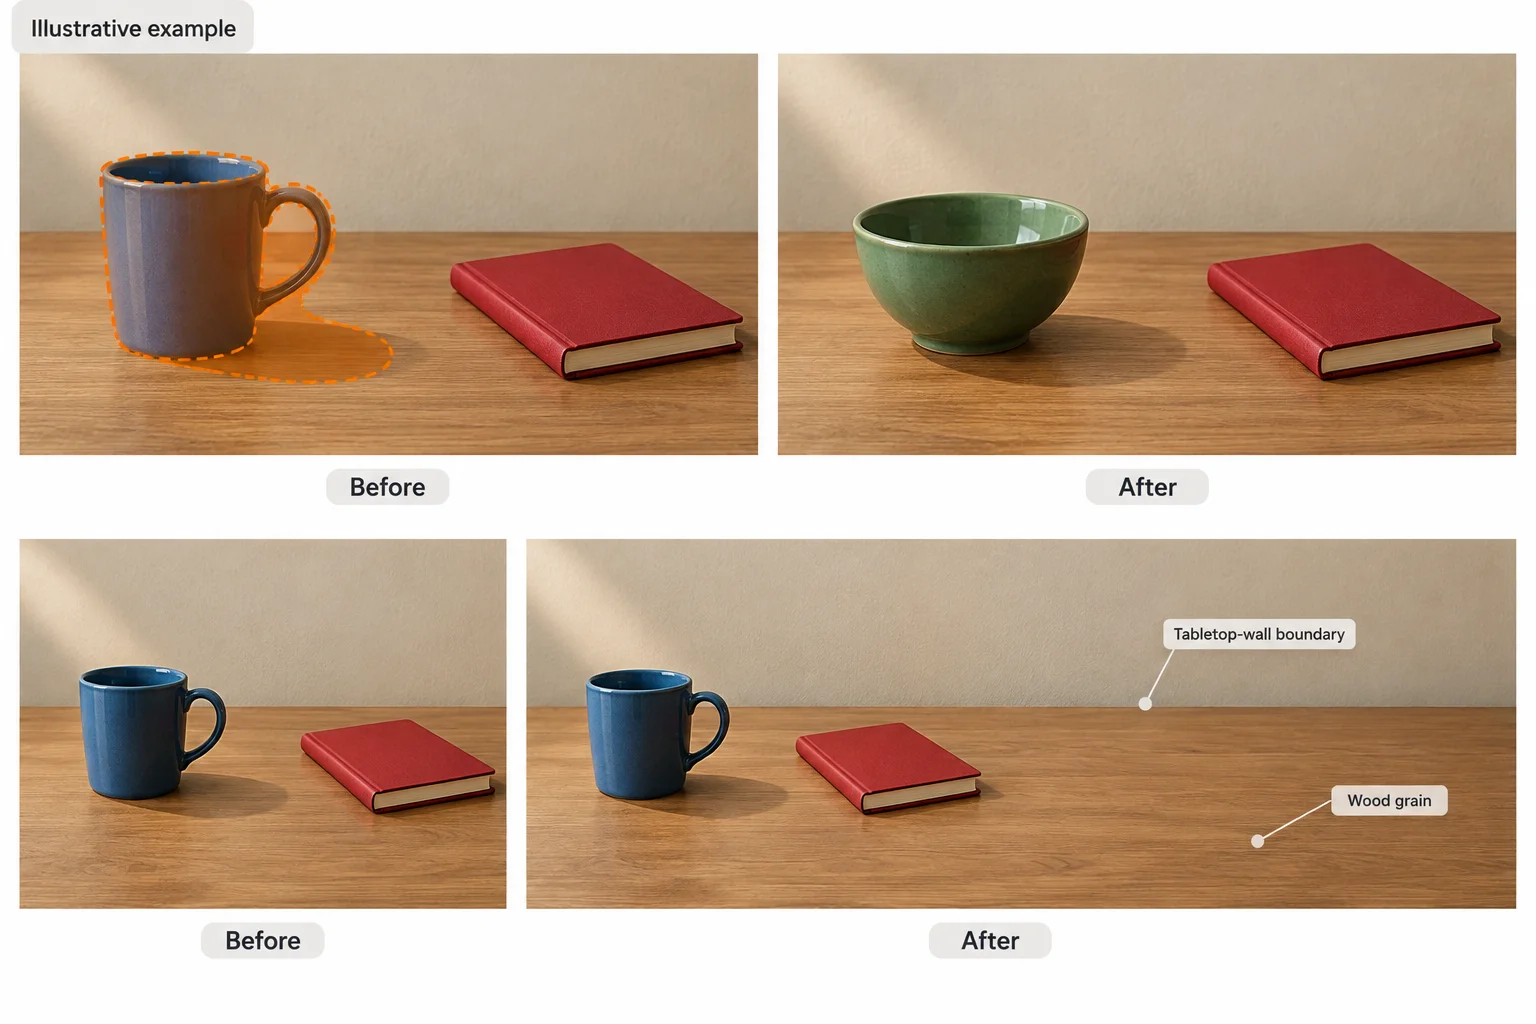
Illustrative example: replacement changes content within the existing canvas; extension adds scene beyond it.
Choose the operation from the requested outcome—not from the fact that the image needs improvement.
A request to turn the blue mug into a green ceramic bowl calls for region replacement because the change happens at an existing location. A request to change the square image from 1:1 to 16:9 by adding space on the right calls for scene extension.
Scene extension preserves the original content’s proportions. It is not stretching, which distorts what is already there, and it is not cropping, which removes part of the existing image.
Use the requested result to identify both the operation and the part of the image that should change.
| Editing goal | Choose | What changes |
|---|---|---|
| Change the blue mug into a green ceramic bowl | Region replacement | Existing content at the mug location |
| Make the 1:1 scene into 16:9 by adding space on the right | Scene extension | New area beyond the right edge |
| Make a wider image by widening everything already visible | Neither | This is stretching, not an extension |
| Make a wider image by cutting away part of the square | Neither | This is cropping, not an extension |
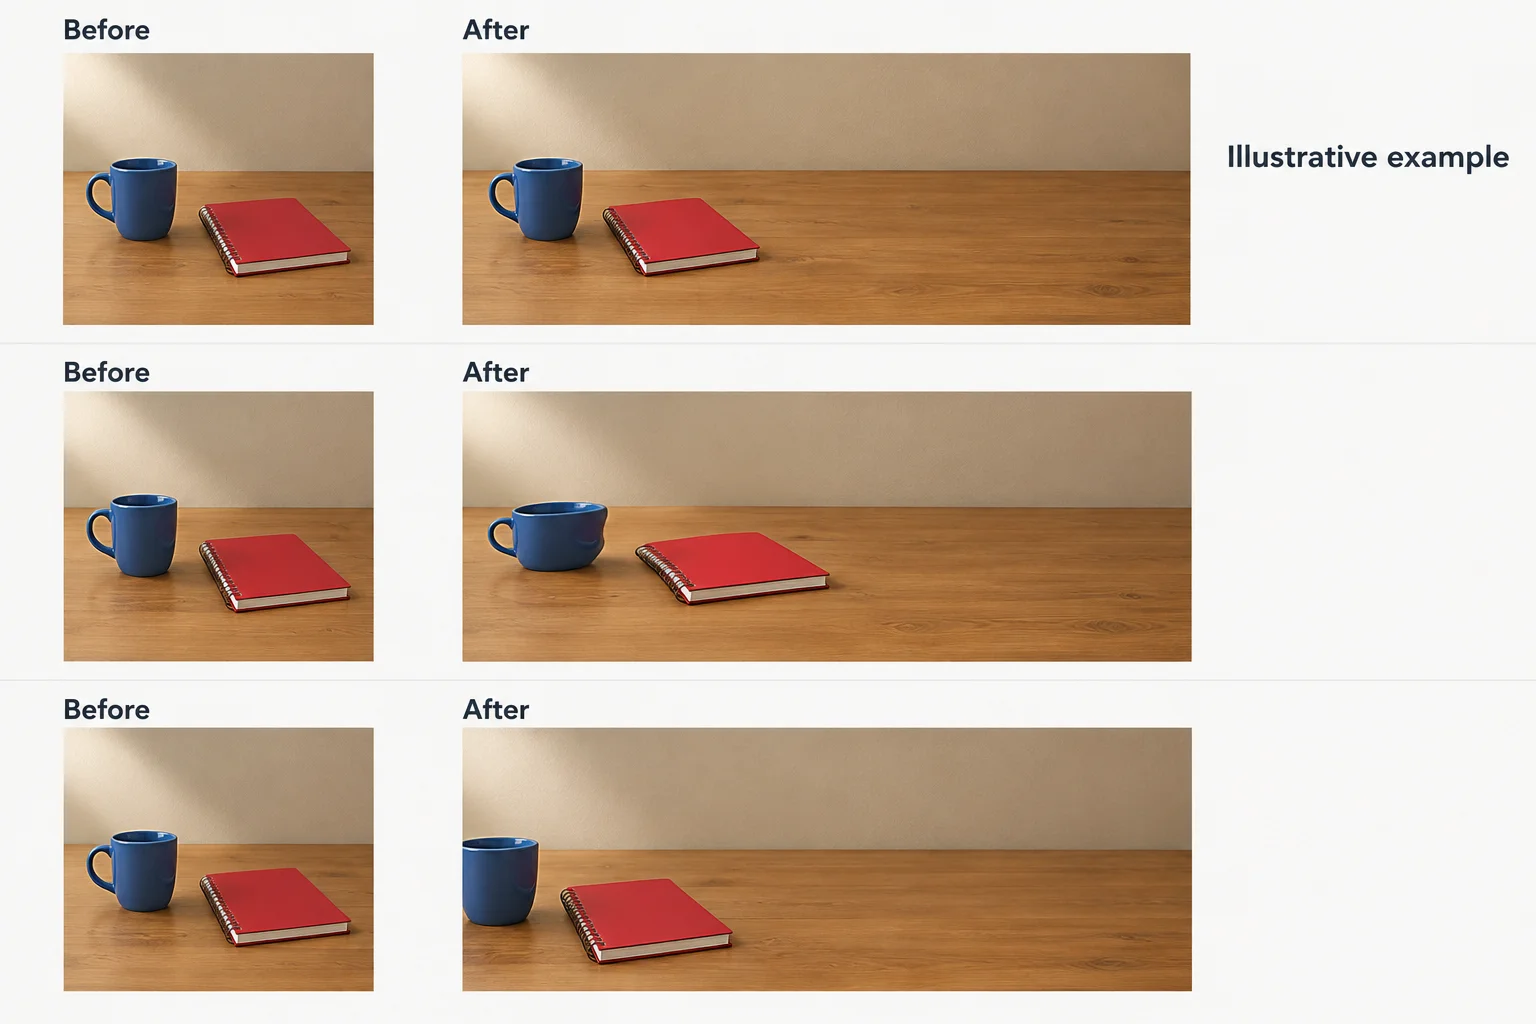
Only the first After view adds new scene area while keeping the original content intact.
Match each editing goal or outcome to its correct operation category.
Tap an item and then its matching pair.
Step 2 of 8
Define a bounded editable area for a region replacement and name the visible details that must remain unchanged.
For a region replacement (inpainting), a selection or mask communicates the intended editable area. It tells the tool where a change is requested; it does not lock everything outside that boundary.
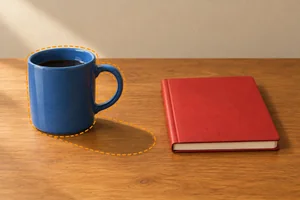
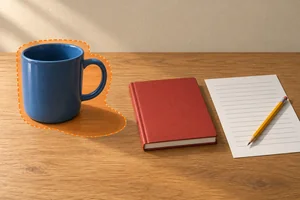
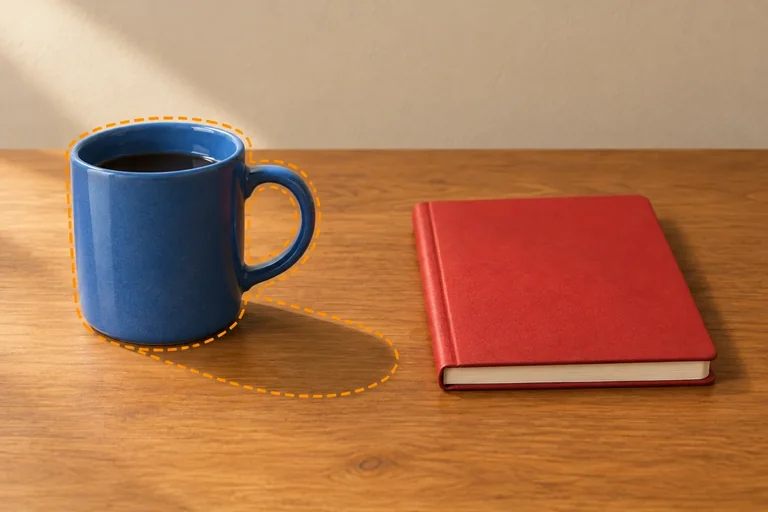
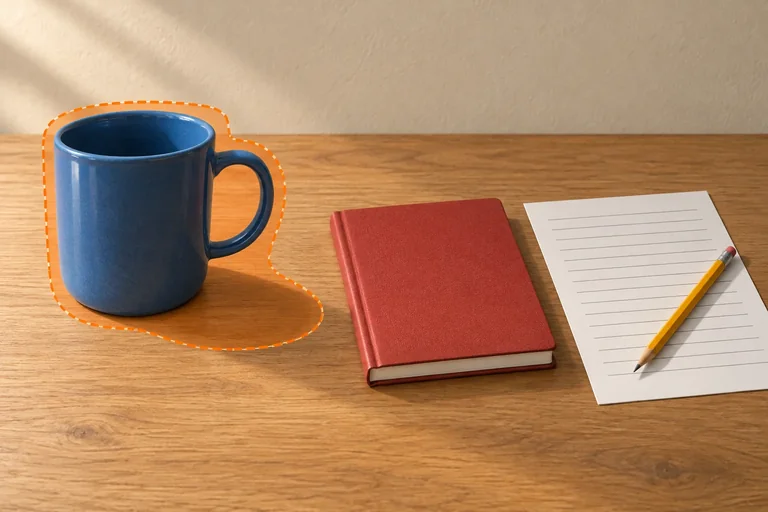
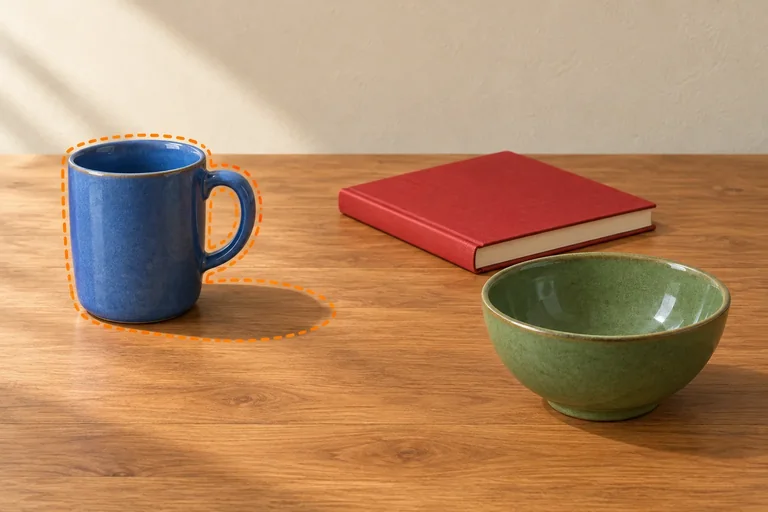
For the recurring replacement, bound the blue mug on the left, its handle pointing right, and the cast shadow affected by removing the mug. Include only a small amount of nearby tabletop where the new bowl must meet the existing wood. The red notebook is outside the editable area.
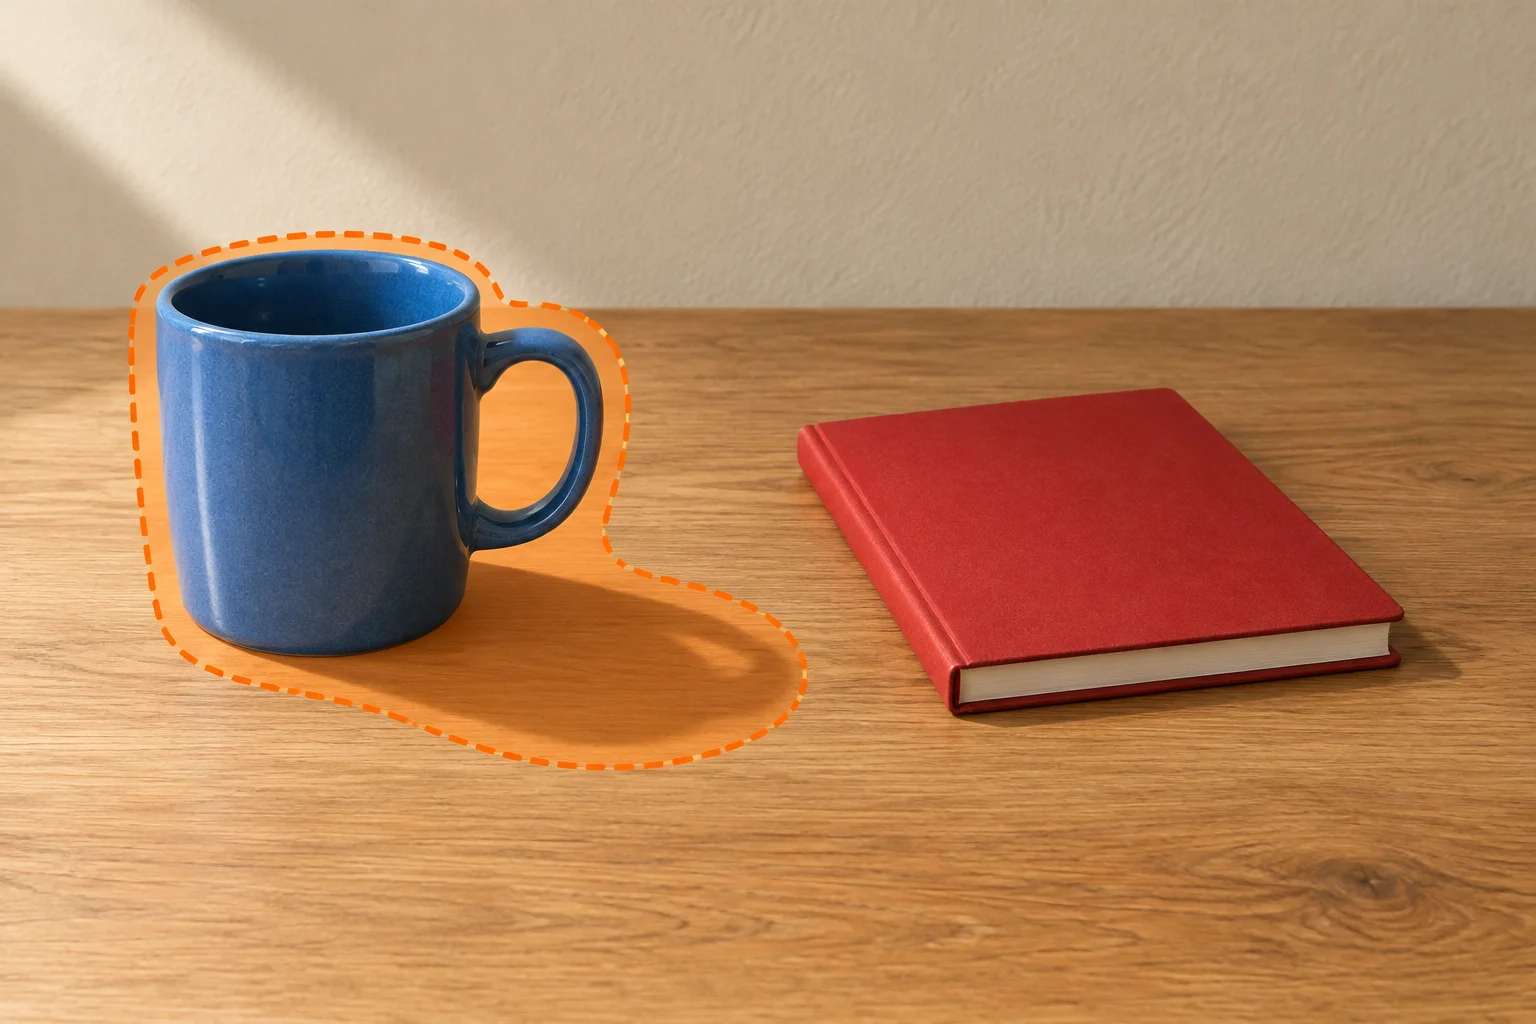
Illustrative example — the orange overlay includes the object’s extremities and its affected shadow, not the notebook.
Tip
A mask states intent, not proof of preservation. A tool can still alter nearby pixels or protected details, so those details must later be checked against the Original.
Protected details are observable facts that should not change. Avoid vague instructions such as “keep the rest the same.” Name the feature and its location.
In this scene, protected details can include:
The bowl is the requested change, so it is not a protected detail.
Example
A text-only location description can define the same boundary without an annotated image:
“Select the blue mug on the left, including its handle extending to the right, the cast shadow toward the lower-right, and a thin surrounding tabletop margin. Keep the closed red notebook near the center-right unchanged in color, shape, and position. Keep the tabletop and beige wall outside the selected area unchanged.”
Visible landmarks and viewer-relative directions make the request testable.
Choose the editable-area overlay that best supports replacing the blue mug with a green ceramic bowl.
For the recurring mug-to-bowl region replacement, write a short planning note.
Use viewer-relative directions where useful.
Write at least 180 characters (0/180).

Step 3 of 8
Use visible perspective, lighting, edges, and texture to plan how a replacement or extension should connect to the surrounding scene.
An editable area identifies where new content may be generated. A seamless result also has to agree with the scene immediately around that area.
For region replacement (inpainting), compare the new object with nearby surfaces, light, and edges. For scene extension (outpainting), compare the new canvas area with the original edge it continues.
Read the visible cues just outside the join:
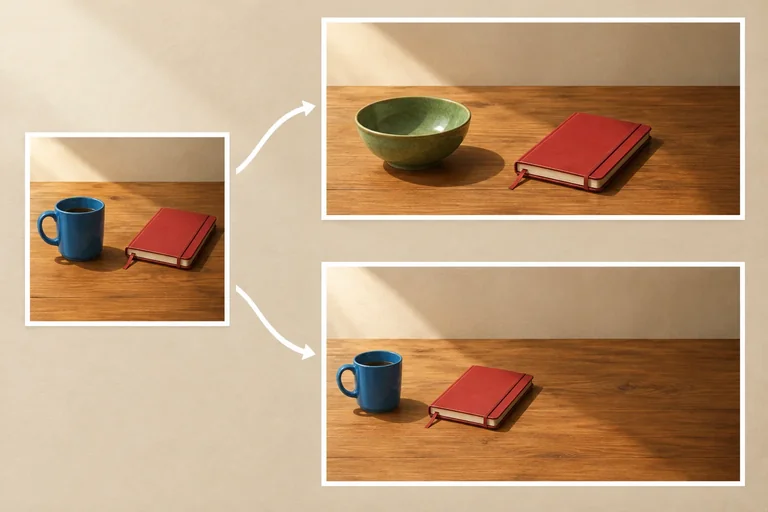
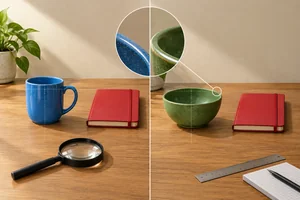
Illustrative example. Before is on the left and After is on the right. The upper pair is Original to Replacement attempt; the lower pair is Original to Extension attempt. Look at the unchanged scene immediately beside each join.
Use nearby, unchanged content as the reference. A generated area does not need to copy every pixel, but it should follow the scene’s visible structure rather than introduce a competing one.
Look immediately outside the edited boundary before deciding what the new content must follow.
| Continuity | Cue outside the edit | What should agree |
|---|---|---|
| Perspective | Tabletop-wall division and surface angle | Lines and apparent scale at the join |
| Lighting | Upper-left illumination | Brightness and shadow toward lower-right |
| Boundary | Existing object and surface edges | A clean connection with no halo or gap |
| Texture | Wood grain and beige wall finish | Plausible pattern, color, and material detail |
Example
Original → Replacement attempt: A green ceramic bowl can differ from the blue mug, but its contact with the tabletop must fit the same viewpoint. Its shaded side and cast shadow should agree with the upper-left light, while the nearby notebook stays unchanged.
Original → Extension attempt: The new right-side area should continue the tabletop and wall at the existing boundary. Continue their direction, brightness, and texture without moving, resizing, or cropping the original content and without inventing extra objects.
Tip
A clean-looking new object is not enough. Inspect the transition between old and new content: that narrow area often reveals a wrong angle, light direction, edge, or material pattern.
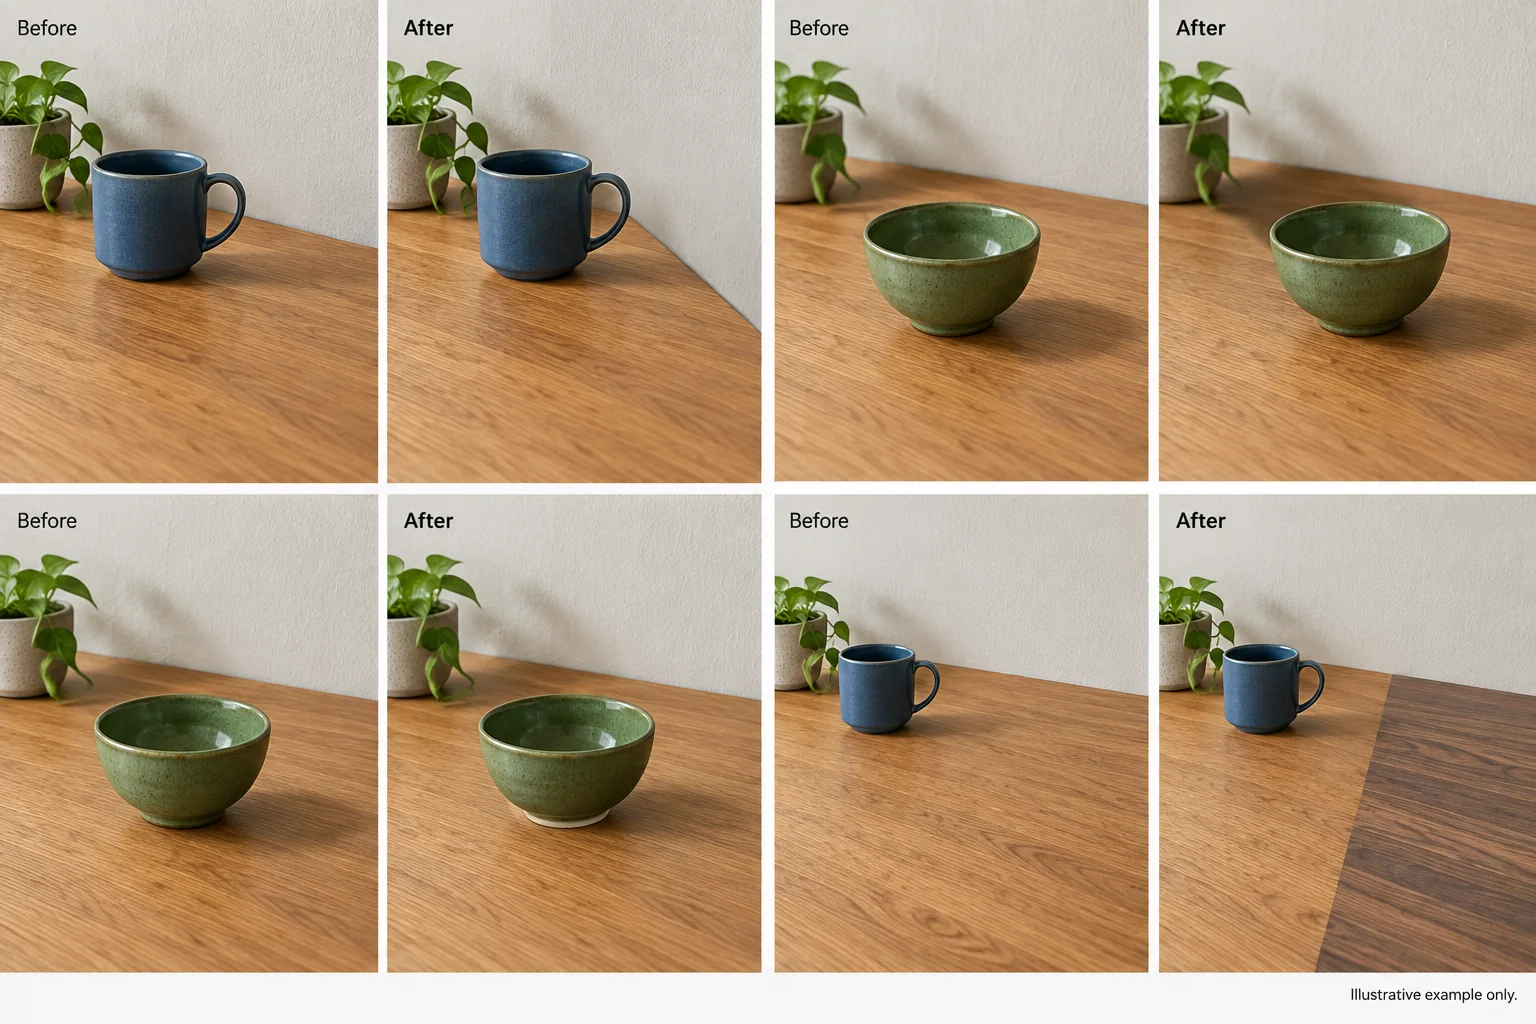
Illustrative example. In every pair, Before is on the left and After is on the right. Use the fixed positions—top-left, top-right, bottom-left, and bottom-right—when completing the match.
Match each fixed grid position to the continuity category and the scene cue that a successful edit should follow.
Tap an item and then its matching pair.
Step 4 of 8
Write a compact, testable specification that separates the requested change, protected details, continuity requirements, and acceptance checks.
An edit specification is a compact plan that separates what should change from what must remain unchanged. It is more testable than a vague request such as “improve this image.”
Use the labels in this order:
Use visible landmarks and viewer-relative directions: left, right, upper-left, and lower-right. A specification can guide an edit, but it does not prove that the finished result obeys the constraints.
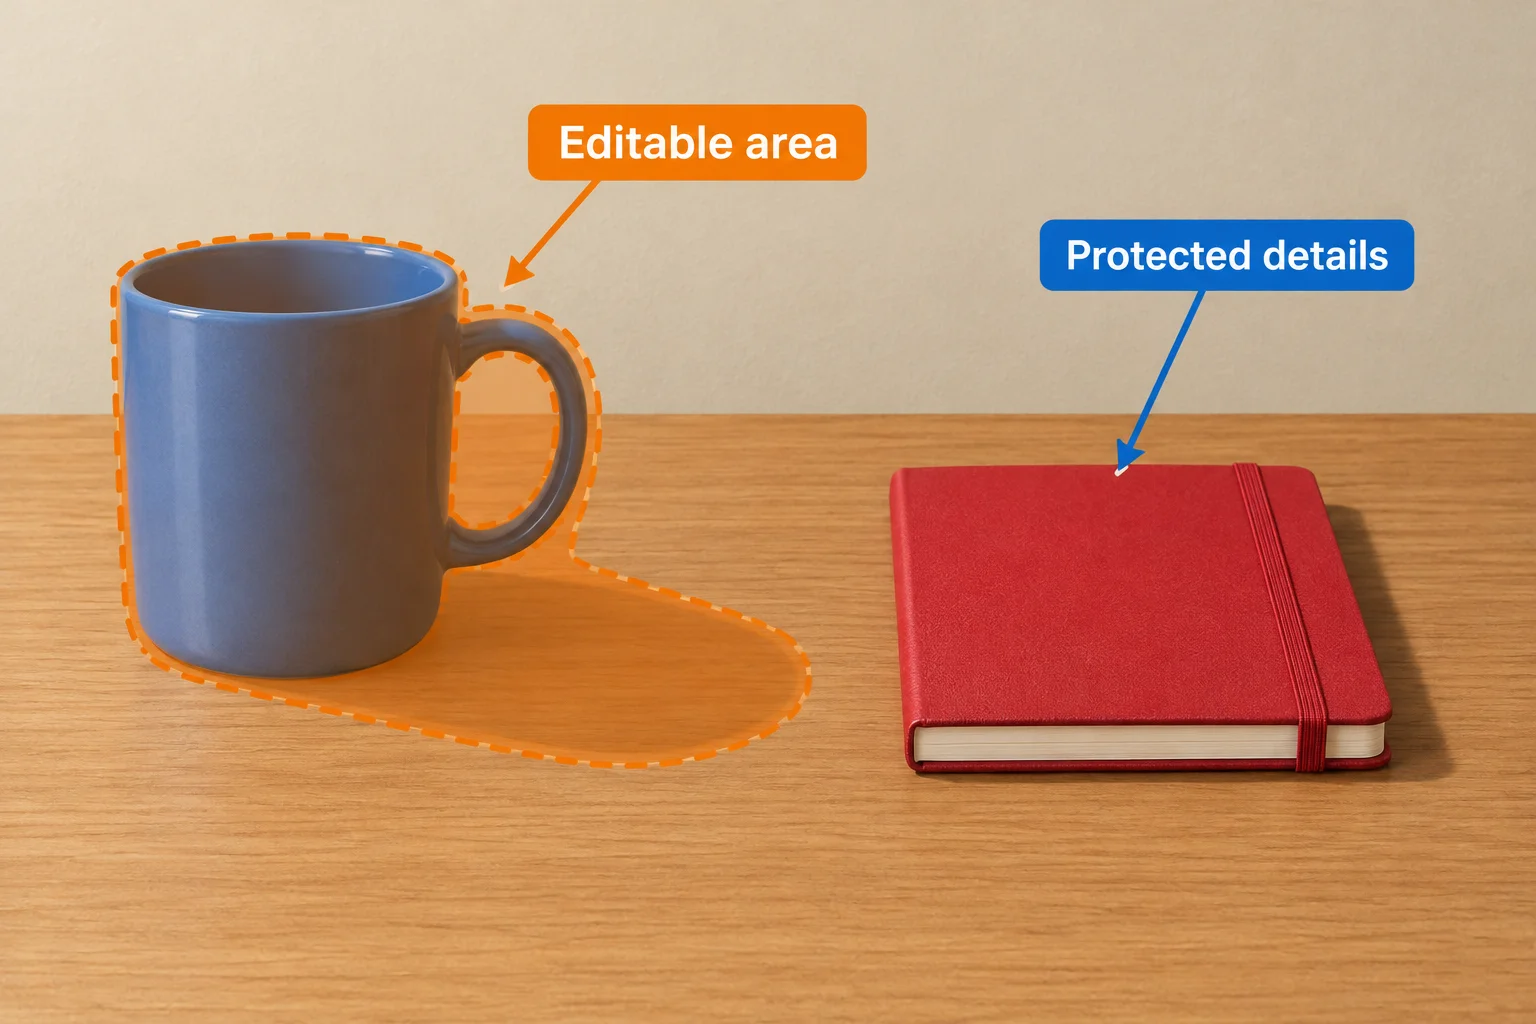
The editable area covers the object’s full footprint and affected shadow. The notebook and the scene outside the orange overlay are protected details.
Each label has one job. Keep the statements concrete enough that someone can locate, perform, and inspect the intended edit.
| Field | What to state |
|---|---|
| Goal | The intended visual outcome. |
| Operation | Region replacement (inpainting) or scene extension (outpainting). |
| Editable area | A bounded location using visible landmarks. |
| Requested change | The specific new or removed content. |
| Protected details | Objects, layout, and features that must not change. |
| Continuity requirements | Perspective, lighting, edges, shadows, and texture to match. |
| Acceptance checks | Observable before-and-after comparisons. |
Example
Goal: Replace the blue mug while preserving the tabletop composition.
Operation: Region replacement (inpainting).
Editable area: On the left, include the blue ceramic mug, its handle pointing right, and the cast-shadow area extending toward the lower-right; include only a narrow surrounding tabletop margin where needed.
Requested change: Replace the mug with a green ceramic bowl at the same location.
Protected details: Keep the closed red notebook near the center-right unchanged. Keep the wooden tabletop, beige wall, original layout, and all content outside the editable area unchanged.
Continuity requirements: Match the tabletop perspective and apparent scale. Light the bowl from the upper-left and create a plausible shadow toward the lower-right. Blend its contact edge and shadow into the existing wood texture without a halo or seam.
Acceptance checks: Compare Original with Replacement attempt. Confirm that the bowl occupies the intended location, no mug or handle remains, the notebook is unchanged, and the bowl, shadow, and tabletop boundary appear continuous.
Acceptance checks describe what to inspect, not what a tool promises to deliver. Compare the relevant landmarks in Original and an attempt:
Use the outcome labels carefully:
A written requirement is useful, but only a comparison can verify it.
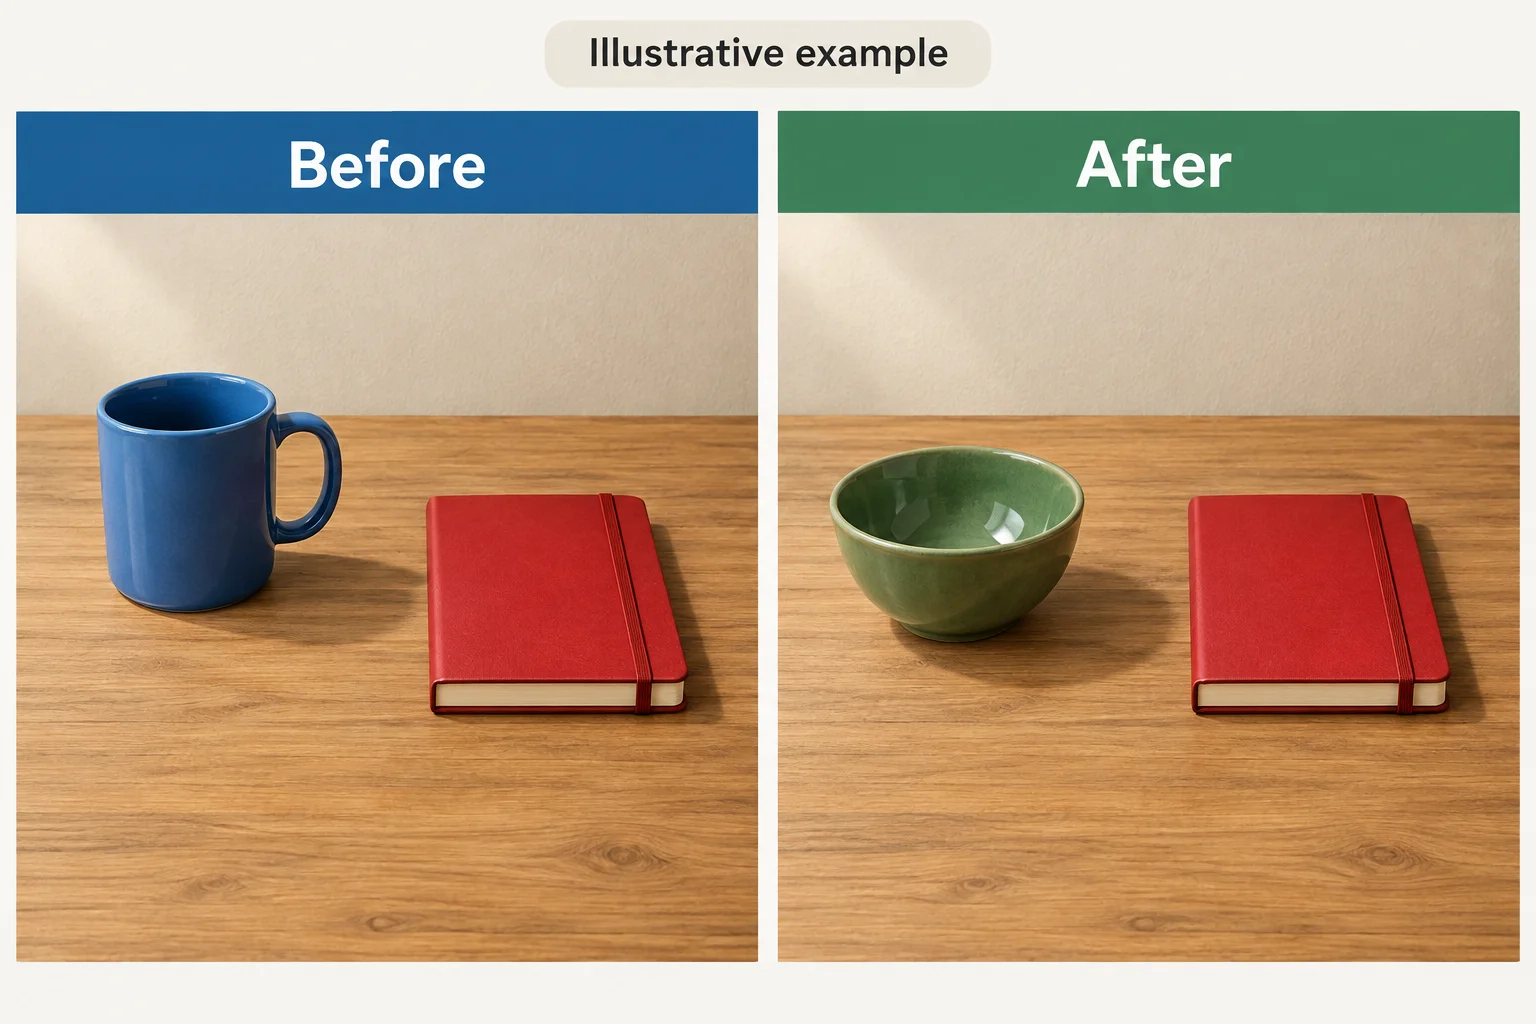
Illustrative example — Before is on the left and After is on the right. This display shows the kind of evidence an acceptance check should inspect; it does not verify an edit on your own image.
Draft a compact edit specification for the displayed square tabletop scene. The blue mug on the left must become a green ceramic bowl in the same location. Preserve the red notebook near the center-right and the rest of the scene outside the intended change.
Write these labels in exactly this order: Goal, Operation, Editable area, Requested change, Protected details, Continuity requirements, and Acceptance checks.
Make the area locatable with landmarks and viewer-relative directions. Make the checks observable in a comparison with Original. No actual after image is provided, so state the appropriate outcome label.
Write at least 350 characters (0/350).
Step 5 of 8
Carry out a bounded region replacement when your accessible tool supports it, or produce the complete specification needed to perform the same replacement later.
Region replacement (inpainting) changes a bounded part of an existing image. For a safe, comparable workflow, keep Original unchanged, define the editable area, submit one targeted request, and retain the resulting Replacement attempt.
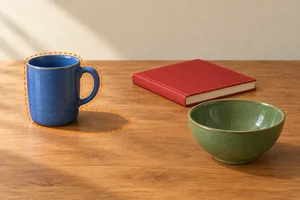
For the recurring tabletop scene, the editable area must cover the blue mug on the left, its right-facing handle, and the cast shadow affected by removing it. The red notebook near the center-right and the scene outside the editable area are protected details.
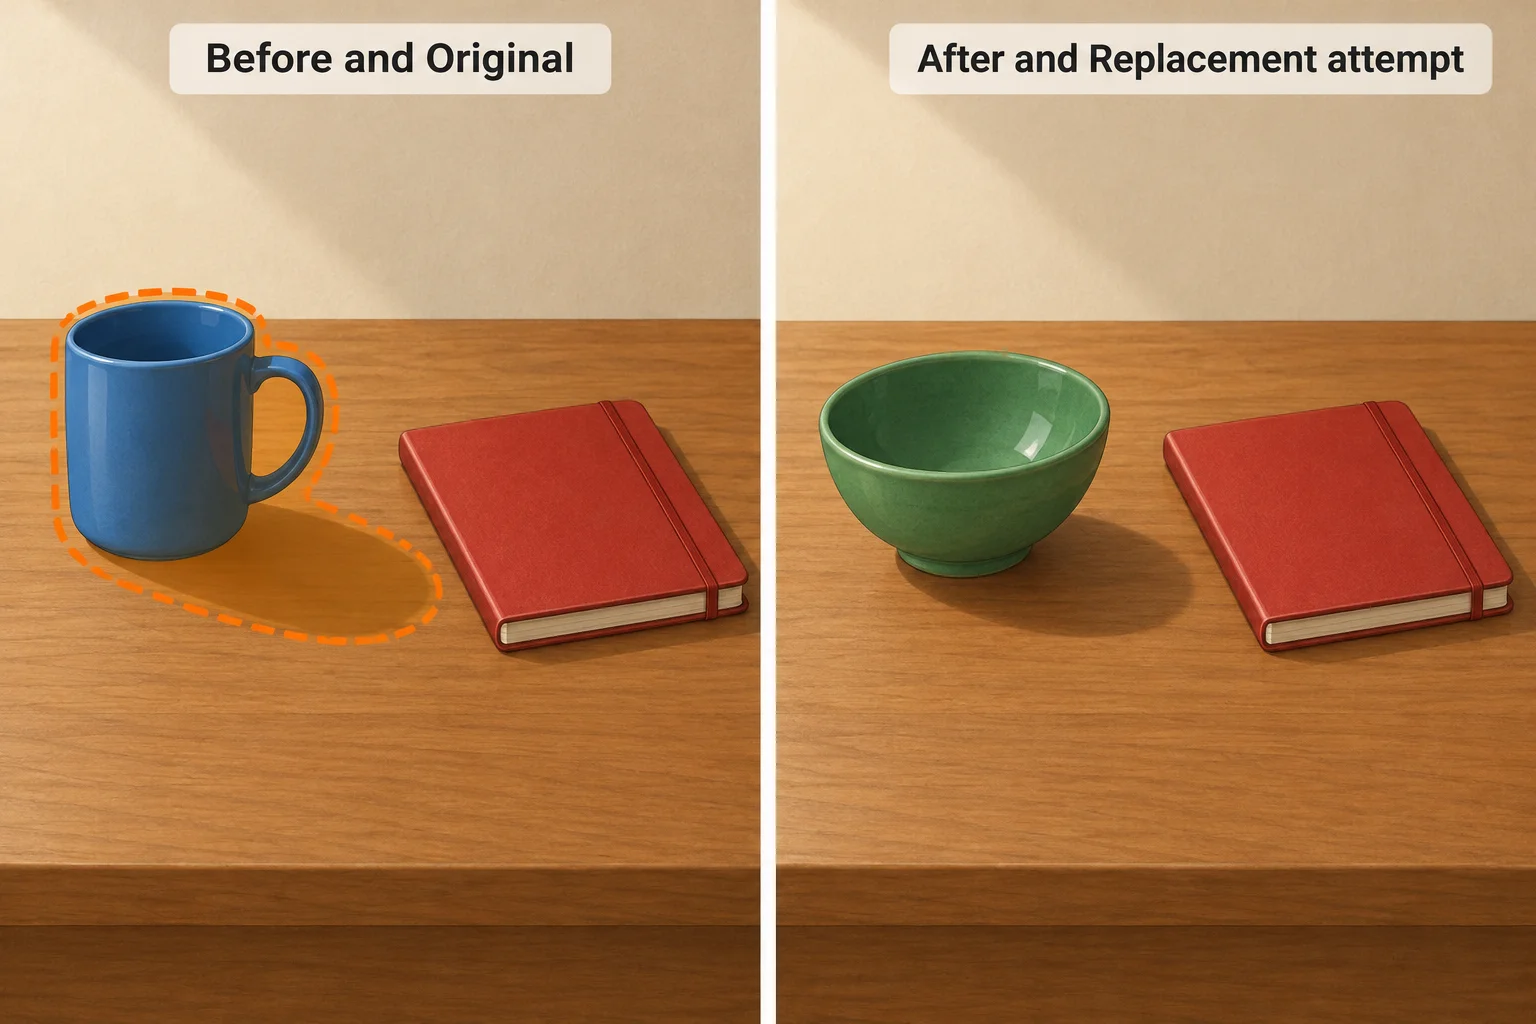
Illustrative example. Before is on the left; After is on the right. The orange overlay includes the object footprint and affected shadow, not the protected notebook.
Tip
Use region editing only when an accessible tool offers a selection, mask, or equivalent control. Work only with an image you own or may use. If that control is unavailable, write the same request as an edit specification; a written specification is a plan, not an executed edit.
Put these actions in the order for one bounded region-replacement run.
You have two equivalent routes. In a tool, make the bounded selection and submit the request on your own or authorized image. Without that feature, create an execution-ready edit specification instead.
Use the required labels in this order: Goal, Operation, Editable area, Requested change, Protected details, Continuity requirements, and Acceptance checks. State locations from the viewer’s perspective. A specification should be specific enough for another person or suitable tool to carry out, while not claiming that a result already exists.
Example
Goal
Replace the blue mug with a green ceramic bowl while preserving the 1:1 tabletop scene.
Operation
Region replacement (inpainting), branching from Original.
Editable area
The blue mug on the left, its handle pointing right, its footprint, and its cast shadow toward the lower-right, with a narrow surrounding margin.
Requested change
Remove the mug and create a green ceramic bowl at the same location.
Protected details
Keep the closed red notebook near the center-right unchanged. Keep all tabletop and beige-wall content outside the editable area unchanged.
Continuity requirements
Match the tabletop perspective and wood texture. Keep light from the upper-left and give the bowl a plausible shadow toward the lower-right. Avoid a seam or halo at the boundary.
Acceptance checks
The mug and handle are absent; a green bowl occupies the intended location; the notebook is unchanged; the boundary blends with the tabletop.
Choose one route.
Practical route: Report a replacement you attempted on your own or authorized image. State that you retained Original, identify your editable area, name at least two protected details, and state that you retained Replacement attempt.
Text-only route: Write an execution-ready replacement specification for the recurring tabletop scene. Use these labels in this exact order: Goal, Operation, Editable area, Requested change, Protected details, Continuity requirements, Acceptance checks.
Do not describe a specification as an executed edit unless you actually performed it.
Write at least 250 characters (0/250).

Step 6 of 8
Plan a right-side scene extension from 1:1 to 16:9 while preserving the original image and continuing its surfaces, lighting, and layout.
For a scene extension (outpainting), enlarge the canvas first. In this task, change a square 1:1 canvas to 16:9 by adding space only on the right.
Keep the entire original image at its existing size and position, flush with the left side of the wider canvas. The new right-side area is generated to continue the scene. Do not stretch, crop, move, or resize the original content.
This differs from region replacement (inpainting): no existing object is being swapped here; the scene is being continued beyond its former boundary.
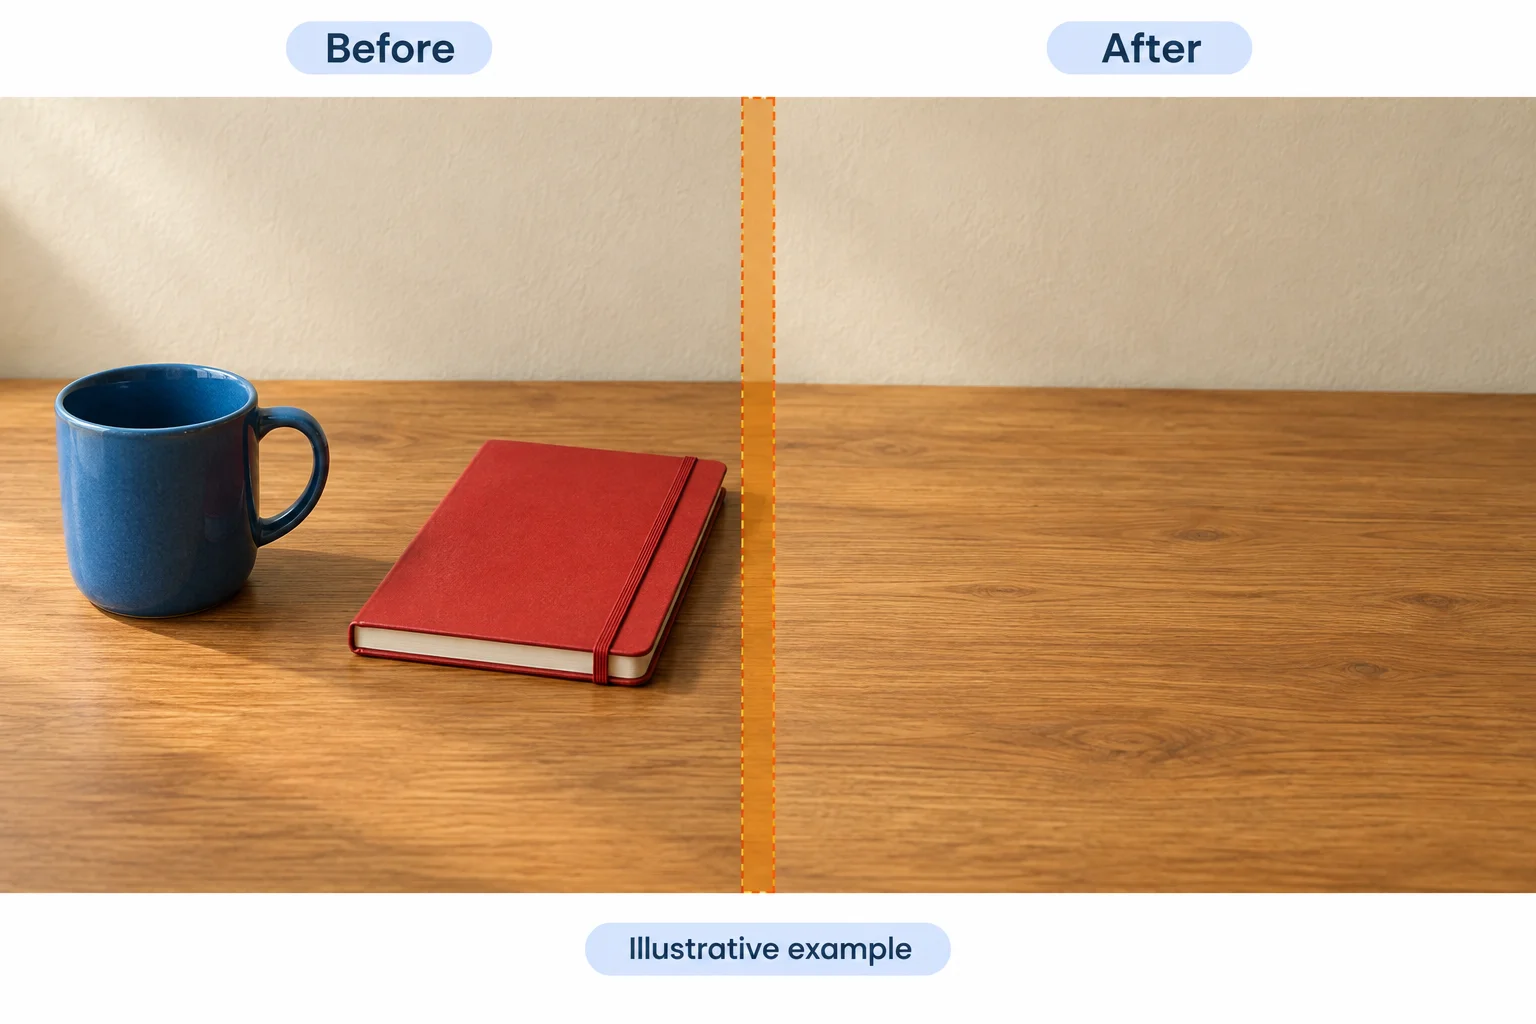
Illustrative example. Before is on the left; After is on the right. The original square remains intact, and only the right side is added.
The new area should continue what is already visible: the beige wall above and wooden tabletop below. Match the existing perspective, upper-left lighting, and lower-right shadow direction. Do not invent extra mugs, notebooks, or decorations.
Some tools allow a narrow overlap across the old right edge to blend the join. Treat that overlap carefully: it may help continuity, but it does not permit changes to nearby protected details. Keep the original scene intact and inspect that edge after generation.
Example
Use this specification when an editing tool is unavailable, or adapt it for a tool that supports canvas expansion.
Goal
Create a wider version of the Original tabletop scene.
Operation
Scene extension (outpainting).
Editable area
The added canvas space on the right, plus a narrow overlap at the original right edge only if needed for blending.
Requested change
Change the canvas from 1:1 to 16:9. Keep the Original at the left at its current size and position. Generate space only on the right.
Protected details
Do not move, resize, crop, recolor, or alter the Original content: blue mug on the left with handle pointing right, closed red notebook near the center-right, tabletop, wall, and their layout.
Continuity requirements
Continue the wooden tabletop and beige wall with compatible perspective. Preserve upper-left lighting and shadows toward the lower-right. Add no objects.
Acceptance checks
The canvas is 16:9; the Original is unchanged and left-aligned; the right side contains a seamless tabletop-and-wall continuation without extra objects. Label any generated result Extension attempt.
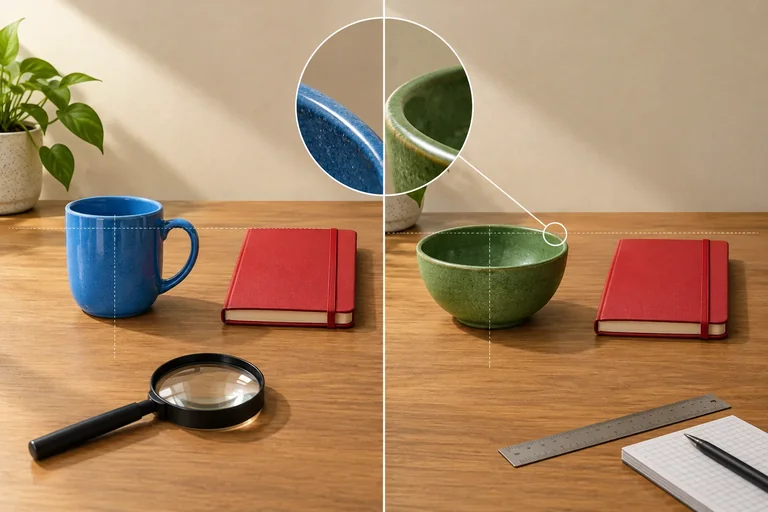
Which arrangement correctly represents a right-only extension from 1:1 to 16:9?
Choose one route.
Local-edit route: Using an image you own or may use and a tool available to you, perform a right-side scene extension. Preserve the original content, then label the generated version Extension attempt.
Text-only route: Use the tabletop scenario from this tutorial and write an execution-ready edit specification instead.
For either route, write the labels below in this exact order: Goal, Operation, Editable area, Requested change, Protected details, Continuity requirements, and Acceptance checks. Make clear the target ratio, right-only direction, placement of the original, what new content should appear, and what must not change. If no actual output exists, its outcome is Not evaluated.
Write at least 250 characters (0/250).
Step 7 of 8
Inspect before-and-after results for boundary failures and unintended changes, then write bounded correction requests with a recheck plan.
A strong review is broader than asking whether the new object looks appealing. Inspect in this order:
For a region replacement (inpainting), inspect the object footprint and its affected shadow. For a scene extension (outpainting), inspect both the join to the Original and the Original content itself.
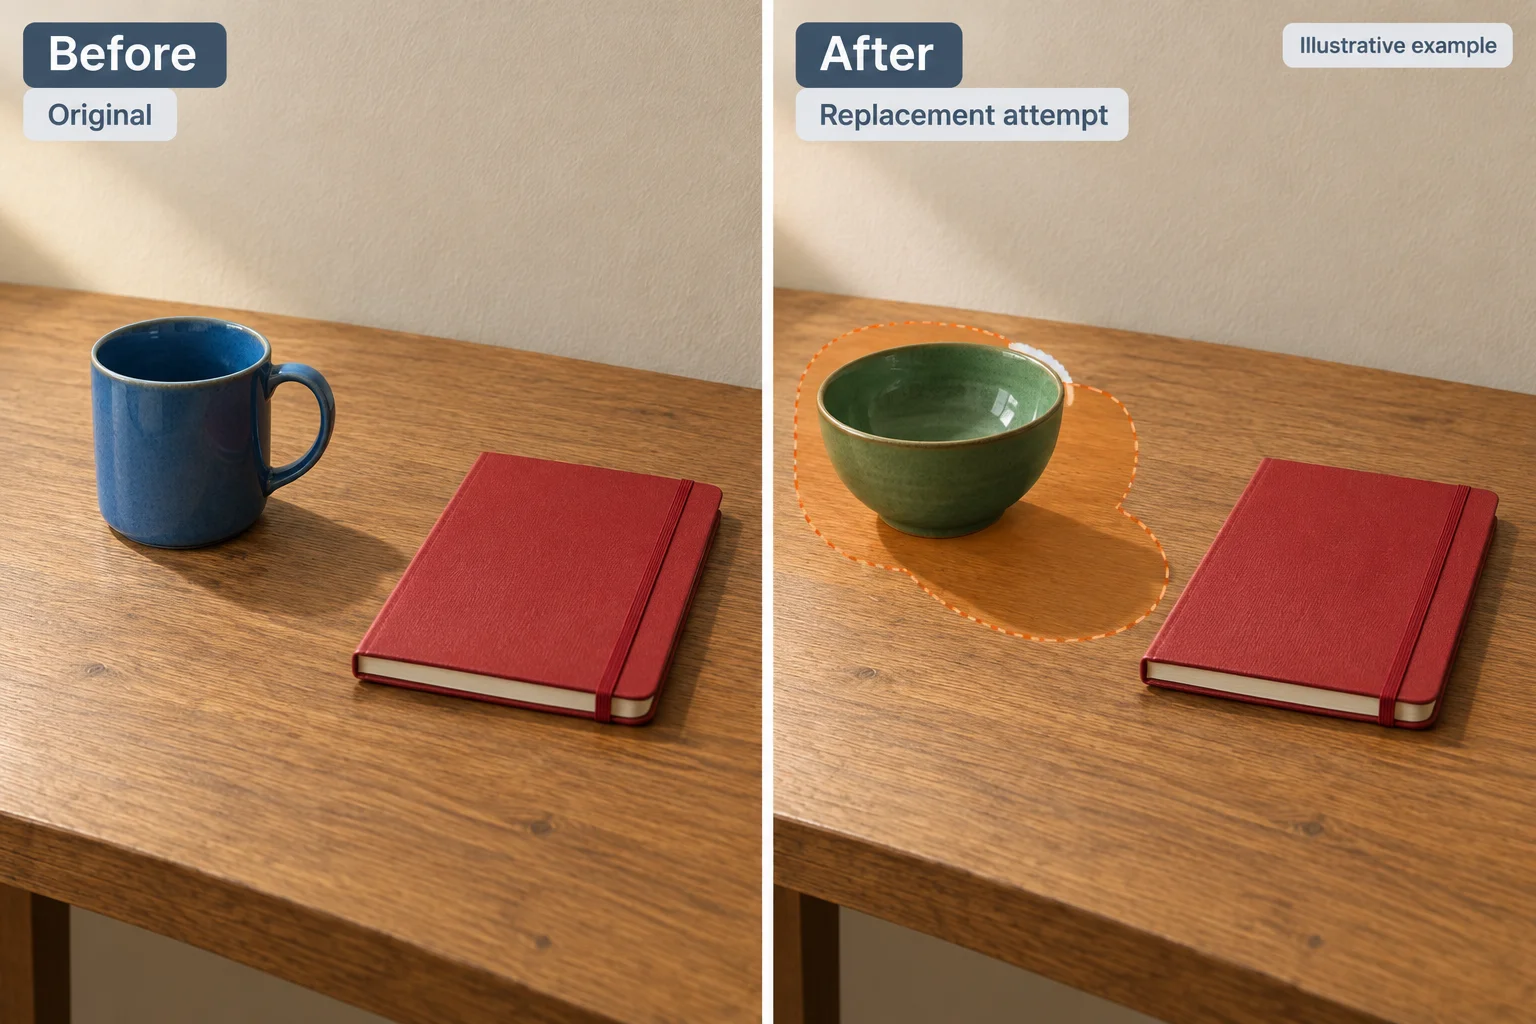
Illustrative example. Compare the edited interior, the boundary, and the protected notebook separately.
Use identifiable landmarks when comparing views: the mug or bowl rim, the notebook corners, the tabletop edge, and the wall-table boundary.
For an extension, the Original portion can look smaller only because it is displayed within a wider canvas. Compare that Original portion at a similar displayed scale. A wider 16:9 frame must not be mistaken for a smaller mug, notebook, or tabletop.
If a protected detail changed, the outcome is Revise, even if the newly generated area looks convincing. When several protected details drift, returning to the saved Original for a new attempt can be safer than patching repeatedly.
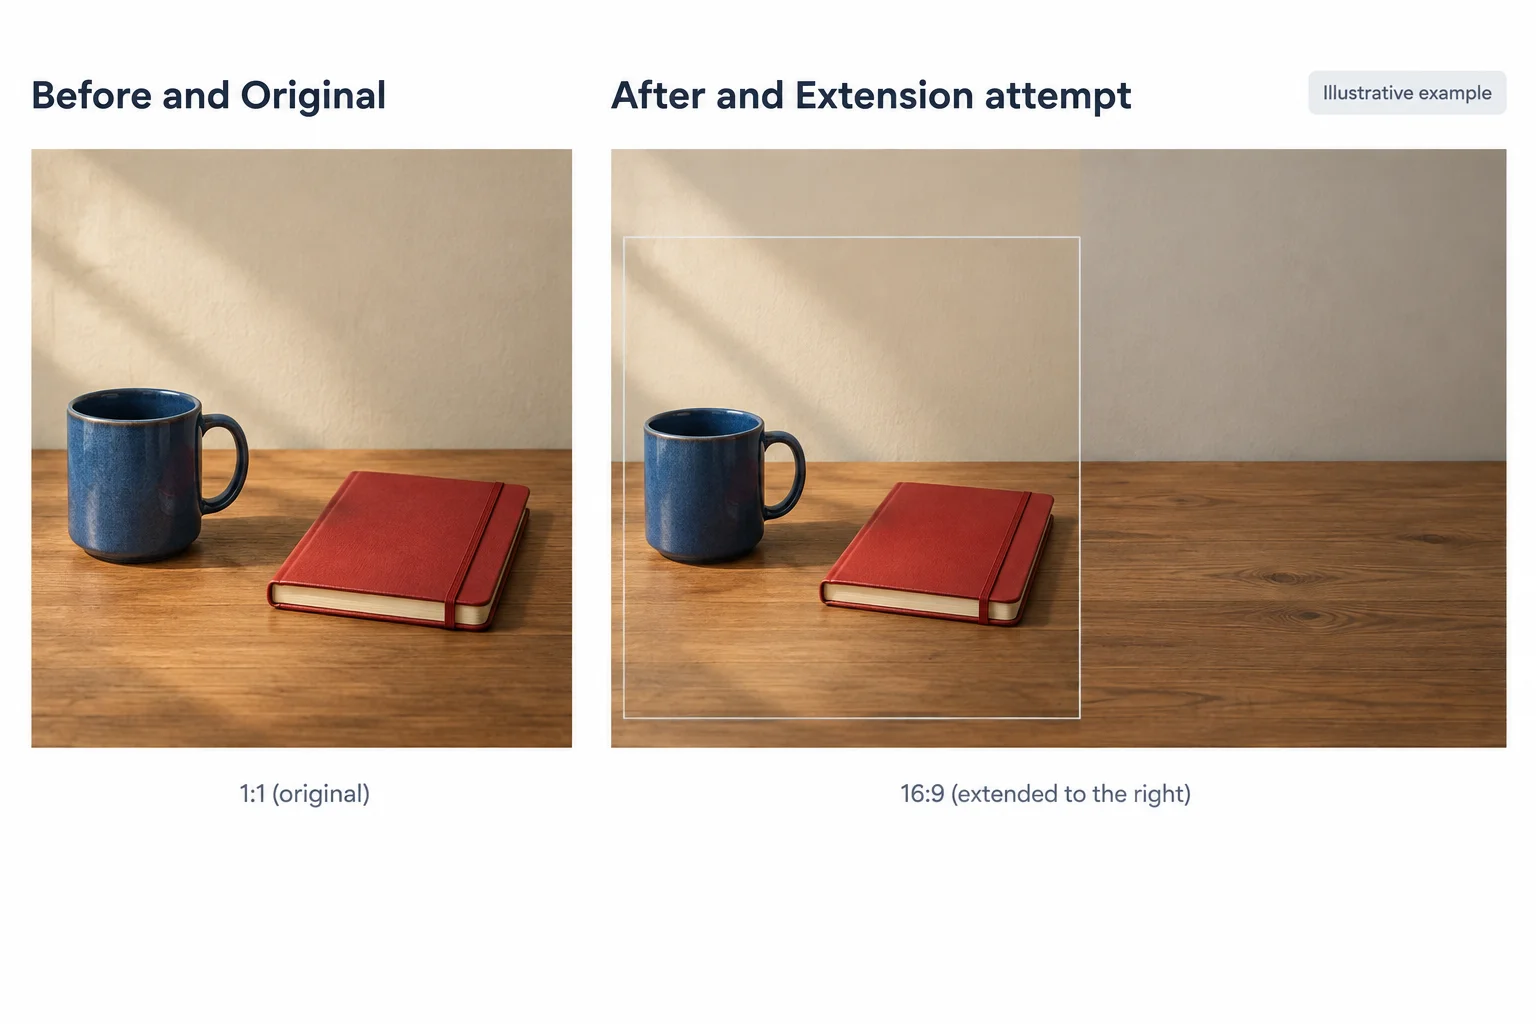
Illustrative example. Compare landmarks in the Original portion before judging the new right-side space.
Write a review note for each evidenced problem. Keep the observed evidence separate from the action you request.
| Part | What it contains |
|---|---|
| Location | A visible landmark or bounded area |
| Observed mismatch | What differs or fails visually |
| Requested correction | A limited change to make |
| Recheck | The corrected area and protected details to inspect again |
Match each statement to its role in a review note.
Tap an item and then its matching pair.
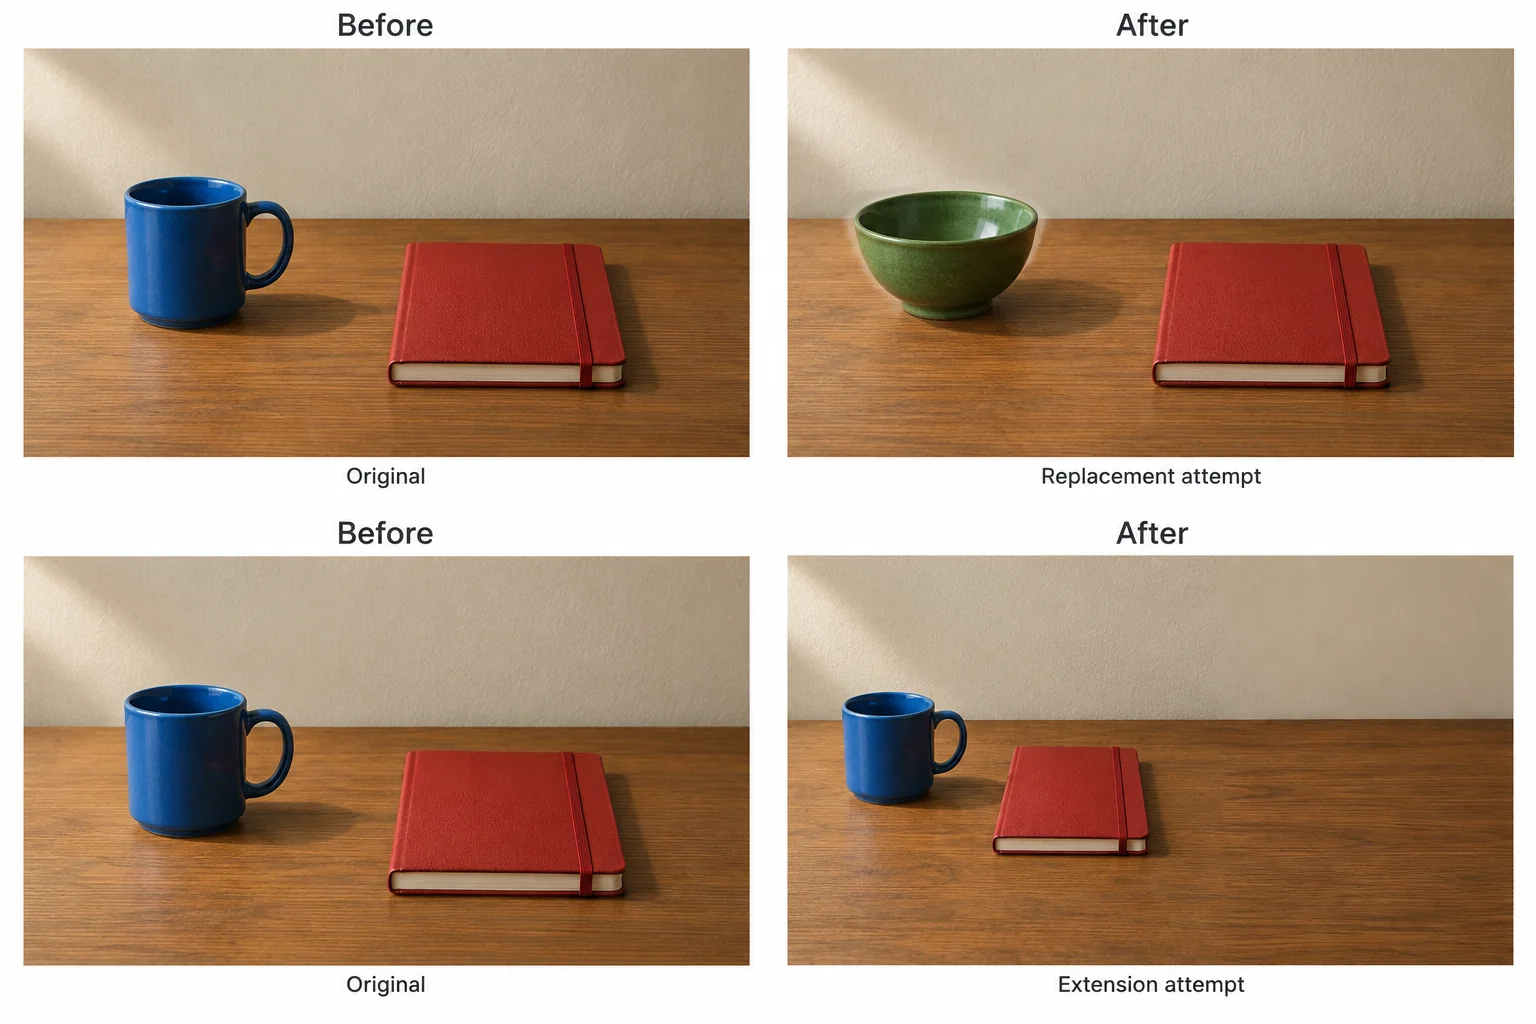
Illustrative example. Inspect both pairs before writing your review notes.
Based on the two illustrative pairs, write a review note for each visible mismatch using this exact format:
Location — Observed mismatch — Requested correction — Recheck
Include the replacement boundary issue, the extension join issue, and the protected-detail change. Then state one outcome label: Accept or Revise.
If you have a local result from your own or authorized image, you may inspect it too, but base this response on the examples shown.
Write at least 450 characters (0/450).

Step 8 of 8
Consolidate one targeted image-editing task into a clear specification and an evidence-based review decision.
A final handoff separates a plan from evidence. For one targeted task, state why you chose region replacement (inpainting) or scene extension (outpainting), define the editable area, protect what must not change, and inspect the available result.
Make claims that match the artifact you have:
An attractive image alone is not a complete handoff. A reviewer needs the edit specification and an evidence-based review.
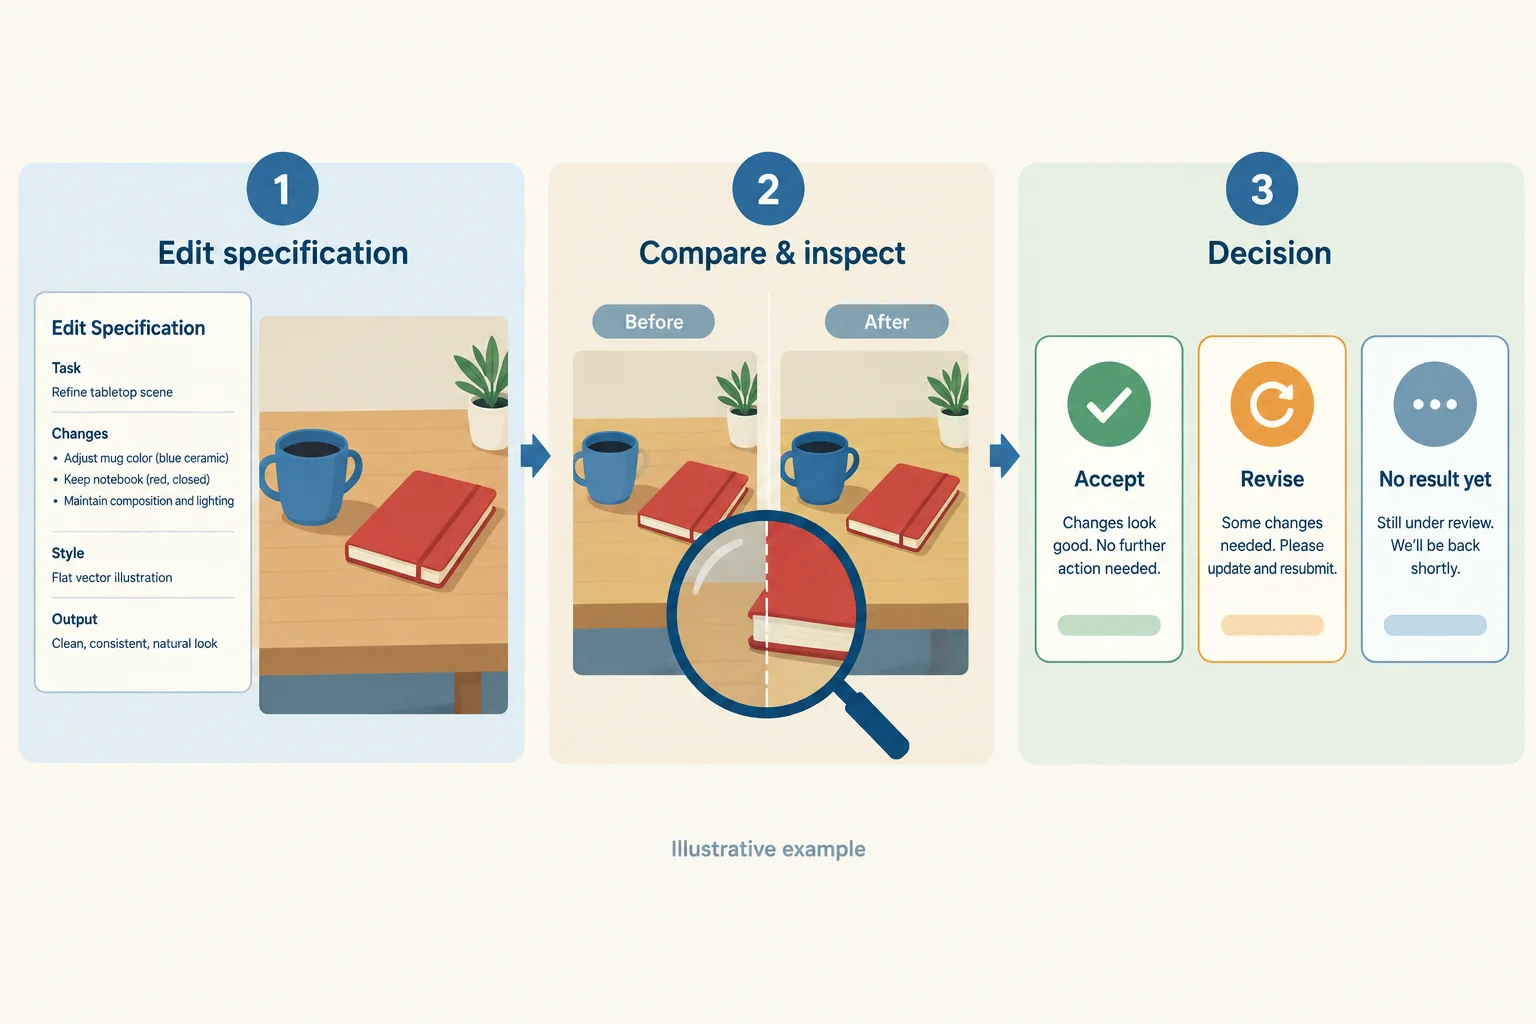
Illustrative example: the decision must reflect both the available evidence and what has actually been verified.
Complete the final handoff using either an available local result from an image you own or may use, or the supplied illustrative branch below. Do not combine replacement and extension branches.
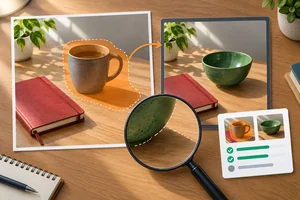
The supplied branch starts from Original and uses region replacement (inpainting): the blue mug on the left was meant to become a green ceramic bowl in the same location. Its editable area includes the mug, its handle pointing right, and its affected shadow. Compare the edited interior, the boundary, and protected details outside the editable area.
The supplied pair is an illustrative comparison, not an executed result on your computer. Its visible evidence can support a review decision and a correction request, but not a claim that you performed the edit.
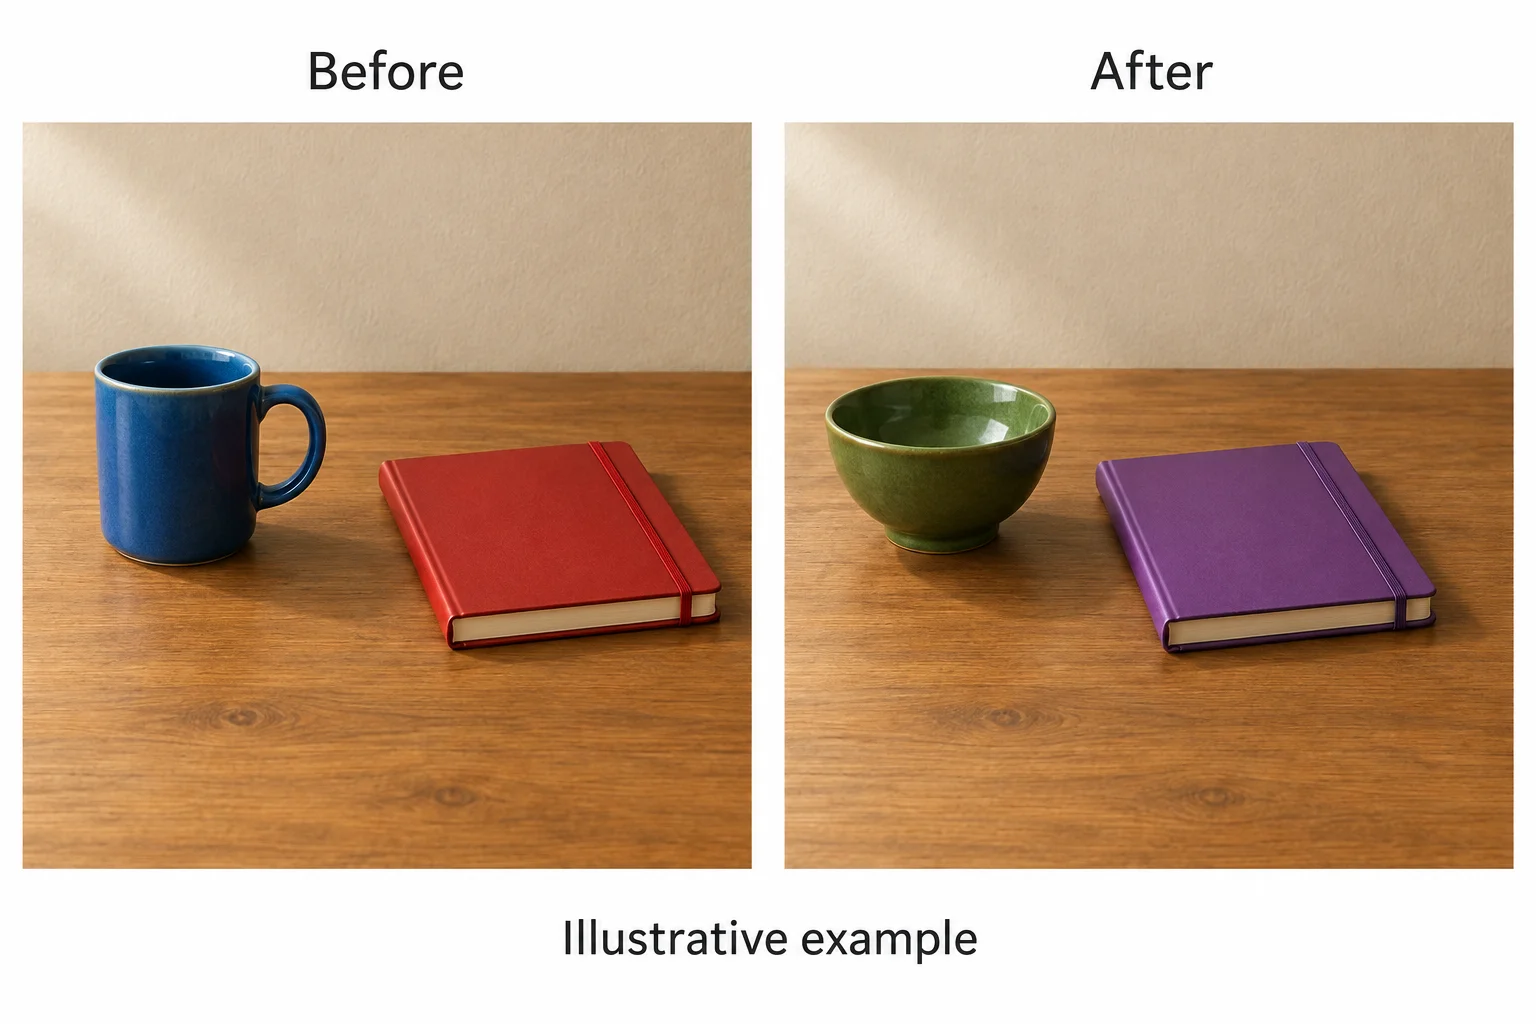
Illustrative example. Compare Original on the left with Replacement attempt on the right; record only evidence that is visible in the pair.
Create one final handoff. Use either a local before-and-after result from an image you own or may use, or the supplied illustrative comparison on this screen. If your local result has no observed defect, do not invent one; use the supplied comparison so you can complete the correction portion.
Write a compact edit specification with these labels in exactly this order: Goal, Operation, Editable area, Requested change, Protected details, Continuity requirements, and Acceptance checks. In Operation, justify the choice. Name at least three protected details.
Then add Evidence type, Version labels, Outcome, and one review note in exactly this format:Location — Observed mismatch — Requested correction — Recheck
Use Original plus Replacement attempt or Extension attempt, as applicable. Use Corrected attempt only after a revision. Cite visible comparison evidence, request a bounded correction, and state what must be rechecked. Mark a plan with no actual result Not evaluated.
Write at least 500 characters (0/500).
Summary
Use this reusable checklist whenever you replace a region or extend a scene.
Congratulations! You completed: Replacing and Extending Image Regions
Thousands of online courses in video, ebooks and audiobooks.
To test your knowledge during online courses
Generated directly from your cell phone's photo gallery and sent to your email

Download our app via QR Code or the links below:.



Carry knowledge in your pocket.
Download the Cursa app.
There are hundreds of free courses available, with a free certificate of completion that is saved in your mobile image gallery.
Download the app to access the Course Completion Certificate for Free.


+ 10 million
students

Free and Valid
Certificate

60 thousand free
exercises

4.8/5 rating in
app stores

Free courses in
video and ebooks