References can accelerate your progress in drawing and painting, but many learners get stuck in a loop of copying photos or other artists’ work and wondering how to create something that feels like their own. The good news: you don’t need “natural talent” or sudden inspiration—you need a repeatable workflow that turns reference material into original artwork while still teaching you fundamentals.
This guide walks through a reference-to-original process you can practice with any medium—pencil, watercolor, oils, or digital—while building skills that carry across subjects. If you’re exploring free certified learning paths, you can browse the https://cursa.app/free-courses-art-and-design-en-online or the broader https://cursa.app/free-online-art-and-design-en-courses.
Step 1: Define your “learning goal” before you pick references
Originality improves when you know what you’re trying to learn. Choose one primary goal per piece, such as: gesture and movement, facial proportions, texture rendering (fur, metal, skin), atmosphere, or edges and brush control. Then choose references that serve that goal.
Tip: keep your goal narrow. “Paint a beautiful portrait” is too broad; “paint believable skin transitions on cheeks and nose” is workable.
Step 2: Build a reference “kit,” not a single image
Copying happens most when you rely on one photo. Instead, build a kit of 6–12 references that you can remix. Include:
• Subject references (pose, animal, vehicle, plant)
• Lighting references (rim light, soft overcast, indoor warm light)
• Material references (leather, glass, stone, hair)
• Mood and palette (2–3 artworks or film stills for color/atmosphere)
When you combine multiple sources, your final image becomes a new solution rather than a trace of one photo.
Step 3: Do “micro-studies” that extract principles
Before you start the final piece, do 10–20 minute studies that answer one question at a time. Examples:
• 5 gestures to capture the action line
• 3 value studies (only 3–5 values) to test lighting
• 1–2 texture swatches to learn marks and edges
• 3 thumbnail compositions to test readability
Micro-studies convert references into skills. Once you understand the principle (like how a shadow wraps around a cylinder), you can apply it to a different subject and still stay accurate.

Step 4: Change at least three “identity levers”
To move from “copied” to “original,” deliberately change three major levers:
1) Design: alter silhouette, proportions, or big shapes.
2) Context: change setting, story, props, or time of day.
3) Lighting: move the light source, switch soft/hard edges, add rim light or backlight.
4) Camera: adjust angle, cropping, and focal length feel.
5) Medium language: translate into your medium’s strengths (graphite line economy, watercolor blooms, digital texture brushes, etc.).
Even if your anatomy is based on reference, shifting these levers makes the final work yours.
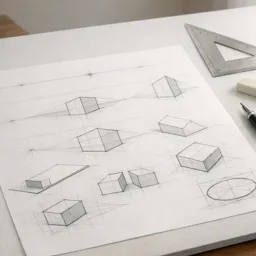
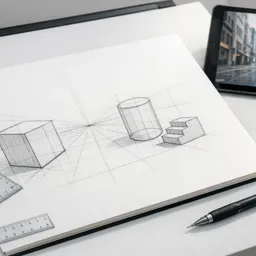
Step 5: Use a “construction draft” instead of outlining details
When learners trace details early, they lock themselves into the photo’s exact shapes. A construction draft keeps you flexible. Build the subject with simple forms first: boxes, cylinders, spheres, and big planes. Then refine.
If you want structured fundamentals support, pairing this method with foundational practice can help—see https://cursa.app/free-online-courses/drawing-for-beginners for guided skill-building exercises.
Step 6: Plan values first, then color (even in painting)
Many “copied but off” paintings fail because values weren’t planned. Start with a small value plan: identify your lightest lights, darkest darks, and the midtone family. Then add color choices that respect that structure.
This step applies across media. If you’re diving deeper into paint handling, explore the https://cursa.app/free-online-courses/painting subject collection for technique-focused lessons.
Step 7: Keep “reference windows” separate from your canvas
A simple habit that reduces unintentional copying: don’t place a single reference image right next to your canvas at the same size. Instead, use:
• A small reference collage (your kit) that forces interpretation
• Zooming in for micro-questions only (“How does the ear attach?”)
• Flipping your canvas to check design, not to match the photo
Digital artists can apply the same principle while learning on devices—browse https://cursa.app/free-online-courses/draw-on-tablet for workflows, brush handling, and practice routines.
Step 8: Add one “personal constraint” to develop voice
Style often emerges from constraints you repeat. Try one constraint per project:
• Only two brushes (one block-in, one texture)
• Limited palette (3–5 colors plus white)
• Hard-edge only (graphic look) or soft-edge only (misty look)
• No pure black—mix darks from complements
• Exaggerate proportions (longer limbs, larger hands) while keeping structure believable
These constraints transform “practice” into a recognizable approach—without needing to chase a fixed style label.

Step 9: Finish with a critique checklist (fast and objective)
Before calling it done, run a quick checklist:
• Readability: does the focal point stand out?
• Big shapes: does it work when blurred or zoomed out?
• Values: are the light/shadow families consistent?
• Edges: are there enough soft vs. sharp transitions?
• Anatomy/perspective: any obvious tangents or misalignments?
• Color temperature: are lights warmer/cooler than shadows (intentionally)?
If you want to see how artists intentionally adapt references in modern contexts, the https://cursa.app/free-online-courses/contemporary-art collection is a helpful way to broaden your visual decision-making beyond realism.
A simple practice plan you can repeat
Use this weekly loop to build both skill and originality:
- Pick one goal (e.g., “metal reflections”).
- Build a 6–12 image reference kit.
- Do 3 micro-studies (10–20 minutes each).
- Create 6 thumbnails and pick one.
- Change 3 identity levers.
- Construct → value plan → color/finish.
- Critique with the checklist and write 3 notes for next time.
Over time, your work becomes less about copying what you see and more about designing what you want—using reference as a tool, not a cage. Keep your workflow consistent, and let each piece teach one clear lesson.