Free Course Image Blender 3.0 Character Modeling Masterclass: From Base Mesh to Texturing

Free online courseBlender 3.0 Character Modeling Masterclass: From Base Mesh to Texturing

Duration of the online course: 18 hours and 47 minutes

New

Model game-ready 3D characters in Blender 3.0 with this free course—sculpt, retopo, UV unwrap, bake details, and texture for a polished finish.

In this free course, learn about

  • Set up character reference images fast using image planes in Blender
  • Build a clean symmetrical base mesh with Mirror modifier and Clipping
  • Use proportional scaling/axis constraints to edit forms without changing other dimensions
  • Improve topology flow with LoopTools (e.g., Relax) for cleaner edge loop spacing
  • Fit meshes to target shapes using modifiers like Shrinkwrap, Subsurf and Simple Deform
  • Apply Mirror before sculpting; add detail by increasing mesh density (e.g., Dyntopo/remesh)
  • Sharpen subdivided edges using support loops/crease techniques and clean normals to fix shading
  • Perform topology edits: Grid Fill holes, Knife cuts, Merge vertices, Boolean subtract shapes
  • Retopologize high-poly to game-ready low-poly; reduce loops while preserving silhouette
  • Manage modifier order (Shrinkwrap/Mirror) and keep low/high meshes aligned for baking
  • UV unwrap by marking seams; straighten quad strips; pack islands using UV grouping features
  • Bake clean maps: triangulate low-poly, reduce normal-map fuzz with better cage/ray settings
  • Create outlines and textures; use high-res painting and fix mirrored UV/parallax issues
  • Set up eye/helmet shaders: transparency blend mode, stable highlights, apply rotation, robust nodes

Course Description

Bring a full character workflow into your Blender skillset and learn how to go from a simple base mesh to a finished, textured model that’s ready for games, animation, or portfolio presentation. This free online course follows a practical, production-style process that helps you build confidence with the tools that matter most in character creation, while also teaching you how to avoid common mistakes that lead to messy topology, shading issues, or frustrating bakes.

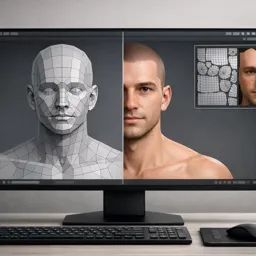
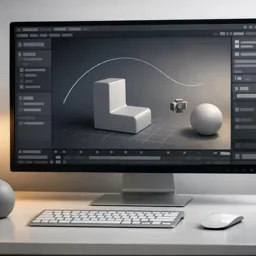
You’ll start by shaping a clean, symmetrical base and setting up references the right way, so proportions and silhouettes stay under control from the beginning. From there, you’ll push the model into a high-poly version to add refinement and surface quality, using Blender features that improve form quickly and keep edits non-destructive until you’re ready to commit. Along the way, you’ll learn how to fix face direction problems, keep seams welded during mirroring, and correct shading artifacts so the character reads well under lighting.

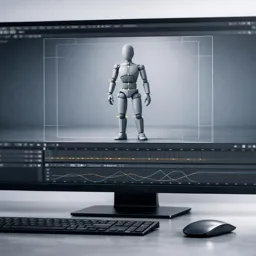
Once the high-poly is complete, the course guides you into retopology with a clear goal: a lighter, animation-friendly or game-ready mesh that keeps the silhouette while removing unnecessary density. You’ll practice creating clean edge flow, keeping parts aligned for baking, and using projection techniques to ensure the low-poly adheres to the sculpted shape. This step is essential for real-time work, and it’s also where many beginners get stuck—so the focus stays on decisions that produce reliable results rather than overly complicated theory.

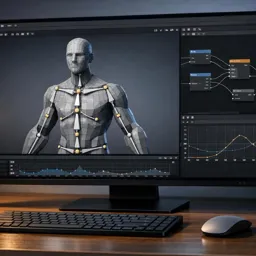
You’ll then move into UV mapping with a workflow built for character assets: placing seams strategically, unwrapping cleanly, and organizing islands to make texturing and baking predictable. With your UVs prepared, you’ll bake surface detail from high to low poly, creating maps that preserve the sculpt’s definition without the performance cost. The course also addresses quality issues like fuzzy edges and explains practical fixes so your normal maps and outlines look crisp.

Finally, you’ll texture and polish the model, including stylized details such as eye materials, highlights, and transparency setups that behave correctly under rotation and mirroring. By the end, you’ll have a strong understanding of how the major stages connect—from modeling choices to baking outcomes—so you can repeat the pipeline on new characters with better speed and consistency.

Course content

  • Video class: [#01] Blender 3.0 Character Modeling Tutorial - Beginner Friendly [2022] 07m
  • Exercise: After creating the high poly mesh, what is the next major step used to prepare the character for a clean low poly version with baked detail?
  • Video class: [#02] Blender 3.0 Character Modeling Tutorial - Reference Setup [2022] 14m
  • Exercise: When setting up reference images in a new Blender scene, what is the quickest method described to bring the images into the viewport as image planes?
  • Video class: [#03] Blender 3.0 Character Modeling Tutorial - Base Mesh Modeling 1 [2022] 17m
  • Exercise: When setting up symmetrical poly modeling for the character, what does enabling the Mirror modifier’s Clipping option primarily prevent?
  • Video class: [#04] Blender 3.0 Character Modeling Tutorial - Base Mesh Modeling 2 [2022] 18m
  • Exercise: When scaling the duplicated cylinder to increase thickness without changing its height, which shortcut setup is used?
  • Video class: [#05] Blender 3.0 Character Modeling Tutorial - Base Mesh Modeling 3 [2022] 21m
  • Exercise: What Blender add-on is enabled to access tools like Relax for smoothing and improving edge loop spacing?
  • Video class: [#06] Blender 3.0 Character Modeling Tutorial - Base Mesh Modeling 4 [2022] 24m
  • Exercise: Which modifier is used to fit the helmet mesh onto the icosphere to get a cleaner, more spherical shape?
  • Video class: [#07] Blender 3.0 Character Modeling Tutorial - Base Mesh Modeling 5 [2022] 22m
  • Exercise: When mirroring a duplicated ear by scaling it on the X axis with a negative value, what step ensures the face directions are corrected afterward?
  • Video class: [#08] Blender 3.0 Character Modeling Tutorial - Base Mesh Modeling 6 [2022] 17m
  • Exercise: When creating a quick hair indication mesh that conforms to the character’s head, which snapping setup ensures moved vertices stick to the surface from any view?
  • Video class: [#09] Blender 3.0 Character Modeling Tutorial - High Poly Modeling 1 [2022] 24m
  • Exercise: Before starting sculpting detail, which modifier is applied so the mirroring becomes part of the mesh?
  • Video class: [#10] Blender 3.0 Character Modeling Tutorial - High Poly Modeling 2 [2022] 24m
  • Exercise: Which action was used to increase mesh density so finer sculpted details could be added without manually adding geometry?
  • Video class: [#11] Blender 3.0 Character Modeling Tutorial - High Poly Modeling 3 [2022] 14m
  • Exercise: After adding a Subdivision Surface modifier to the helmet, what technique is used to restore sharper edges where needed?
  • Video class: [#12] Blender 3.0 Character Modeling Tutorial - High Poly Modeling 4 [2022] 27m
  • Exercise: When converting part of the hand into a thumb with clean topology after deleting the lower half, which tool is used to fill the open area?
  • Video class: [#13] Blender 3.0 Character Modeling Tutorial - High Poly Modeling 5 [2022] 16m
  • Exercise: Which tool and follow-up action are used to create a cut around the foot area and then combine two vertices into one?
  • Video class: [#14] Blender 3.0 Character Modeling Tutorial - High Poly Modeling 6 [2022] 24m
  • Exercise: When creating a cut-out section in the neck ring, which Blender tool is used to subtract one cylinder from the ring mesh?
  • Video class: [#15] Blender 3.0 Character Modeling Tutorial - High Poly Modeling 7 [2022] 25m
  • Exercise: When adding a Subdivision Surface modifier caused shading artifacts, what was used to fix the shading by recalculating normals?
  • Video class: [#16] Blender 3.0 Character Modeling Tutorial - High Poly Modeling 8 [2022] 15m
  • Exercise: After copying the lower pants detail to the other side, which step is used to fix the flipped surface direction?
  • Video class: [#17] Blender 3.0 Character Modeling Tutorial - High Poly Modeling 9 [2022] 24m
  • Exercise: When fitting the modeled hair strand to the head, which modifier is used to bend it into shape?
  • Video class: [#18] Blender 3.0 Character Modeling Tutorial - High Poly Modeling 10 [2022] 18m
  • Exercise: When the character’s legs looked too thin, which shortcut was used to quickly inflate them for more volume?
  • Video class: [#19] Blender 3.0 Character Modeling Tutorial - High Poly Modeling 11 [2022] 20m
  • Exercise: Which tool/shortcut is used to add multiple loop cuts on the arm ring detail by increasing the number of cuts with the scroll wheel?
  • Video class: [#20] Blender 3.0 Character Modeling Tutorial - Retopology 01 [2022] 23m
  • Exercise: Why is retopology commonly done after creating a high-poly character model for games?
  • Video class: [#21] Blender 3.0 Character Modeling Tutorial - Retopology 02 [2022] 25m
  • Exercise: When preparing multiple body parts to bake as one, what is the recommended step before joining objects with Ctrl+J?
  • Video class: [#22] Blender 3.0 Character Modeling Tutorial - Retopology 03 [2022] 35m
  • Exercise: When creating a symmetrical detail from a plane, what is the key reason to delete one half and add a Mirror modifier with Clipping enabled?
  • Video class: [#23] Blender 3.0 Character Modeling Tutorial - Retopology 04 [2022] 33m
  • Exercise: When reducing a detailed mesh for a game-ready version, why is it acceptable to delete many edge loops while keeping the silhouette intact?
  • Video class: [#24] Blender 3.0 Character Modeling Tutorial - Retopology 05 [2022] 44m
  • Exercise: When adjusting a mirrored mesh, which Mirror modifier option prevents vertices from being pulled apart at the center seam because they snap together?
  • Video class: [#25] Blender 3.0 Character Modeling Tutorial - Retopology 06 [2022] 32m
  • Exercise: When refining the leg’s low-poly topology, what is suggested as an easy way to reduce too many loops while keeping the mesh smooth?
  • Video class: [#26] Blender 3.0 Character Modeling Tutorial - Retopology 07 [2022] 49m
  • Exercise: When retopologizing and using a Shrinkwrap with a Mirror on a non-symmetrical mesh, what modifier order is recommended?
  • Video class: [#27] Blender 3.0 Character Modeling Tutorial - Retopology 08 [2022] 44m
  • Exercise: When moving the foot/leg to fix intersections, what must be done to keep the low and high resolution meshes aligned for baking?
  • Video class: [#28] Blender 3.0 Character Modeling Tutorial - Retopology 09 [2022] 46m
  • Exercise: Which Blender tool was used to snap the updated low-resolution helmet parts onto the high-resolution helmet surface?
  • Video class: [#29] Blender 3.0 Character Modeling Tutorial - Retopology 10 [2022] 20m
  • Exercise: When shrinkwrapping a duplicated mesh piece onto a target, which Shrinkwrap setting was suggested as an alternative to Nearest Surface Point to potentially get a better result?
  • Video class: [#30] Blender 3.0 Character Modeling Tutorial - UV Mapping 01 [2022] 42m
  • Exercise: When starting UV mapping, what is the first key step to help Blender unwrap a mesh cleanly?
  • Video class: [#31] Blender 3.0 Character Modeling Tutorial - UV Mapping 02 [2022] 49m
  • Exercise: Which Blender UV unwrap tool is used to straighten a strip of quads after selecting one face that is already straight?
  • Video class: [#32] Blender 3.0 Character Modeling Tutorial - UV Mapping 03 [2022] 19m
  • Exercise: When packing UVs for complex character parts, what feature is used to keep stacked islands (like fingers) packed together as a single group?
  • Video class: [#33] Blender 3.0 Character Modeling Tutorial - Texture Baking [2022] 18m
  • Exercise: Why is it recommended to triangulate the low-poly mesh before baking and exporting to another application?
  • Video class: [#34] Blender 3.0 Character Modeling Tutorial - Outlines [2022] 29m
  • Exercise: Why is it important to apply shrinkwrap (and similar deforming) modifiers before deleting the high-res objects?
  • Video class: [#35] Blender 3.0 Character Modeling Tutorial - Texturing 01 [2022] 25m
  • Exercise: How can you eliminate fuzzy/unclean edges in a baked normal map?
  • Video class: [#36] Blender 3.0 Character Modeling Tutorial - Texturing 02 [2022] 32m
  • Exercise: When painting black-and-white outline textures, what was the main reason given for increasing the image resolution to 4096×4096?
  • Video class: [#37] Blender 3.0 Character Modeling Tutorial - Texturing 03 [2022] 27m
  • Exercise: When creating the white part of the eye, what requirement must be met for the Grid Fill tool to work correctly?
  • Video class: [#38] Blender 3.0 Character Modeling Tutorial - Texturing 04 [2022] 40m
  • Exercise: To enable transparency when mixing an Emission shader with a Transparent shader for the eye plane, which material setting must be changed?
  • Video class: [#39] Blender 3.0 Character Modeling Tutorial - Texturing 05 [2022] 42m
  • Exercise: How can you fix a mirrored eye where the parallax/texture shift moves in the wrong direction due to flipped UVs?
  • Video class: [#40] Blender 3.0 Character Modeling Tutorial - Texturing 06 [2022] 13m
  • Exercise: What change fixes the eye highlight/shading so it stays correct even when the object is flipped upside down?
  • Video class: [#41] Blender 3.0 Character Modeling Tutorial - Texturing 07 [2022] 20m
  • Exercise: Why was the object rotation applied (Ctrl+A → Apply Rotation) when setting up the helmet eye-like shader?
  • Video class: [#42] Blender 3.0 Character Modeling Tutorial - Texturing 08 [2022] 07m
  • Exercise: Which node setup fixes the effect so it works even when the face is not pointing forward?
  • Video class: [#Final] Blender 3.0 Character Modeling Tutorial - Final Cleanup [2022] 23m
  • Exercise: What is the main reason the eye line was changed from a mesh element to a painted texture?

This free course includes:

18 hours and 47 minutes of online video course

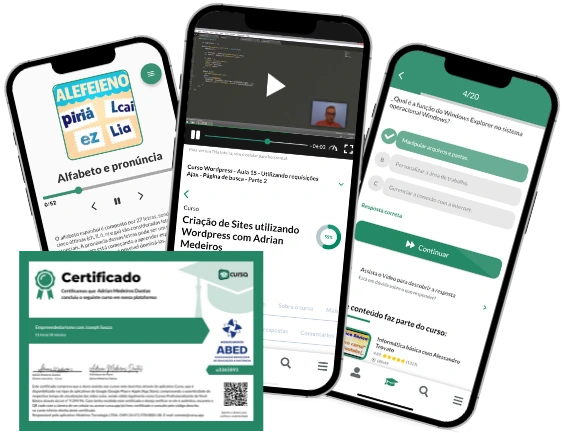
Digital certificate of course completion (Free)

Exercises to train your knowledge

100% free, from content to certificate

Ready to get started?Download the app and get started today.

Install the app now

to access the course
Icon representing technology and business courses

Over 5,000 free courses

Programming, English, Digital Marketing and much more! Learn whatever you want, for free.

Calendar icon with target representing study planning

Study plan with AI

Our app's Artificial Intelligence can create a study schedule for the course you choose.

Professional icon representing career and business

From zero to professional success

Improve your resume with our free Certificate and then use our Artificial Intelligence to find your dream job.

You can also use the QR Code or the links below.

QR Code - Download Cursa - Online Courses

More free courses at Animation and 3D Design

Free Ebook + Audiobooks! Learn by listening or reading!

Download the App now to have access to + 5000 free courses, exercises, certificates and lots of content without paying anything!

  • 100% free online courses from start to finish

    Thousands of online courses in video, ebooks and audiobooks.

  • More than 60 thousand free exercises

    To test your knowledge during online courses

  • Valid free Digital Certificate with QR Code

    Generated directly from your cell phone's photo gallery and sent to your email

Cursa app on the ebook screen, the video course screen and the course exercises screen, plus the course completion certificate