Scenario Setup: What You Are Trying to Prove
Goal of this lab: reconstruct how a phishing message led (or did not lead) to account access, what the attacker did after access, and what evidence supports each step. You will build a time-ordered narrative that answers: (1) how the lure arrived, (2) whether the user interacted with it, (3) whether credentials or tokens were captured, (4) how the account was accessed (password, OAuth consent, session token, MFA fatigue, legacy auth), (5) what actions occurred in email and cloud apps, and (6) what remediation evidence you should preserve for follow-on work.
Scenario: A finance employee reports “I got a weird email and now my mailbox is sending invoices.” The organization uses Microsoft 365 with Entra ID (Azure AD). The user has MFA enabled. You have access to: the user’s mailbox (eDiscovery export or admin access), Microsoft 365 Unified Audit Log, Entra ID sign-in logs, Entra ID audit logs, Exchange Online message trace, and the user’s Windows workstation (live access or collected artifacts). You may also have a secure email gateway (SEG) log source and a web proxy log source.

Key concept: phishing investigations are about correlating multiple partial truths. The email itself rarely proves compromise; the sign-in and audit logs rarely show the lure. The reconstruction comes from aligning timestamps, identifiers (Message-ID, InternetMessageId, ClientIP, UserAgent, SessionId, CorrelationId), and the attacker’s operational pattern (new inbox rules, OAuth grants, unusual sign-in properties, mass forwarding, mailbox delegation).
Evidence Map: What to Collect for This Scenario
Email and Messaging Sources
- Suspicious email: full headers, body (HTML), attachments, and any embedded links.
- Exchange Online message trace: delivery path, verdicts, and whether the message was blocked, quarantined, or delivered.
- Mailbox audit events (via Unified Audit Log): rule creation, forwarding changes, mailbox login, item access, and send events.
- Mailbox configuration: inbox rules, forwarding addresses, delegates, and transport rules affecting the user.
Identity and Access Sources (Entra ID / Microsoft 365)
- Entra ID sign-in logs: interactive sign-ins, non-interactive sign-ins, and service principal sign-ins if relevant.
- Entra ID audit logs: changes to MFA methods, conditional access, app consent, role assignments, and user properties.
- OAuth consent and enterprise apps: newly granted permissions, suspicious app display names, and publisher verification status.
- Conditional Access and MFA details: MFA requirement, method used, and “MFA satisfied by claim” patterns.
Endpoint and Network Sources (Workstation + Perimeter)
- Browser artifacts: history, downloads, cached pages, and saved form interactions related to the phishing URL and login pages.
- DNS / proxy logs: resolution and HTTP(S) connections to phishing domains, URL shorteners, and credential collection endpoints.
- EDR telemetry (if available): process tree for browser launches, suspicious child processes, and persistence attempts.
Practical tip: before deep analysis, create a “source availability table” listing each log source, retention window, timezone, and export format. Many reconstruction errors come from mixing UTC and local time or assuming a log source retained the relevant period.
Step-by-Step: Analyze the Phishing Email Itself
Step 1 — Preserve the message in a forensically useful format
Export the message as an .eml or .msg file so you retain full headers and MIME parts. If you only copy/paste the body, you lose routing and authentication context. If you are using Microsoft Purview eDiscovery, export with metadata and include the original message.
- Listen to the audio with the screen off.
- Earn a certificate upon completion.
- Over 5000 courses for you to explore!

Download the app
Step 2 — Parse headers to identify the true sender path
Review: Return-Path, Received: chain, Authentication-Results (SPF/DKIM/DMARC), and Message-ID. In phishing, the display name is often legitimate-looking, but the envelope sender and sending infrastructure tell the real story.
Header fields to capture in notes (examples):
- From / Reply-To / Return-Path
- Message-ID
- Authentication-Results: spf=fail|softfail, dkim=fail, dmarc=fail
- Received: (topmost external hop IP/host)
- X-Forefront-Antispam-Report / X-MS-Exchange-Organization-SCL (if present)
- List-Unsubscribe (sometimes abused)
Interpretation pattern: a DMARC fail does not prove maliciousness, but it increases suspicion when combined with a newly registered domain, mismatched Reply-To, or a link to an unrelated host.
Step 3 — Extract and normalize URLs and attachments
From the HTML body, extract all links (including hidden anchors and image links). Normalize them by expanding URL shorteners (using a safe method such as a sandboxed URL expander or threat intel platform) and record the final destination domain, path, and query parameters. For attachments, record filename, type, and whether it contains macros or embedded links (for example, an HTML attachment that opens a fake login page).
What you are looking for: (1) credential harvest pages that mimic Microsoft, Google, or banking portals; (2) OAuth consent links (often to “login.microsoftonline.com” but with a malicious app ID); (3) invoice-themed payloads that lead to malware or remote access tools.

Step-by-Step: Determine Whether the User Interacted
Step 4 — Correlate email delivery with user interaction signals
Start with the email’s delivery time from message trace, then look for evidence of user interaction: “MailItemsAccessed” events (if enabled), “MessageBind”/“MailRead” style events in audit logs, or client-side indicators such as the message being moved, flagged, or replied to. If you cannot rely on item access auditing, use indirect indicators: the user clicked a link (proxy logs), or the browser visited the phishing domain shortly after delivery.
Practical correlation method: build a mini-timeline with three columns: (A) email events (delivered, opened, moved), (B) web events (DNS/proxy), (C) identity events (sign-ins). You are trying to see a plausible chain: delivered → click → sign-in anomaly.
Step 5 — Check browser evidence for the phishing URL and login flow
On the workstation, search browser history for the phishing domain, URL shortener, and common Microsoft login endpoints. In many campaigns, the user is redirected through multiple domains before landing on a credential page. Capture the full redirect chain if possible (proxy logs help here). Also look for downloads (HTML files, ISO/IMG, ZIP) that may indicate the phishing was a malware delivery attempt rather than credential theft.
Key concept: a visit to “login.microsoftonline.com” is not automatically benign. Attackers can use legitimate Microsoft login pages in OAuth consent flows or to harvest tokens via malicious apps. The context is the query parameters and the surrounding events.
Step-by-Step: Reconstruct Account Access (Password, MFA, Tokens, OAuth)
Step 6 — Pull Entra ID sign-in logs for the user around the suspected time
Export sign-in logs for a window that covers at least 24 hours before and after the phishing email. Include both interactive and non-interactive sign-ins. For each suspicious sign-in, capture: timestamp (UTC), result, IP address, location, device details, client app, user agent, authentication requirement, MFA result, and correlation identifiers.
Suspicious sign-in indicators to flag:
- New country/ASN or “impossible travel” patterns
- Unfamiliar user agent (automation frameworks, unusual browsers)
- Client app = “Other clients” or legacy protocols (if not blocked)
- Many failures followed by a success (password spray / guessing)
- MFA prompts repeated (fatigue) or MFA denied then later approved
- Sign-in marked “Interrupted” with additional details about MFA
Step 7 — Distinguish interactive compromise from token/OAuth compromise
Use the sign-in log fields to determine the access method:
- Password + MFA interactive sign-in: you see an interactive sign-in with MFA requirement satisfied. Investigate whether the MFA method used matches the user’s normal behavior (e.g., push approvals at odd hours).
- Session token theft: may show as a sign-in with “MFA satisfied by claim” or a sign-in that does not trigger MFA when it normally would, especially if the attacker reuses a session from a different IP shortly after the user authenticated.
- OAuth consent attack: the user is tricked into granting a malicious app permissions. This may not require the attacker to know the password after consent; instead, the app uses refresh tokens to access mail and files. Look for new enterprise app consent events and subsequent non-interactive access.
- Legacy authentication: if allowed, attackers may use IMAP/POP/SMTP AUTH. This often appears as non-interactive sign-ins or Exchange protocol logs rather than a normal browser sign-in.
Step 8 — Check Entra ID audit logs for app consent and MFA method changes
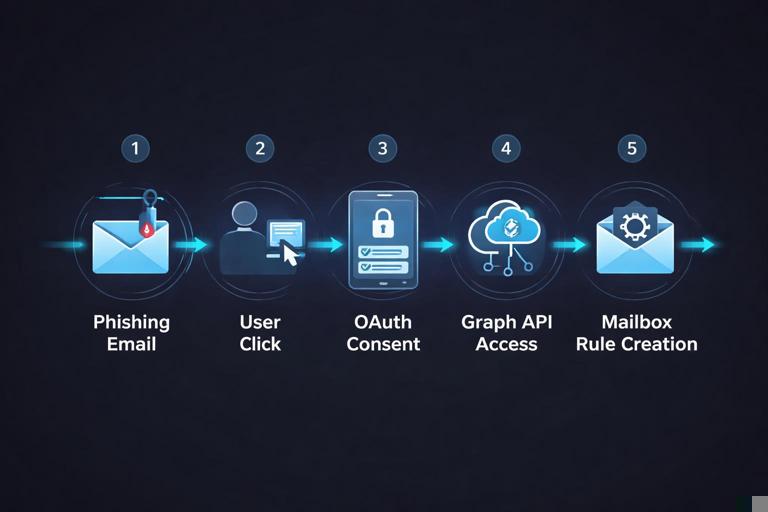
Export audit logs for the same time window. Filter for events such as “Consent to application,” “Add service principal,” “Update user,” “Add authentication method,” “Register security info,” and changes to conditional access or security defaults. A common pattern is: phishing email → user clicks → user grants app consent → attacker uses Graph API to read mail and create rules.
Practical check: review the list of enterprise applications with recent consent. For each suspicious app, record: app name, app ID, permissions granted (Mail.Read, Mail.ReadWrite, offline_access), consented by which user, and consent timestamp.
Step-by-Step: Reconstruct Mailbox Actions After Access
Step 9 — Look for attacker mailbox persistence: rules, forwarding, delegates
Attackers commonly create inbox rules to hide replies from victims or route invoices to themselves. They may also set forwarding to an external address or add mailbox delegates. Use mailbox configuration exports and audit logs to identify:
- New or modified inbox rules (especially those that move messages to RSS, Archive, or Deleted Items).
- Forwarding SMTP address set at mailbox level.
- New delegates with “Send As” or “Full Access.”
- Creation of hidden rules that match keywords like “invoice,” “payment,” “wire,” “ACH,” “bank.”
Example rule red flags:
- Condition: Subject contains “invoice” OR body contains “payment”
- Action: Move to Deleted Items AND mark as read
- Action: Forward to external address
Step 10 — Identify outbound fraud: sent items, impersonation, and reply-chain hijacking
Determine whether the mailbox sent messages during the suspicious window. Use audit logs and message trace to find outbound emails, especially those sent to external recipients or to existing vendor threads. Capture: recipients, subject, time, and whether the message was sent via Outlook, OWA, EWS, Graph, SMTP AUTH, or a third-party app. Reply-chain hijacking often uses existing threads to appear legitimate; look for “Re:” subjects tied to real conversations.
Practical technique: pick one fraudulent outbound message and reconstruct its creation path: (1) sign-in event that preceded it, (2) client app used, (3) IP and user agent, (4) whether a rule moved the sent copy or deleted it.
Step-by-Step: Build a Defensible Timeline (Account Access Reconstruction)
Step 11 — Normalize timestamps and align identifiers
Convert all timestamps to a single reference (commonly UTC) and note the original timezone. Then align events using stable identifiers:
- Email identifiers: Message-ID, InternetMessageId, sender IP from headers.
- Identity identifiers: CorrelationId, RequestId, SessionId (where available), user ID.
- Network identifiers: proxy session ID, source NAT IP, destination domain.
Why this matters: attackers may use the same IP across multiple actions (sign-in, Graph access, mailbox rule creation). Even when IP changes, correlation IDs and app IDs can link actions to a single compromise chain.
Step 12 — Write the reconstruction as testable statements
Instead of writing “the user was phished,” write statements that can be supported by artifacts, such as:
- “At 09:14 UTC, a message with Message-ID <…> was delivered to the user’s mailbox (message trace event …).”
- “At 09:18 UTC, the workstation resolved phishing-domain.example and connected to /login (proxy log session …).”
- “At 09:20 UTC, an interactive sign-in from IP X succeeded with MFA via push approval (sign-in log CorrelationId …).”
- “At 09:27 UTC, a new inbox rule ‘Invoices’ was created to move messages containing ‘wire’ to Deleted Items (Unified Audit Log event …).”
- “At 09:35 UTC, outbound email to vendor@example.com was sent via Graph API (audit event …), consistent with OAuth-based access.”
Decision Points: Identify the Attack Path Variant
Variant A — Credential harvest + MFA fatigue
Indicators: many MFA prompts, user eventually approves, interactive sign-in success from unusual IP, rapid mailbox rule creation. Validate by checking MFA detail fields and the timing between repeated prompts and the successful sign-in.
Variant B — OAuth consent (no password reuse required after consent)
Indicators: audit log shows user consent to a new app; subsequent mailbox access occurs as non-interactive sign-ins or via service principal activity; emails sent via Graph/EWS without a typical interactive login pattern. Validate by mapping the app ID to the access events and permissions.
Variant C — Session token theft (adversary-in-the-middle)
Indicators: user signs in legitimately, then attacker accesses resources without triggering MFA, often from a different IP shortly after. Validate by looking for “MFA satisfied by claim,” unusual device properties, and near-simultaneous access from different networks.
Variant D — Legacy protocol abuse
Indicators: sign-ins show legacy client apps or protocols; mailbox actions occur without OWA/Outlook interactive sessions; SMTP AUTH used for outbound spam. Validate by checking client app fields and whether legacy auth is permitted for the tenant/user.
Hands-On Lab Tasks: What to Produce
Task 1 — Phishing email worksheet
Create a worksheet (table or notes) containing: sender domain, Reply-To, SPF/DKIM/DMARC results, sending IP, subject, attachment names, extracted URLs, and the final landing domain. Include screenshots or copied header blocks where appropriate.
Task 2 — Sign-in anomaly list
Produce a list of all sign-ins in the 24–48 hour window with a “suspicion score” you define (for example: new geo + unfamiliar user agent + success = high). For each, include IP, location, client app, result, and MFA details.
Task 3 — Mailbox change log
Document all mailbox configuration changes: rules created/modified, forwarding changes, delegates added, and any transport settings affecting the user. For each change, capture the actor (user vs admin vs app), timestamp, and originating IP if available.
Task 4 — Outbound message reconstruction
Select one suspicious outbound message and reconstruct: when it was sent, how it was sent (client/app), from where (IP), and what mailbox persistence existed at that time (rules/forwarding). Include message trace evidence and audit events.
Task 5 — Final timeline table (no narrative yet)
Build a single table with columns: Time (UTC), Source, Event, Key fields (IDs/IPs/app), Confidence (High/Medium/Low), Notes. This table becomes the backbone for reporting and for validating alternative explanations (e.g., travel, VPN, legitimate mobile client).
Common Pitfalls and How to Avoid Them
Mixing timezones and assuming ordering
Some Microsoft 365 exports are UTC, while endpoint artifacts may be local time. Always annotate timezone and convert before you infer causality (for example, “click happened before sign-in”).
Assuming the phishing email is the initial access vector
Sometimes the email is a follow-on action after compromise (attacker already in mailbox and sends internal phish). Validate by checking whether suspicious sign-ins predate the email delivery.
Over-trusting geolocation
IP geolocation can be misleading due to VPNs, mobile carriers, and cloud hosting. Treat location as a clue, not proof. Combine it with user agent, device ID, and sign-in risk indicators.
Missing OAuth and app-based access
Mailbox compromise can occur without a classic “login” event if a malicious app has consent. Always check audit logs for consent and review enterprise apps with recent grants.
Ignoring rule-based concealment
Attackers often hide their tracks by moving security alerts, MFA emails, or replies. When you see missing messages, check rules and Deleted Items, and correlate with rule creation timestamps.