What “Evidence Intake” Means in a Digital Forensics Workflow
Evidence intake is the controlled process of receiving potential digital evidence, verifying what was received against what was requested or expected, and creating the initial documentation that will follow the item through its entire lifecycle. Intake is not analysis. It is the moment you turn “an object from the world” into “an item in a case system” with a unique identity, clear ownership, and a recorded condition. A good intake process prevents mix-ups (wrong device, wrong account, wrong date range), reduces handling errors, and ensures that every later action can be tied back to a specific item and a specific person.
In practice, intake usually happens at a lab front desk, an evidence room window, or a controlled receiving area. For smaller teams, intake might happen at a secure workstation in an office. Regardless of location, the goals are the same: identify the item, document its state, label it, package it appropriately, and record who had it before you and who has it now.
Key Roles and Responsibilities During Intake
Intake is easiest when responsibilities are explicit. Common roles include the submitting party (who brings or ships the evidence), the receiving technician (who performs intake), the case agent or requester (who defines what is needed), and the evidence custodian (who controls storage). In small organizations, one person may wear multiple hats, but the documentation should still reflect each role clearly.
Define who is allowed to accept evidence, who is allowed to open packaging, and who is allowed to move items in and out of storage. If your process allows “any analyst can accept evidence,” you increase the chance of inconsistent documentation. A simple rule helps: only trained staff perform intake, and every intake results in a standardized record.
Intake Checklist: What to Verify Before You Accept an Item
Before signing anything or taking possession, verify that the submission matches the request. This is especially important when multiple devices look similar (two black laptops, several identical USB drives) or when cloud exports arrive as multiple files. The aim is to catch discrepancies early, while the submitting party is still present and can clarify.
- Listen to the audio with the screen off.
- Earn a certificate upon completion.
- Over 5000 courses for you to explore!

Download the app
Identity and Scope Verification
- Case identifier: confirm the case number or internal ticket ID.
- Submitting party: record full name, organization, contact details, and role.
- Item description: device type, make/model, color, capacity, and any visible identifiers (serial number, asset tag, IMEI if available on packaging).
- Requested scope: what you were asked to do (e.g., “extract chat messages from this phone,” “review this cloud export for documents from May”).
- Time constraints: court dates, incident response deadlines, or retention windows.
Condition and Tamper Indicators
Document the physical condition and any signs of prior handling. If the evidence arrives sealed, note the seal type and seal number. If it arrives unsealed, note that fact without speculating about intent. If packaging is damaged, photograph it and describe it.
- Packaging condition: intact, torn, wet, crushed, re-taped.
- Seals: present/absent, seal numbers, whether the seal appears broken.
- Device condition: cracked screen, missing screws, bent ports, water damage indicators.
- Accessories included: chargers, SIM trays, dongles, external drives, notebooks with passwords.
Step-by-Step: Performing Evidence Intake at the Counter
This step-by-step assumes an in-person handoff. The same logic applies to mailed shipments, but you will add shipping documentation and photos of the box before opening.
Step 1: Prepare the Intake Area
Use a clean, uncluttered surface. Have gloves available if your policy requires them. Ensure you have an evidence camera or a phone dedicated to evidence photography, evidence labels, tamper-evident tape, and the intake form (paper or electronic). If you use an evidence management system, log in before the handoff so you can enter details immediately.
Step 2: Confirm Case Details and Authority to Submit
Ask the submitting party to state the case number and what they are submitting. If your organization requires authorization (e.g., a signed request, warrant, or internal approval), confirm that the required paperwork is present. Record the type of authorization in your notes (for example, “internal incident ticket approved by Security Manager”), but avoid repeating legal analysis here; your goal is to document what was provided.
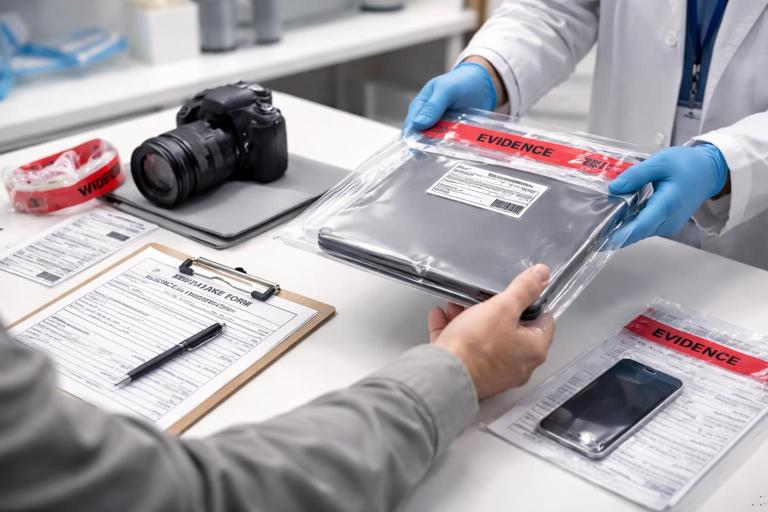
Step 3: Photograph the Item as Received
Take overview photos before you change anything: the item in its packaging, any seals, and any labels already attached. Then take close-ups of serial numbers, asset tags, and visible damage. Photos should be time-stamped by your system if possible, and referenced in the intake record (e.g., “Photo set P001–P006”).
Step 4: Create a Unique Evidence Identifier
Assign an evidence ID that is unique within your organization. Many teams use a format like CASE-YYYY-ITEM### (e.g., DF-2026-014-ITEM002). The key is consistency and uniqueness. Place the evidence ID on a label attached to the evidence container (not directly on delicate surfaces) and on all paperwork.
Step 5: Record Detailed Descriptors
Write descriptors that would allow another person to pick the correct item out of a shelf of similar devices. Include make, model, color, storage size, and identifiers. For mobile devices, record whether a SIM is present and whether the device appears powered on or off at intake (do not change its state just to find out; document what you observe).
Step 6: Capture “As-Received” State Notes
Document what you can observe without manipulating the device unnecessarily. Examples: “Laptop lid closed, no power cable attached,” “Phone in airplane mode per submitter statement,” “USB drive in plastic bag with handwritten label ‘Payroll’.” If the submitter provides passwords or PINs, record them in the approved secure location (not on the outside of the evidence bag). Note where the credentials are stored and who provided them.
Step 7: Package and Seal for Storage
Place the item in an appropriate evidence bag or box. Add padding to prevent movement. Apply tamper-evident tape and sign/date across the seal if your policy requires it. The goal is that any later opening is obvious and documented. For small items (SIM cards, microSD), use a smaller inner container inside the main bag and label both.
Step 8: Complete the Chain of Custody Entry
Record the transfer from the submitting party to you. Include date/time, location, names, signatures (or electronic attestations), and the evidence ID. If multiple items are submitted, list each item separately; avoid “bag of electronics” as a single line item unless the bag is sealed and treated as one container with a clear inventory inside.
Step 9: Move to Secure Storage
Transport the sealed item directly to the evidence storage area. Avoid leaving it unattended on a desk. Log the storage location (room, locker, shelf, bin). If your system supports it, scan the barcode at each movement step.
Chain of Custody: What It Is and What It Must Prove
Chain of custody is the documented history of who had control of an evidence item, when they had it, where it was, and why it changed hands. It is not just a form; it is a narrative of accountability. A strong chain of custody allows a reviewer to answer: “Could this item have been swapped, altered, or accessed by an unknown person?” The documentation should make that unlikely and, importantly, should make any gaps visible.
Chain of custody must be continuous from the moment your organization takes possession until the item is returned, destroyed per policy, or otherwise disposed of. Continuity does not mean the item never moves; it means every movement is recorded, justified, and attributable to a person.
What to Record in Chain of Custody Entries
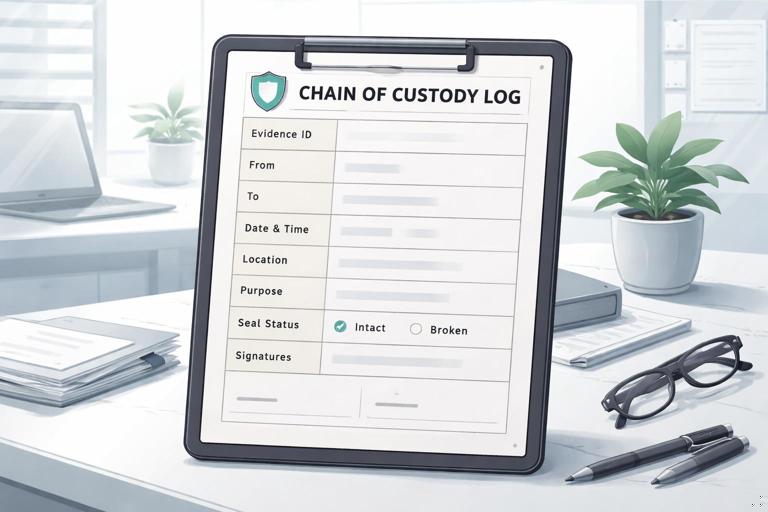
Each custody event should be specific enough that an independent person can reconstruct the item’s journey. Avoid vague entries like “handled for analysis.” Instead, record the purpose and the conditions of transfer.
- Evidence ID and item description (or reference to the intake record).
- From: name, role, organization, contact (as applicable).
- To: name, role, organization.
- Date and time (use a consistent time zone and format).
- Location of transfer (evidence room window, lab bench, remote handoff).
- Reason/purpose (intake, imaging, examination, court transport, return to owner).
- Seal status (intact/broken; seal number; new seal applied).
- Signatures or electronic attestations.
Practical Example: A Simple Chain of Custody Timeline
Imagine a laptop is submitted by an internal IT manager. The custody record should show a clear sequence of events, not just the first and last handoff. A minimal but defensible timeline might look like: received at 10:12 by Receiving Tech A; placed in Locker 3 at 10:25; removed by Analyst B at 14:05 for examination; returned to Locker 3 at 17:40 with seal replaced; later transferred to Case Agent at 09:00 for court transport. Each step has a person, time, and purpose.
Evidence ID: DF-2026-014-ITEM002 (Dell Latitude 5420, black, SN ABC123...) 2026-01-07 10:12 From: J. Smith (IT Manager) To: R. Lee (Receiving Tech) Purpose: Intake Location: HQ Intake Desk Seal: N/A (unsealed on arrival) 2026-01-07 10:25 From: R. Lee To: Evidence Storage Purpose: Secure storage Location: Evidence Room Locker 3 Seal: Seal #T10291 applied 2026-01-07 14:05 From: Evidence Storage To: M. Patel (Analyst) Purpose: Examination Location: Lab Bench 2 Seal: T10291 intact 2026-01-07 17:40 From: M. Patel To: Evidence Storage Purpose: Return after examination Location: Evidence Room Locker 3 Seal: T10291 broken; new Seal #T10310 appliedDocumentation Standards: Writing Notes That Hold Up Under Review
Documentation in forensics is operational writing: it should be clear, factual, and reproducible. Write as though someone else will need to repeat your steps months later with no ability to ask you questions. Use plain language, avoid speculation, and separate what you observed from what someone told you.
Use Objective, Testable Language
- Prefer: “Screen is cracked in the top-right corner; glass missing in a 1 cm area.”
- Avoid: “Screen looks like it was smashed on purpose.”
- Prefer: “Submitter stated device was found powered on.”
- Avoid: “Device was definitely on earlier.”
Correcting Mistakes in Records
Mistakes happen: wrong time, typo in a serial number, wrong locker number. Correct them in a way that preserves the history of the record. In paper logs, draw a single line through the error so it remains readable, add initials/date, and write the correction. In electronic systems, use the built-in audit trail or amendment function; do not overwrite without a trace. The goal is transparency, not perfection.
Handling Common Evidence Types at Intake (Windows, Mobile, Cloud)
Different evidence types require different intake details. Your intake form should have general fields plus evidence-type-specific sections so you don’t forget critical descriptors.
Windows PCs and Laptops
- Record: make/model, serial number, asset tag, storage type (HDD/SSD if known), number of drives if visible, and any attached peripherals submitted.
- Note ports and adapters included (USB-C dongles, external DVD drives) because they can affect later access.
- Document whether the device arrived with a power supply and whether the battery is present (if removable).
Mobile Devices
- Record: make/model, color, storage size if known, IMEI/serial if visible on packaging or SIM tray, and whether a SIM/microSD is included as separate items.
- Document the state as observed: powered on/off, locked/unlocked, visible notifications (describe without interacting), and any physical damage.
- Record accessories: charging cable, adapter, Faraday bag if provided, and any written PIN/password provided by the submitter (stored securely).
Cloud Exports and Online Account Data
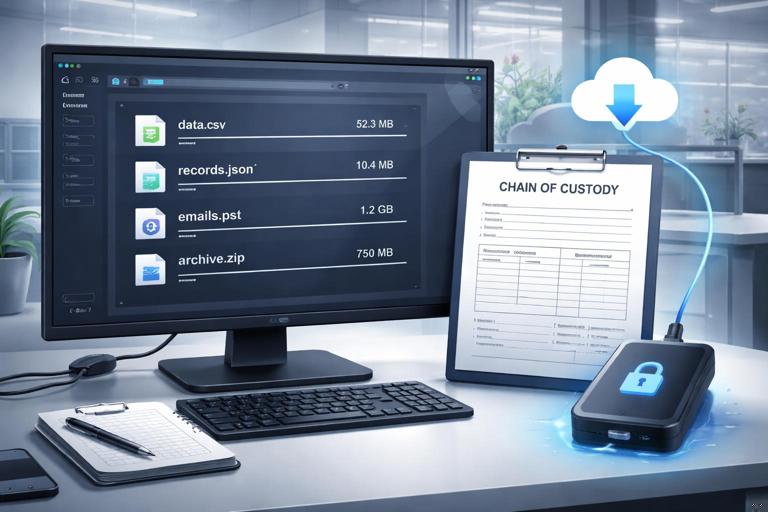
Cloud evidence often arrives as a download link, an archive file, or a set of CSV/JSON/PST files. Intake must capture provenance details: who generated the export, from which account, using which tool or portal, and the date/time the export was created and downloaded. Also record the file list and sizes as received, and preserve the original container (for example, the original ZIP file) as its own item.
- Record: account identifier (email/tenant/user ID), export method (admin portal export, eDiscovery export, user self-download), and the date range requested.
- Capture: the exact filenames, sizes, and the storage medium used to deliver them (secure share, external drive).
- Document access credentials separately and securely; note who provided them and any access limitations (MFA, expiring links).
Shipping and Remote Intake: When Evidence Arrives by Mail or Courier
When evidence is shipped, your first documentation is the shipping container. Photograph the unopened box from multiple angles, including the shipping label and any damage. Record the carrier, tracking number, and delivery time. Open the package carefully and retain all packing materials until you confirm the contents match the packing list.
If the item arrives with a seal, photograph the seal before opening. If you must break a seal to verify contents, document that action as a custody event and apply a new seal after verification. For remote submissions of cloud exports, treat the “delivery mechanism” as part of intake: record the URL (if policy allows), the sender, the time you accessed it, and how you transferred the files into controlled storage.
Evidence Storage and Access Control Documentation
After intake, the evidence should be stored in a controlled area with restricted access. Documentation should include the storage location and any access control mechanism (key, badge, dual control). If your evidence room uses sign-in logs, those logs become part of the custody story. If you use lockers, record locker numbers and seal numbers. If you use a safe, record the safe ID and the authorized custodian list in your policy documentation.
When evidence is removed for work, record the checkout and check-in times, the person responsible, and the condition of seals. If an item must remain out overnight, document where it is stored (for example, a locked lab cabinet) and who has access. The key idea is that “in the lab” is not a location; a specific secured place is.
Separating Evidence, Working Copies, and Derived Materials in Documentation
During a case you may create derived materials such as exported logs, screenshots, reports, or subsets of data for review. Your documentation should clearly distinguish the original evidence item from any derived materials and indicate where each is stored. Treat derived materials as their own tracked items when they need to be transferred to others (for example, to an investigator or legal team). This prevents confusion later about what came from where and which file set was actually reviewed.
Use consistent naming conventions tied to the evidence ID. For example, a folder name might include the case ID and item number, and each export might include a date and analyst initials. The goal is that a reviewer can trace a screenshot or exported CSV back to the specific evidence item and the specific action that produced it.
Practical Intake Forms: Fields You Should Include
Whether you use paper forms, spreadsheets, or an evidence management system, the form should prompt complete, consistent entries. A good form reduces reliance on memory and personal style. Below is a practical set of fields that works for many beginner-friendly labs.
Core Fields
- Case ID / Ticket ID
- Evidence ID
- Item type (laptop, phone, external drive, cloud export)
- Detailed description and identifiers
- Submitter details and contact
- Date/time received and receiving staff member
- Condition notes and photos reference
- Packaging and seal details
- Storage location assigned
- Requested scope / tasking summary
Optional but Useful Fields
- Priority and deadlines
- Related items (e.g., “SIM card is ITEM003”)
- Credential handling note (where stored, who provided)
- Special handling warnings (fragile, biohazard label, water damage)
- Return/disposition instructions (return to owner, retain until date)
Common Intake and Custody Pitfalls (and How to Avoid Them)
Most chain of custody problems come from small omissions: missing times, unclear item descriptions, or unrecorded temporary movements. These are preventable with habits and checklists.
- Vague descriptions: fix by recording serial numbers, photos, and distinguishing marks.
- Unrecorded handoffs: fix by requiring a custody entry every time the item changes control, even within the same team.
- Evidence left unattended: fix by defining “no unattended evidence” and providing temporary lockboxes near workstations.
- Credentials written on bags: fix by using a secure credential vault and referencing it in the intake record.
- Mixing multiple items in one bag: fix by separate packaging or a sealed container with a clear internal inventory and sub-item labels.
Mini Scenario: Intake of a Phone, a SIM, and a Cloud Export
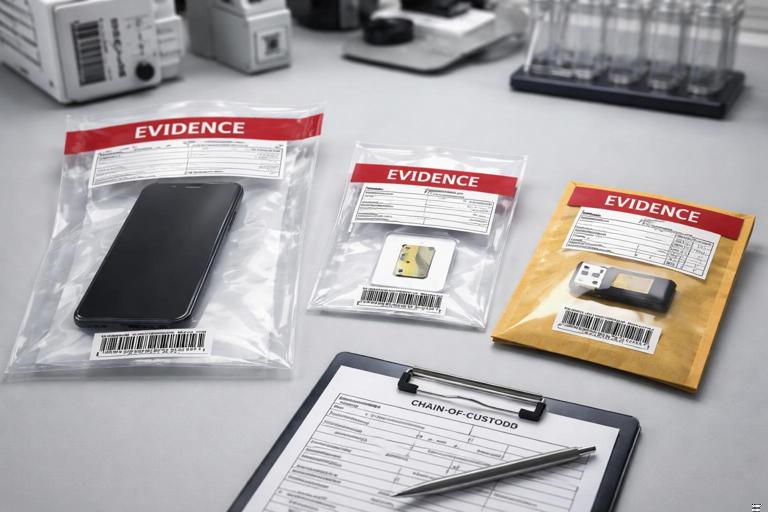
Suppose you receive three related items: a smartphone, a SIM card removed by the submitter, and a ZIP file containing a cloud export. Intake should treat each as a distinct item with its own evidence ID, while also documenting their relationship. You would photograph the phone and note visible identifiers and condition; package and seal it. You would place the SIM in a small labeled SIM holder, then into a sealed bag, and record it as a separate item. For the cloud export, you would record the delivery method, the account identifier, the export creation time (as provided), and the filenames and sizes as received, then store the original ZIP as the primary container. In your notes, you would cross-reference: “SIM ITEM003 associated with Phone ITEM002,” and “Cloud Export ITEM004 associated with account used on ITEM002 per submitter statement.”