Why Disk and File System Basics Matter in an Exam
In digital forensics, many “mysteries” are not solved by advanced tools first, but by correctly understanding what a disk is, how partitions are laid out, and how a file system records data. Examinations often require you to answer questions like: Is this a full-disk image or a partition image? Where would deleted files still be recoverable? Why does a folder appear empty even though space is used? These answers depend on disk geometry, partitioning schemes, and file system structures. This chapter focuses on the essentials you need to interpret artifacts, choose the right acquisition scope, and avoid misreading what you see in forensic tools.
Core Terminology: Disk, Volume, Partition, and File System
Disk (Physical Device)
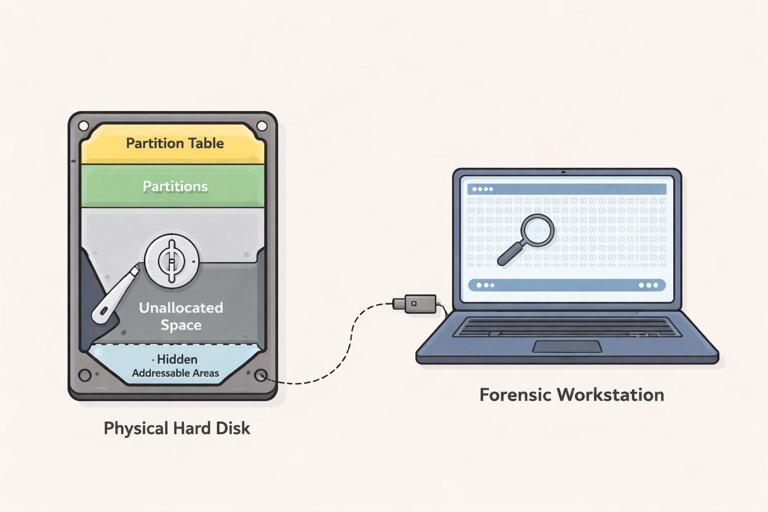
A disk is the physical storage device (HDD, SSD, USB flash drive, memory card). In Windows, it is typically shown as “Disk 0,” “Disk 1,” and so on. A disk contains raw addressable storage, usually presented as logical blocks (sectors). Forensic tools can acquire the entire disk as a “physical image,” capturing everything: partition tables, unallocated space, and any hidden areas that are addressable.
Partition (A Defined Region on a Disk)
A partition is a contiguous or defined region of a disk described by a partition table (MBR or GPT). Partitions are what operating systems use to create volumes. A disk can have multiple partitions: for example, an EFI System Partition, a Microsoft Reserved Partition, a Windows OS partition, and a Recovery partition. In examinations, you must distinguish between “unallocated space” (not assigned to any partition) and “free space” (inside a partition but not currently used by files).
Volume (What the OS Mounts)
A volume is what the operating system mounts and assigns a drive letter to (like C: or D:). A volume usually corresponds to a partition, but not always. Dynamic disks, Storage Spaces, and some RAID configurations can create volumes that span multiple disks or partitions. Forensics tools may show “volumes” as logical entities separate from the physical disk layout.
File System (How Data Is Organized)
A file system is the on-disk structure that organizes files and directories and tracks which blocks belong to which file. Common Windows-related file systems include NTFS and exFAT; FAT32 is common on removable media; cloud sync folders may exist on NTFS but represent remote content as placeholders. Understanding the file system helps you interpret timestamps, deleted file recovery potential, and why certain artifacts exist where they do.
- Listen to the audio with the screen off.
- Earn a certificate upon completion.
- Over 5000 courses for you to explore!

Download the app
Sectors, Clusters, and Addressing: Where Data Actually Lives
Sectors and Logical Block Addressing (LBA)
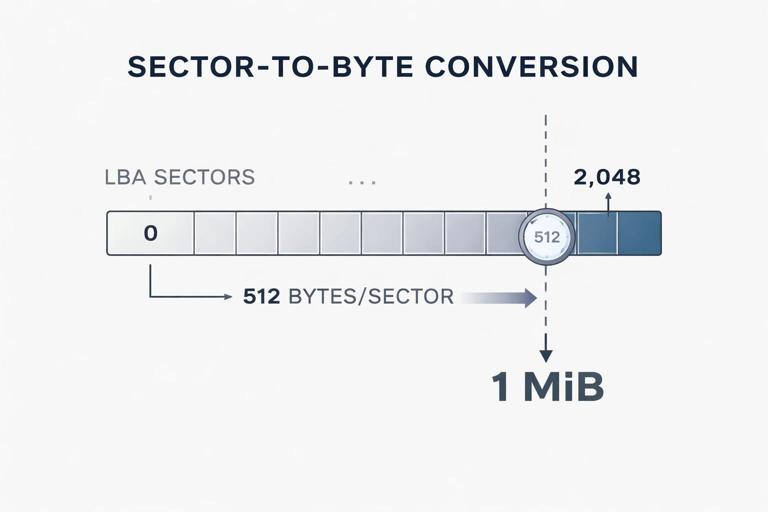
Modern disks are addressed using LBA, where each sector has a number starting at 0. Historically, sectors were 512 bytes, but many modern drives use 4096-byte physical sectors (4K). Some drives expose 512-byte logical sectors for compatibility (512e). In examinations, sector size matters because offsets in hex viewers and tool-reported locations depend on it. If a tool reports an artifact at sector 2048, you need to know the sector size to compute the byte offset.
Clusters (Allocation Units)
File systems allocate space in clusters (also called allocation units). A cluster is made of one or more sectors. For example, NTFS often uses 4096-byte clusters. A file that is 1 byte still consumes at least one cluster. Slack space is the unused portion of the last cluster allocated to a file; it can contain remnants of previous data. During examinations, slack space can explain why strings from old content appear “inside” a current file’s allocated area.
Practical: Convert Sector to Byte Offset
When you need to locate an artifact in a raw image, convert sector numbers to byte offsets:
byte_offset = sector_number * bytes_per_sectorExample: If bytes_per_sector is 512 and sector_number is 2048:
byte_offset = 2048 * 512 = 1,048,576 bytes (1 MiB)This is why many partitions start at sector 2048: it aligns partitions on a 1 MiB boundary for performance and compatibility.
Partitioning Schemes: MBR vs GPT
MBR (Master Boot Record)
MBR is an older partitioning scheme that stores partition information in the first sector of the disk (LBA 0). It supports up to four primary partitions (or three primary plus one extended partition containing logical partitions). MBR has limitations: it typically cannot address disks larger than 2 TB (with 512-byte sectors), and it is more fragile in some failure scenarios because key metadata is concentrated at the beginning of the disk.
For examinations, MBR-related tasks often include identifying partitions from the partition table, recognizing extended/logical partitions, and understanding that “unallocated” may exist outside any defined partition. Also note that some malware and bootkits historically targeted MBR because of its role in bootstrapping.
GPT (GUID Partition Table)
GPT is the modern standard, commonly used with UEFI systems. GPT stores a protective MBR at LBA 0 (to prevent old tools from misinterpreting the disk), a primary GPT header and partition array near the beginning, and a backup GPT header and partition array near the end of the disk. This redundancy can be important in examinations: if the primary GPT is damaged, the backup may still describe the partition layout.
GPT supports many partitions (commonly 128 by default in Windows) and uses globally unique identifiers (GUIDs) for partition types and disk identity. In forensic tools, you may see partitions labeled by type GUID (e.g., EFI System Partition) rather than just “primary.”
Practical: Identify MBR vs GPT in a Hex View
Step-by-step approach when you have a raw disk image and a hex viewer:
- Step 1: Navigate to LBA 0 (offset 0). Look for the MBR signature 0x55AA at the end of the sector (last two bytes).
- Step 2: Check for an “EFI PART” signature at the start of the GPT header (typically at LBA 1). In hex/ASCII, you may see the string
near the beginning of that sector.EFI PART - Step 3: If “EFI PART” exists at LBA 1, you are likely looking at GPT. If not, and the partition table entries exist in the MBR sector, it may be MBR.
- Step 4: If GPT, also check near the end of the disk for the backup GPT header (tools can compute the last LBA; in a hex viewer you may need the image size and sector size).
This quick check helps you interpret what your forensic tool is showing and whether “missing partitions” could be due to damaged headers.

Common Windows Disk Layouts You’ll See
UEFI + GPT Typical Layout
On many modern Windows systems using UEFI and GPT, you may see:
- EFI System Partition (ESP): small (often 100–300 MB), FAT32, contains bootloaders and boot configuration.
- Microsoft Reserved Partition (MSR): small (often 16 MB), not formatted with a file system, used internally by Windows.
- Windows OS partition: usually NTFS, large, contains the operating system and user data.
- Recovery partition: contains Windows Recovery Environment and tools.
In examinations, the ESP can contain boot-related artifacts, and the Recovery partition can contain diagnostic logs or remnants of prior installations. The MSR is usually not directly useful for file recovery but is important to recognize so you don’t misinterpret it as “mysterious hidden space.”
BIOS + MBR Typical Layout
Older systems may show a System Reserved partition (NTFS, often 100–500 MB) plus the main NTFS partition. The System Reserved partition may contain boot manager files and BitLocker-related boot components. Even if you are not focusing on encryption topics, recognizing this partition prevents you from overlooking boot artifacts or mislabeling it as irrelevant.
NTFS Essentials for Examinations
What NTFS Tracks: Metadata and Content
NTFS stores file metadata in the Master File Table (MFT). Each file and directory has an MFT record containing attributes such as file name, timestamps, security identifiers, and pointers to file content. Small files may be “resident,” meaning their content is stored directly inside the MFT record. Larger files are “non-resident,” meaning the MFT record contains data runs that point to clusters elsewhere on disk.
For examinations, this matters because a file can exist even if its content clusters are missing (e.g., overwritten), and conversely, content can exist in unallocated space even if the file entry is gone. It also matters because carving tools may find content without metadata, while MFT parsing can recover metadata even when content is partially missing.
Directories and File Names
NTFS directories are implemented as indexes (B-tree-like structures). Files can have multiple names (e.g., long file name and 8.3 short name). In some cases, short names can provide clues about older naming or application behavior. When you see two names for the same file in a forensic tool, it is often due to multiple filename attributes rather than duplication.
Deleted Files in NTFS
When a file is deleted, NTFS typically marks its MFT record as not in use and releases its clusters back to the pool of free space. The content may remain until overwritten. This is why deleted file recovery is often possible, especially soon after deletion. However, on busy systems, freed clusters can be reused quickly.
Practical: Reason About Recovery Likelihood
Use this step-by-step reasoning during triage or exam questions:
- Step 1: Determine whether you have a full-disk image or only a logical/volume capture. Full-disk images preserve unallocated space outside partitions and partition metadata; volume images preserve unallocated space within that volume but not outside it.
- Step 2: Check whether the file was likely resident. Very small files (like tiny text notes) may be resident in the MFT, increasing recovery chances even if clusters were reused.
- Step 3: Consider system activity. High-write environments (browsers, updates, virtual memory) increase overwrite risk.
- Step 4: Look for partial artifacts: file name and timestamps may survive in the MFT even when content is gone.
This structured approach helps you justify findings: “metadata present, content overwritten” is a common and defensible result.
FAT32 and exFAT Essentials (Removable Media Focus)
Why FAT Variants Matter
Removable drives and SD cards frequently use FAT32 or exFAT for compatibility across devices. These file systems have simpler metadata than NTFS and behave differently during deletion. FAT-based systems use a File Allocation Table to chain clusters for a file. exFAT modernizes FAT concepts for larger volumes and files.
Deletion Behavior
In FAT32, deletion often marks the first character of the directory entry as a special value and marks clusters as free in the FAT, but the content may remain until overwritten. exFAT has similar concepts but different structures. In examinations, you may see directory entries that still contain file names (partially) and timestamps even after deletion, depending on what has been overwritten.
Practical: Common Pitfall with FAT Timestamps
FAT timestamps have limitations (coarser granularity and sometimes local time assumptions). Step-by-step, when interpreting FAT/exFAT times:
- Step 1: Identify the file system type (FAT32 vs exFAT) and the device context (camera, phone, car infotainment, etc.).
- Step 2: Check whether the tool reports times as local time or UTC; confirm tool settings.
- Step 3: Correlate with other artifacts (folder naming patterns, sequential numbering, known device behavior) rather than relying on a single timestamp.
This prevents overconfident timeline statements when the underlying time representation is limited.
Unallocated Space, Free Space, and Slack Space
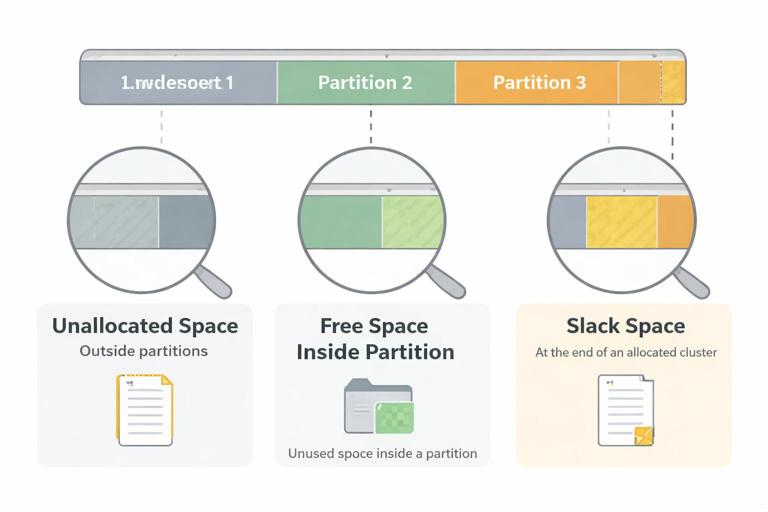
Unallocated Space (Outside Any Partition)
Unallocated space is disk area not assigned to any partition. It can contain remnants of old partitions, previous installations, or data from partitions that were deleted or resized. If you only capture a single volume, you will miss this area entirely. In examinations, unallocated space can hold critical remnants such as fragments of old file systems or prior user data.
Free Space (Inside a Partition)
Free space is within a partition but not currently allocated to active files. Deleted file content often persists here until overwritten. Many forensic suites allow “unallocated clusters” searches inside a volume, which is where carving and keyword searches can be effective.
Slack Space (Inside Allocated Clusters)
Slack space is the unused tail of a cluster allocated to a file. It can contain remnants of previously stored data. Slack is particularly relevant when small files are created and deleted frequently, or when files are edited and shrink. In examinations, slack can produce “false-looking” strings that are real remnants but not part of the current file content.
File System Artifacts vs File Content: What Tools Are Showing You
Allocated Files, Deleted Entries, and Orphans
Forensic tools typically categorize findings as allocated (active) files, deleted files (metadata indicates deletion), and “orphan” files (content found without a clear directory entry, often via carving). Each category has different evidentiary value and interpretive risk. Allocated files have the strongest linkage between name, path, metadata, and content. Deleted files may have reliable metadata but potentially incomplete content. Carved files may have content but uncertain original name/path/timestamps.
Practical: Decide Which View to Trust
Step-by-step decision process when a tool shows conflicting results:
- Step 1: Check whether the file is resident or non-resident (NTFS). Resident content is tightly bound to metadata; non-resident content depends on cluster availability.
- Step 2: Compare the tool’s “file system view” (MFT/FAT directory) with “carved results.” If both exist, prefer file system-backed results for attribution (name/path).
- Step 3: Validate by examining the raw bytes at the reported clusters/offsets in a hex view when something seems inconsistent (e.g., file signature mismatch).
- Step 4: If only carving found it, treat name/path/timestamps as unknown unless corroborated elsewhere.
This keeps your interpretation aligned with what the underlying structures can actually prove.
Fragmentation and Data Runs: Why Files Aren’t Always Contiguous
Fragmentation Basics
A file may be stored in multiple extents across the disk, especially on heavily used volumes. NTFS tracks these extents using data runs in the MFT. Fragmentation affects recovery because a deleted file’s clusters may be reused in parts, producing partially intact content. It also affects carving: carving works best when files are contiguous and have recognizable headers/footers.
Practical: Recognize Fragmentation Symptoms
Step-by-step indicators that a recovered file may be fragmented or partially overwritten:
- Step 1: The file opens but contains sudden corruption mid-stream (e.g., a JPEG displays partially then breaks).
- Step 2: The tool reports multiple extents/data runs for the file.
- Step 3: Hash or signature checks fail for known file types (e.g., PDF header exists but internal structure is inconsistent).
- Step 4: Hex inspection shows a valid header followed by unrelated data patterns.
In examinations, this supports statements like “file content partially recovered; remainder likely overwritten or fragmented beyond reconstruction.”
System Areas and Special Partitions You Should Not Misinterpret
EFI System Partition (ESP)
The ESP is usually FAT32 and contains bootloaders and configuration used by UEFI. In a forensic context, it can show which boot entries exist and sometimes evidence of boot modifications. Even when your primary focus is user activity, recognizing the ESP helps you understand the boot chain and avoid confusing it with user storage.
Recovery Partitions
Recovery partitions can contain Windows recovery images, logs, and tools. They may also contain remnants from upgrades. In examinations, these partitions can explain why a disk has “missing” space or why multiple Windows-related partitions exist.
Microsoft Reserved Partition (MSR)
The MSR is not formatted and typically has no user-accessible files. Its presence is normal on GPT disks. If a tool shows it as a small unformatted partition, that is expected and not inherently suspicious.
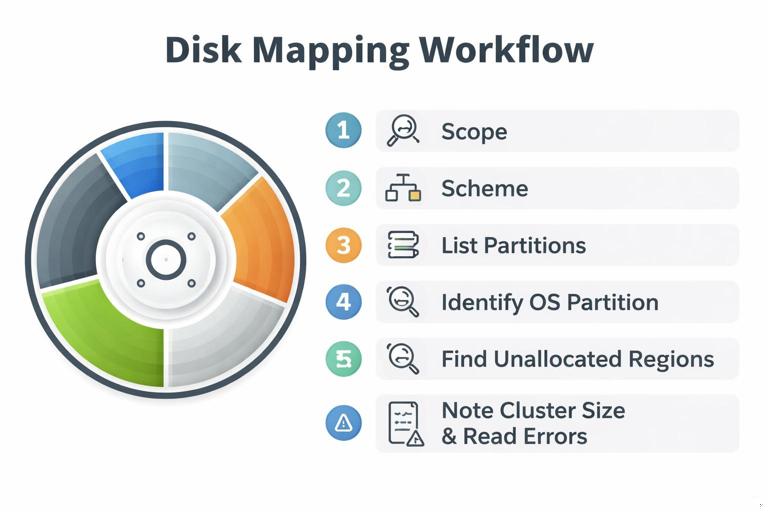
Practical Workflow: Map a Disk Image Before You Analyze Files
Step-by-Step Disk Mapping Checklist
Before deep analysis, create a mental (or written) map of the disk. This prevents you from missing partitions or misunderstanding what “unallocated” means in your tool.
- Step 1: Identify the acquisition scope: physical disk image vs partition/volume image. Note what cannot be present (e.g., a volume image cannot include partitions outside that volume).
- Step 2: Determine partitioning scheme: MBR or GPT. Confirm by checking tool-reported scheme and, if needed, verifying signatures in hex.
- Step 3: List partitions in order with start/end offsets (or LBAs), sizes, and file system types (NTFS, FAT32, exFAT, unknown/unformatted).
- Step 4: Identify which partition is the OS/user-data partition (often the largest NTFS). Note additional partitions (ESP, Recovery).
- Step 5: Identify unallocated space regions outside partitions (if full-disk image). Consider whether they could contain remnants of prior partitions.
- Step 6: For each relevant partition, note cluster size and whether the tool reports bad sectors or read errors (these can explain missing artifacts).
This checklist is simple but powerful: many exam mistakes come from skipping it and jumping straight to keyword searches.
Practical Workflow: Interpret What “Empty” Means
Empty Folder vs Space Used
A folder can appear empty while the volume shows significant used space for several reasons: hidden/system files, alternate data streams (NTFS), files stored in other directories, or artifacts in unallocated space. Also, cloud sync clients may show placeholders that are not fully present locally. In examinations, you should separate “no visible files in this folder” from “no data exists related to this folder.”
Step-by-Step Checks When a Folder Looks Empty
- Step 1: Confirm you are viewing the correct partition/volume and not a similarly named mount point.
- Step 2: Check for hidden and system files in the forensic tool’s file listing options.
- Step 3: On NTFS, check for alternate data streams associated with files in the directory (tool-dependent feature).
- Step 4: Review directory entries for deleted items (some tools show deleted entries under the same folder).
- Step 5: Search unallocated space for directory name strings or known file signatures associated with expected content.
This approach helps you explain discrepancies without assuming tampering.
Practical Workflow: Choose the Right Target for Searches and Carving
Search Scope Matters
Searching “the disk” can mean very different things depending on the tool: allocated files only, allocated plus unallocated within a partition, or the entire physical image including unallocated outside partitions. For examinations, you should be explicit about scope because it affects what you can find.
Step-by-Step: Plan Your Search Strategy
- Step 1: Start with file system-backed artifacts (allocated and deleted entries) for attribution (names, paths, timestamps).
- Step 2: Expand to unallocated clusters within relevant partitions for deleted content and fragments.
- Step 3: If you have a full-disk image, include unallocated space outside partitions to catch remnants of old partitions.
- Step 4: Use carving selectively for file types likely to be present (images, documents) and interpret carved results cautiously.
This keeps your analysis efficient and reduces noise from carving everything everywhere.