What “Cloud and SaaS Evidence” Means in Practice
Cloud and SaaS evidence is the set of records that describe user actions, access, configuration changes, and content stored or processed in a provider-managed environment. In Microsoft 365 and Google Workspace, the most valuable evidence often lives in audit logs, email systems, collaboration tools, identity and access records, and administrative configuration histories. Unlike endpoint forensics, you usually cannot acquire a “disk image” of the provider’s infrastructure; instead, you collect provider-generated logs and export user content through supported admin and eDiscovery interfaces or APIs. The practical goal is to answer questions such as: who accessed which account, from where, when, and what did they do (read, send, delete, share, download, create rules, change MFA, grant OAuth access, create forwarding, or modify retention settings).
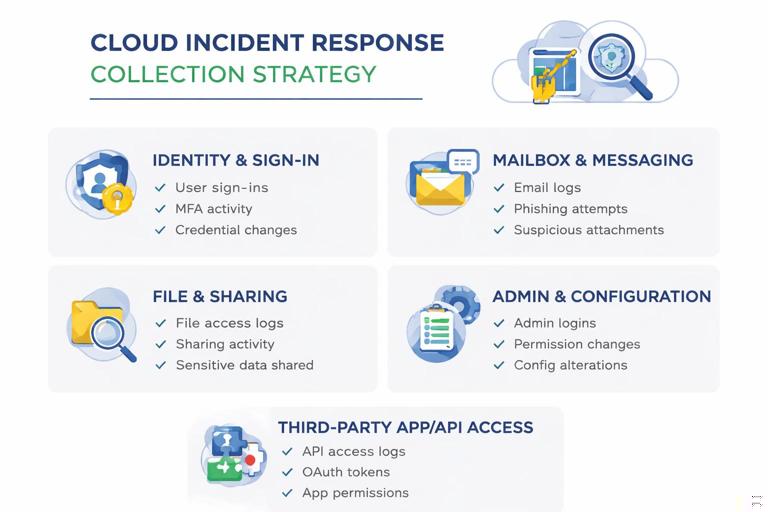
Collection Strategy: Decide What You Need Before You Click Export
A cloud collection plan should be driven by the incident hypothesis and the data types that can confirm or refute it. Common scenarios include business email compromise, insider data exfiltration, ransomware staging via cloud sync, and abuse of OAuth apps. For each scenario, prioritize (1) identity and sign-in evidence, (2) mailbox and messaging evidence, (3) file and sharing evidence, (4) admin and configuration evidence, and (5) third-party app and API access evidence. Also decide whether you need point-in-time exports (snapshots) or ongoing log capture for a window of time. Many SaaS logs have limited retention unless you have the right license or have configured longer retention; this makes early collection and preservation critical.
Key Evidence Sources in Microsoft 365
Microsoft 365 evidence typically comes from Microsoft Purview audit logs, Entra ID (Azure AD) sign-in and audit logs, Exchange Online mailbox artifacts, SharePoint/OneDrive activity, Teams activity, and security/defender telemetry if available. For investigations focused on account takeover, Entra ID sign-in logs and audit logs show authentication events, conditional access outcomes, device and IP information, and changes to security settings. For email compromise, Exchange mailbox audit logs, message traces, and mailbox configuration (forwarding, inbox rules, delegates, and OAuth consent) are high value. For data theft, SharePoint/OneDrive file access and sharing events plus download/sync indicators are essential. Admin actions—like creating transport rules, changing retention, or adding privileged roles—often appear in unified audit logs and Entra audit logs.
Microsoft 365 Prerequisites and Readiness Checks
Before collecting, confirm you have the right roles and that auditing is available. In many tenants, unified audit logging is enabled by default, but you should verify it in the Microsoft Purview portal. Confirm the time zone context used by the portal and exports, and record it in your notes because timestamps may be presented in UTC or tenant-local time depending on the view. Identify the tenant ID, the relevant user principal names (UPNs), and the suspected time window. If the incident involves privileged accounts, confirm whether Privileged Identity Management (PIM) is used and whether role activation events are logged. If you plan to use PowerShell, ensure you can authenticate with an account that has least-necessary permissions for audit search and eDiscovery exports.
Step-by-Step: Collect Microsoft 365 Unified Audit Log (Purview)
This workflow targets the broad “who did what” record across Exchange, SharePoint, OneDrive, Teams, and Entra-related activities that flow into unified audit (depending on configuration and licensing).
- Listen to the audio with the screen off.
- Earn a certificate upon completion.
- Over 5000 courses for you to explore!

Download the app
Step 1: Define the query parameters
Write down the exact start and end timestamps, the users of interest, and the activity types you care about (for example: MailItemsAccessed, Send, UpdateInboxRules, Add-MailboxPermission, FileDownloaded, SharingSet, UserLoggedIn, Add service principal, Consent to application). Keep the initial query broad if you are unsure, then narrow after you confirm the event volume.
Step 2: Search in Purview Audit
In Microsoft Purview, go to Audit and run a search for the time range and users. Export results in a format that preserves fields (CSV is common). If the portal limits the number of returned records, segment the time window (for example, 6-hour or 1-day slices) and export each slice. Name exports consistently, such as M365_Audit_2025-01-10_0000-0600UTC_UserA.csv.
Step 3: Preserve the raw export and a working copy
Store the original export as read-only in your evidence repository and create a working copy for analysis. Record the portal query parameters and any filters used. If you later need to defend your process, being able to reproduce the same query is often as important as the exported file itself.
Step 4: Validate completeness with spot checks
Do quick sanity checks: confirm the earliest and latest timestamps match your requested window; confirm the expected users appear; confirm key columns like Operation, UserId, ClientIP, UserAgent, ObjectId, and Workload are present. If you see missing fields, try exporting in a different format or using PowerShell for richer output.
Step-by-Step: Collect Entra ID (Azure AD) Sign-In Logs and Audit Logs
For account compromise investigations, Entra logs are often the most probative because they show authentication attempts, token issuance context, and administrative changes.
Step 1: Collect sign-in logs for the affected accounts
In the Entra admin center, navigate to Sign-in logs and filter by user, time range, and status (success/failure). Export results (CSV/JSON depending on options). Capture fields such as IP address, location, device details, authentication requirement, conditional access result, and client app. If you suspect legacy authentication or IMAP/POP abuse, filter by client app and protocol indicators.
Step 2: Collect audit logs for configuration changes
In Audit logs, filter for activities like Add member to role, Update user, Add authentication method, Register device, Add service principal, Consent to application, Update conditional access policy, and changes to MFA settings. Export the results and preserve the filter criteria used.
Step 3: Correlate sign-in and audit events
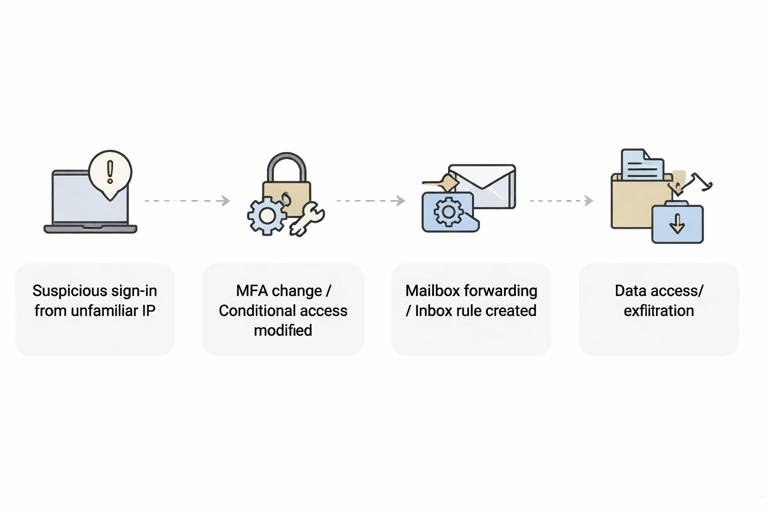
Build a timeline that links suspicious sign-ins to subsequent changes. A common pattern is: suspicious sign-in from unfamiliar IP → MFA method added/changed or conditional access modified → mailbox forwarding or inbox rule created → data access or exfiltration. Your exports should allow you to connect these steps by time and actor.
Step-by-Step: Collect Exchange Online Evidence (Mailbox, Rules, Forwarding, Message Trace)
Email compromise often hinges on mailbox configuration and message flow records. You typically need both content (messages) and metadata (rules, forwarding, trace logs).
Step 1: Capture mailbox configuration state
Collect evidence of forwarding settings, inbox rules, delegates, and mailbox permissions. In the Exchange admin center, review the mailbox settings for forwarding and permissions. For a repeatable approach, use Exchange Online PowerShell to export configuration to text/CSV so you can preserve the exact output.
# Example: export inbox rules and forwarding-related settings (run with appropriate permissions) Get-InboxRule -Mailbox user@domain.com | Select Name,Enabled,Priority,From,SubjectContainsWords,BodyContainsWords,ForwardTo,RedirectTo,DeleteMessage | Export-Csv .\user_inboxrules.csv -NoTypeInformation Get-Mailbox user@domain.com | Select UserPrincipalName,ForwardingSmtpAddress,DeliverToMailboxAndForward | Export-Csv .\user_forwarding.csv -NoTypeInformation Get-MailboxPermission user@domain.com | Select User,AccessRights,IsInherited,Deny | Export-Csv .\user_mailboxpermissions.csv -NoTypeInformationStep 2: Collect message trace for the incident window
Use message trace to capture inbound and outbound message flow, especially messages sent to external recipients, messages with suspicious subjects, and messages that indicate rule-based forwarding. Export trace results and note any limitations (some portals provide extended trace only for certain time windows). If you need deeper details, use extended message trace where available.
Step 3: Export mailbox content when required
If the investigation requires message bodies, attachments, or deleted items, use Microsoft Purview eDiscovery (Standard or Premium depending on licensing) to create a case, place relevant mailboxes on hold if appropriate, run a content search, and export results. Prefer exports that preserve metadata (sender, recipients, Message-ID, timestamps, folder path). Document the search query (keywords, date filters, participants) and the export options used.
Step-by-Step: Collect OneDrive/SharePoint and Teams Evidence
Collaboration platforms are frequent sources of exfiltration and staging. The evidence you want is usually (1) file access and sharing events, (2) file versions and metadata, and (3) chat or channel messages where sensitive data may have been shared.
Step 1: Identify the sites and drives involved
Determine which OneDrive account(s) and SharePoint sites are relevant. Collect the site URLs, file paths, and any shared link identifiers. If the incident involves a specific document, record its unique ID from the platform where possible; IDs are more reliable than names when files are renamed.
Step 2: Export audit events for file activity
From unified audit logs, filter for SharePoint and OneDrive operations such as FileAccessed, FileDownloaded, FileDeleted, FileModified, SharingSet, SharingInvitationCreated, AnonymousLinkCreated, and SecureLinkCreated. Export the results and keep the raw file activity logs separate from email logs to simplify analysis.
Step 3: Export file content and versions when needed
When you need the actual document(s), use eDiscovery content search targeting SharePoint/OneDrive locations and export the items. If version history matters (for example, a document was edited to insert malicious links or to remove content), collect version metadata and, if possible, export relevant versions. Note that some exports may not include full version history; you may need to collect versions via SharePoint/Graph APIs or administrative tooling depending on your environment.
Step 4: Collect Teams messages and files
Teams chats and channel messages can be collected through Purview eDiscovery searches targeting Teams locations. Also remember that many Teams files live in SharePoint (channels) or OneDrive (chat file sharing), so correlate Teams message exports with SharePoint/OneDrive file activity logs.
Key Evidence Sources in Google Workspace
Google Workspace evidence commonly comes from the Admin console audit logs (Admin audit log, Login audit log, Drive audit log, Gmail audit log, and Token/OAuth-related logs), Gmail message data, Google Drive file metadata and sharing records, and Vault exports for email and Drive content. For account compromise, the Login audit log and OAuth token events are critical. For data theft, Drive audit events (downloads, shares, link creations, permission changes) and Gmail forwarding/filter changes are common indicators. For admin abuse, the Admin audit log shows changes to users, groups, security settings, and API access.
Google Workspace Prerequisites and Readiness Checks
Confirm you have an admin role that permits viewing and exporting audit logs and using Google Vault (if licensed). Identify the primary domain, affected user accounts, and the time window. Record whether the organization uses context-aware access, 2-Step Verification enforcement, SSO, or security keys, because these settings influence what you will see in login events. Also note log retention constraints; some audit logs have limited retention unless you use additional services or exports.
Step-by-Step: Collect Google Workspace Audit Logs (Admin Console)
This workflow focuses on collecting authoritative event records for logins, admin actions, Drive activity, and Gmail-related changes.
Step 1: Collect Login audit log for affected users
In the Admin console, navigate to Reporting or Audit and investigation (depending on your edition) and open the Login audit log. Filter by user and time range. Export results. Capture fields such as IP address, event type, login challenge status, SSO indicators, and device/browser details when available. If you suspect session hijacking or suspicious OAuth access, pay attention to events that indicate new device, unusual location, or changes in authentication method.
Step 2: Collect Admin audit log for configuration changes
Open the Admin audit log and filter for actions involving user security settings, password resets, 2SV changes, role assignments, API controls, and changes to Gmail routing settings. Export and preserve the filtered view parameters. This log is often the best source for “who changed what” at the tenant level.
Step 3: Collect Drive audit log for file access and sharing
Open the Drive audit log and filter for the users, shared drives, or document IDs involved. Export events such as download, view, edit, share, permission change, link sharing enabled, and ownership transfer. If you have a specific sensitive file, use its file ID to avoid ambiguity from renames.
Step 4: Collect Gmail audit log for mailbox-related actions
Use Gmail audit logs to identify message access patterns and configuration changes. Depending on available logs and edition, you may see events related to delegation, routing, or suspicious access. Export what is available and correlate with Gmail settings evidence collected from the mailbox itself (filters, forwarding).
Step-by-Step: Collect Gmail Evidence (Forwarding, Filters, Delegation, and Message Data)
In Workspace incidents, attackers often create forwarding addresses, add filters to auto-forward or auto-delete, or grant mailbox delegation. You want both the configuration state and the message-level evidence.
Step 1: Identify forwarding and filter abuse
Check whether the user has forwarding enabled and whether filters exist that forward, archive, or delete messages matching certain criteria (for example, invoices, wire, payroll). If you have access to the user’s mailbox via admin tools or delegated access, capture screenshots and export settings where possible. If you cannot access the mailbox directly, rely on audit logs plus Vault exports to reconstruct what happened.
Step 2: Export relevant messages via Google Vault
In Google Vault, create a matter for the case, define the scope (user mailbox(es), date range), and run a search using participants, keywords, and time filters. Export results in a format that preserves metadata. If you are investigating exfiltration, include searches for messages sent externally, messages with sensitive attachments, and messages containing suspicious URLs. Record the exact query and export settings used so the export can be reproduced.
Step 3: Preserve message headers when possible
For phishing and BEC, full headers can be essential to identify sending infrastructure, authentication results, and routing. If Vault exports do not include all header details you need, consider collecting headers from the mailbox view for specific messages of interest and preserving them as separate artifacts with message identifiers and timestamps.
Step-by-Step: Collect Google Drive Evidence (Files, Sharing, and Exports)
Drive investigations often revolve around whether a user accessed, downloaded, or shared sensitive files, and whether link sharing was enabled to allow anonymous access.
Step 1: Use Drive audit events to identify target files
From Drive audit logs, identify file IDs, actors, and actions (view, download, share, permission change). Build a list of high-risk files and the exact times they were accessed or shared. This list becomes your collection scope for content exports.
Step 2: Export file content using Vault (when available)
If your organization has Vault for Drive, search by user and date range, and refine by file type, title, or other attributes. Export the files and associated metadata. Note that some exports may not preserve all version history; if version history is critical, you may need to collect additional metadata through administrative tools or APIs.
Step 3: Capture sharing state and link settings
For each key file, capture who it is shared with, whether it is shared externally, and whether link sharing is enabled. If the platform provides an “access” or “sharing” report, export it. If not, document the sharing state as close to collection time as possible, because sharing permissions can change quickly during response.
OAuth Apps, API Access, and Token Abuse (Both Platforms)
Modern SaaS compromises frequently involve OAuth consent and third-party apps rather than password theft. Evidence collection should therefore include app consent events, service principal or app registrations, and token-related activity. In Microsoft 365, look for enterprise applications, consent grants, and service principal changes in Entra logs and unified audit. In Google Workspace, review OAuth app access controls and token-related audit events where available. For both, collect the app name, client ID, publisher, scopes/permissions granted, the consenting user, and the time of consent. Also collect whether the app was later removed and by whom. This evidence helps distinguish legitimate integrations from malicious persistence.
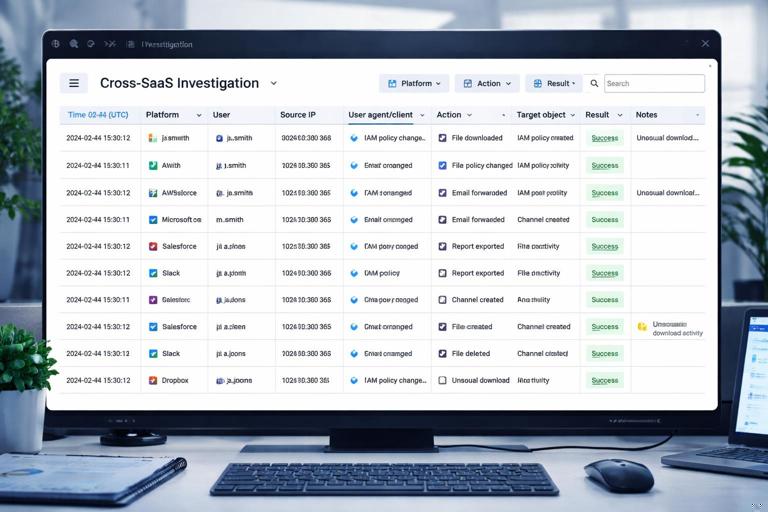
Practical Correlation: Building a Cross-SaaS Timeline
After exporting logs and content, normalize timestamps to a single time zone and build a timeline that merges identity events, mailbox events, and file-sharing events. A practical approach is to create a spreadsheet or log analysis table with columns: Time (UTC), Platform, User, Source IP, User agent/client, Action, Target object (message ID, file ID, rule name), Result, and Notes. Then mark “pivot points” such as the first suspicious sign-in, the first admin change, the first forwarding/rule creation, and the first external share/download. This structure makes it easier to explain the incident path and to identify gaps that require additional collection.
Common Pitfalls and How to Avoid Them
First, missing retention windows: if you wait too long, key audit events may no longer be available. Second, exporting only “pretty” portal views: some portal exports omit fields needed for correlation, so validate the columns and consider API/PowerShell exports when necessary. Third, failing to capture configuration state: logs show events, but you also need the current state of rules, forwarding, delegates, sharing permissions, and app consents. Fourth, not scoping by immutable identifiers: file names and display names change; prefer message IDs, file IDs, object IDs, and UPNs. Fifth, ignoring service accounts and shared mailboxes: attackers often pivot to accounts with broad access. Make sure your collection includes privileged roles, shared resources, and any automation accounts relevant to the environment.