What “Android Evidence” Usually Means in Practice
When you examine an Android device, you are typically trying to answer practical questions: what accounts are present, what apps were used, what communications occurred, what files were created or received, and when those actions happened. Android evidence is spread across multiple layers: backups (cloud or local), file system artifacts (shared storage and app-specific directories), and app data (databases, caches, logs, and configuration files). The challenge is that Android is not one uniform platform: device vendors customize builds, security patch levels vary, and app developers store data differently across versions. Your job is to recognize common storage patterns and extract the most reliable artifacts available for the device and scenario you have.
Android Backups as an Evidence Source
Backups can be the fastest path to useful evidence because they often contain app data and settings without requiring deep access to the live file system. In many cases, a backup is also “cleaner” than a live device because it represents a point-in-time snapshot. However, backups can be incomplete: some apps opt out, some data is excluded by policy, and encryption or account access can block you. Treat backups as one evidence stream that you correlate with on-device artifacts rather than a complete replacement for device analysis.
Types of Android Backups You May Encounter
In the field, you will most commonly see: (1) Google cloud backups (Android Backup / Google One device backup), (2) OEM backups (Samsung Smart Switch, Xiaomi/OPPO tools), (3) ADB-based backups on older Android versions, and (4) app-specific cloud sync (WhatsApp, Signal, Telegram, Microsoft/Google apps). Each type has different contents and access requirements. For example, a Google device backup may restore app lists, some app data, call history, and device settings, but it may not include every app’s internal databases. App-specific sync may contain the most important content (messages, media) but only if the account is accessible and sync was enabled.
Practical Workflow: Collecting and Preserving Backup Evidence
The goal is to obtain a copy of the backup data (or exported content) in a way that you can later analyze and correlate. The exact steps depend on what you have access to: the device, the user’s Google account, an OEM desktop tool, or a seized computer that already contains backup files.
Step-by-Step: Identify Backup Sources and Scope
Step 1: Inventory the device and accounts. Record Android version, OEM, and whether Google services are present. Note visible accounts (Google, Samsung, Microsoft, WhatsApp, Telegram, etc.). This helps you predict which backup ecosystems may exist.
- Listen to the audio with the screen off.
- Earn a certificate upon completion.
- Over 5000 courses for you to explore!

Download the app
Step 2: Check on-device backup settings (if accessible). In Settings, look for “Backup,” “Google One,” “Back up by Google One,” “Samsung Cloud,” or “Smart Switch.” Note the last backup time and what categories are included (apps, call history, device settings, SMS/MMS on some devices, photos via Google Photos, etc.).
Step 3: Look for local backup artifacts on connected computers. If you have a suspect or user PC, search for OEM backup folders (for example, Smart Switch directories) and for Android file transfer caches. Local backups can be a strong source because they may include app data that cloud backups omit.
Step-by-Step: Acquire a Local OEM Backup (Example Pattern)
OEM tools vary, but the pattern is similar: install the vendor tool on a workstation, connect the device, and create a backup to a known folder. If you are allowed to interact with the device, you may need to unlock it and approve prompts. During backup creation, document: tool version, workstation details, the exact backup path, the time range, and any prompts shown on the device. After the backup completes, preserve the entire backup folder structure; do not “clean up” or rename internal files because many tools rely on metadata files and indexes.

Practical tip: if the tool offers category selection (apps, messages, photos), capture the selection screen in your notes and choose the most inclusive option permitted. If the tool supports encryption of the backup, record whether encryption was enabled and how the password was handled, because you will need it for analysis.
Step-by-Step: Acquire App-Specific Backups (Example: WhatsApp)
Many messaging apps maintain their own backup mechanisms. WhatsApp is a common example: it may store local encrypted databases and also back up to Google Drive (Android) if enabled. A practical approach is to collect both: (1) on-device WhatsApp databases and media folders, and (2) any accessible cloud backup exports or account-based downloads. When collecting on-device data, pay attention to the app’s directory structure and the presence of encrypted database files (often with extensions like .crypt*). Also collect the media directory (images, videos, voice notes) because media may persist even when chats are deleted.
File System Artifact Locations on Android
Android evidence is commonly split between “shared storage” and “app private storage.” Shared storage includes user-accessible areas such as /sdcard/ (also shown as “Internal storage”) and sometimes removable SD cards. App private storage lives under /data/data/<package.name>/ (or /data/user/0/<package.name>/), and it typically contains the most valuable app databases and configuration files. Access to app private storage is restricted on modern Android unless you have a forensic acquisition method that can read it; therefore, you should plan to extract maximum value from shared storage and backups when private storage is not available.
Shared Storage: What You Can Often Get Without Deep Access
Shared storage frequently contains: downloaded files, camera photos, screenshots, app-exported documents, cached media, and sometimes app logs or offline content. Common directories include /sdcard/Download/, /sdcard/DCIM/Camera/, /sdcard/Pictures/Screenshots/, and app-specific folders like /sdcard/Android/media/<package.name>/ or /sdcard/Android/data/<package.name>/. On newer Android versions, access to /sdcard/Android/data may be limited through normal file browsing, but forensic tools or ADB (when permitted) may still retrieve it depending on the device state and permissions.
App Private Storage: Where the High-Value Databases Live
When you can access app private storage, focus on files that represent structured records: SQLite databases (.db), Write-Ahead Logs (-wal), shared preferences XML files, and app-specific log files. A key practical point is that SQLite databases often rely on companion files: database.db, database.db-wal, and database.db-shm. If you only collect the main .db file, you may miss recent records that are still in the WAL. Always collect the trio when present.
Practical Workflow: Navigating and Collecting Android File System Artifacts
The steps below assume you have a file system extraction from a tool, an OEM backup folder, or a directory listing from an allowed method. The goal is to find the “artifact-rich” locations quickly and collect the right supporting files.
Step-by-Step: Triage Shared Storage for User Activity
Step 1: Start with user-generated media. Review DCIM and Pictures for photos, screenshots, and edited images. Screenshots are often highly probative because they capture messages, transactions, or app screens at a specific time.
Step 2: Review Download and document folders. Look for PDFs, Office documents, APKs, and archives. APKs in Downloads can indicate sideloading behavior. Also look for “export” files from apps (CSV exports, chat exports, backups).
Step 3: Check app media directories. Many apps store media under /sdcard/Android/media/<package>/. For example, messaging apps may store voice notes, images, and videos there even if message databases are protected.
Step 4: Note timestamps and naming patterns. Android camera files often follow patterns like IMG_YYYYMMDD_HHMMSS.jpg. Apps may use UUID-like names. Use these patterns to infer creation workflows and to correlate with in-app records later.
Step-by-Step: Collect App Data Correctly (Databases and Context Files)
Step 1: Identify the package name. Android apps are identified by package names like com.whatsapp or org.telegram.messenger. Package names map directly to directory paths in private storage and often appear in shared storage paths.
Step 2: Collect SQLite databases with WAL/SHM. If you see msgstore.db, also collect msgstore.db-wal and msgstore.db-shm if present. Do the same for any other .db files. This is essential for completeness.
Step 3: Collect shared preferences and configuration. Shared preferences are typically XML files under shared_prefs. They can contain account identifiers, feature flags, last-run times, and sometimes tokens or server URLs. Even when message content is encrypted, preferences can provide attribution and timeline anchors.
Step 4: Collect cache and log directories selectively. Cache can be large, but it may contain thumbnails, recently viewed content, or temporary files. Logs can reveal server endpoints, error messages, and sometimes user actions. Prioritize smaller, structured logs first and document what you skip due to size constraints.
Key Android System Artifacts That Support Timelines
Even without deep app access, Android has system-level artifacts that can support a timeline and user attribution. Depending on acquisition type, you may see system logs, usage stats, and settings databases. The exact availability varies widely, but you should know what to look for when it is present.
Usage and App Activity Indicators
Some devices maintain usage statistics that can indicate when an app was last used or how often it was opened. If you obtain access to usage stats databases or system services data, treat them as supporting evidence rather than definitive proof of content. Correlate “app opened” indicators with notifications, media creation times, and network-related artifacts when available.
Notifications and UI Artifacts
On certain Android versions and builds, notification-related data may be stored in system databases. Notifications can be valuable because they may contain message previews, sender names, or transaction alerts. However, notification retention is often limited, and privacy features may redact content. If you find notification tables, document the schema and test a few records to understand what fields are populated on that device.
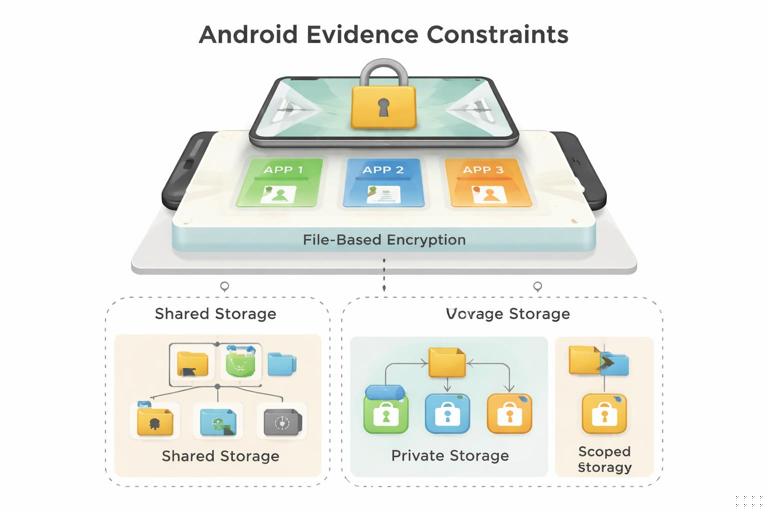
App Data Considerations: Encryption, Sandboxing, and “Scoped Storage”
Modern Android security features directly shape what evidence you can access. App sandboxing isolates private data per app. File-based encryption protects data at rest and may keep certain files unavailable until the device is unlocked. Scoped storage changes how apps read and write shared storage, which affects where you find media and documents. These are not just technical details—they explain why two devices with the same app can yield very different results.
Encryption and Locked-State Gaps
If the device is locked or recently rebooted, some data may be in a “locked” state and not accessible even if you can see the file system structure. In practice, you may observe empty directories, missing databases, or zero-byte files until the user unlocks the device. When you encounter gaps, document the device state at the time of acquisition (powered on, unlocked, airplane mode, time since reboot) and treat missing artifacts as potentially state-related rather than “not present.”
Scoped Storage: Why App Files Moved
On newer Android versions, apps are encouraged (and sometimes required) to store media in app-specific shared locations such as /sdcard/Android/media/<package>/ rather than writing freely across shared storage. This means older guides that say “look in /WhatsApp/” may not apply on newer devices, where the path may be under Android/media. When you cannot find expected folders, search for the package name and check both legacy and scoped-storage paths.
Practical Analysis: Reading Common App Data Formats
Once you have app data, you need to interpret it. Android apps commonly store structured data in SQLite, key-value settings in XML or JSON, and media as standard files. Your analysis should focus on extracting: identifiers (user IDs, phone numbers, email addresses), relationships (contacts, chat participants), content (messages, posts), and timestamps (creation, sent, received, modified). Always keep an eye on time representations: Unix epoch seconds, milliseconds, or ISO strings are all common, and misreading them can shift events by hours or decades.
SQLite Databases: A Practical Mini-Workflow
Step 1: Work on a copy of the database set. Keep the original database files untouched and analyze a duplicate set in your workspace.
Step 2: Check for WAL mode. If -wal exists, ensure your SQLite viewer can read WAL content. If your tool ignores WAL, you may see missing “recent” records.
Step 3: Identify key tables. Look for tables with names like messages, chat, thread, contacts, participants, calls, or attachments. Then sample a few rows to understand what each column represents.
Step 4: Extract and normalize timestamps. Create a small mapping note: “column X is epoch milliseconds,” “column Y is ISO8601,” etc. Use that mapping consistently across your report and timeline.
Example timestamp checks (conceptual): 1697040000 = epoch seconds (2023-10-11...) 1697040000000 = epoch milliseconds (same date, extra 000) 2023-10-11T14:22:05Z = ISO8601 UTCXML and JSON Preferences: What to Look For
Preferences often include: last login time, last sync time, account identifiers, server region, notification settings, and feature toggles. Even when content is encrypted, these files can show that an account was configured on the device and when the app last ran. In practice, you can search within these files for strings like account, user, email, phone, token, last, sync, and device. Treat tokens carefully: they may be sensitive and may have legal handling requirements depending on your environment.
Correlating Backups, File System, and App Data
The strongest Android findings usually come from correlation: a backup indicates an app was present and last backed up on a date; shared storage contains media files created around that time; and an app database (if available) links those media files to messages or posts. When you build a timeline, use multiple anchors: file timestamps, database timestamps, and backup metadata timestamps. If one source is missing or ambiguous, the others can support or challenge your interpretation.
Step-by-Step: A Simple Correlation Pattern
Step 1: Start with a known event. For example, a screenshot showing a conversation or a downloaded document.
Step 2: Identify its file path and timestamp. Record the directory, filename pattern, and file time values available in your extraction.
Step 3: Search app directories for references. Look in app databases for the filename, a media ID, or a hash-like identifier. Many apps store a mapping between message records and attachment files.
Step 4: Cross-check with backup metadata. If you have a backup, confirm whether the app data or media appears there and whether the backup time aligns with the event window.
Common Pitfalls and How to Avoid Them
Android examinations often go wrong in predictable ways. One pitfall is assuming a folder name is universal; instead, search by package name and consider scoped storage paths. Another is collecting only .db files and forgetting WAL/SHM companions, which can hide the newest records. A third is over-trusting a single timestamp source; app timestamps may be in UTC while file timestamps may reflect local time or be altered by copying. Finally, be careful with “missing” evidence: app uninstalls, cleared caches, and locked-state encryption can all remove or hide artifacts without implying innocence or intent.
Practical Checklist: What to Capture for Each High-Value App
- Package name and version (from backup metadata, app lists, or app directories)
- Main SQLite databases plus
-waland-shmfiles shared_prefsXML and any JSON config files- Media directories under
/sdcard/Android/media/<package>/and legacy app folders - Exported files (chat exports, CSVs, PDFs) in
Downloador app export folders - Any app-specific backup files (encrypted archives, local backup folders)
- Notes about device state and any access limitations observed during acquisition