What Push Notifications Are (and What They Are Not)
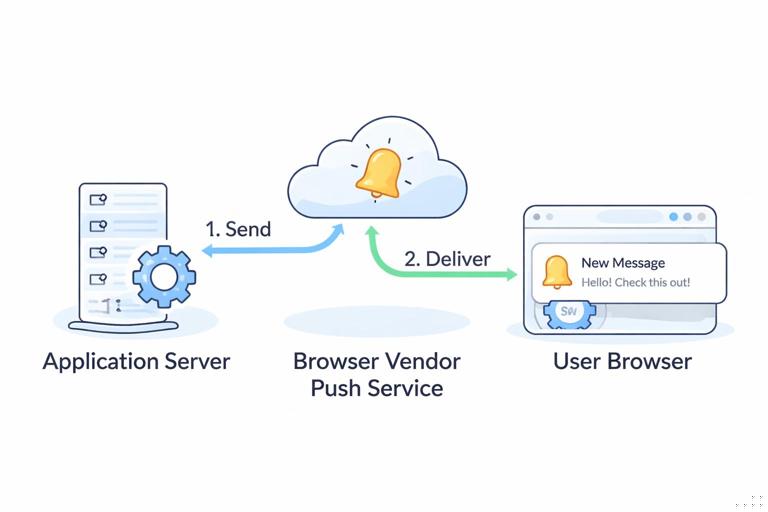
Push notifications let your web app send a message to a user even when the app is not open in a tab. On the web, “push” is a coordinated system involving three major pieces: your application server (where you decide what to send and to whom), a push service (run by the browser vendor, such as Mozilla or Google), and the user’s browser with a service worker that receives the push event and shows a notification.
It helps to separate three related concepts that are often confused:
- Notification: the UI message shown to the user (title, body, icon, actions). This is displayed by the browser/OS notification system.
- Push message: a data payload delivered to the browser via the push service. It can arrive when your site is not open.
- Permission: the user’s explicit choice allowing your origin to show notifications. Without permission, you cannot show notifications, and you usually cannot subscribe to push.
Push notifications are not the same as in-app messages (banners inside your UI) and not the same as email/SMS. They are also not guaranteed delivery: devices can be offline, the OS can throttle background activity, and push services may drop messages under certain conditions. Your design should treat push as “best effort” and ensure the app still works without it.
Web Push Architecture: The Moving Parts
A typical web push flow looks like this:
- Your app asks the user for notification permission at an appropriate time.
- If granted, your app subscribes to push using
PushManager.subscribe(). This creates a push subscription containing an endpoint URL and encryption keys. - Your app sends that subscription to your backend and stores it associated with the user (or an anonymous identifier).
- When you want to notify the user, your backend sends a request to the subscription endpoint (the push service). The payload is encrypted using the subscription keys.
- The push service delivers the push message to the browser on the user’s device.
- Your service worker receives a
pushevent and callsshowNotification()to display a notification. - When the user clicks the notification, the service worker receives a
notificationclickevent and can open/focus a relevant page.
Two practical implications follow from this architecture:
- Listen to the audio with the screen off.
- Earn a certificate upon completion.
- Over 5000 courses for you to explore!

Download the app
- You need a backend. The browser cannot send push messages to itself. Even if you use a third-party provider, there is still a server component making authenticated requests to the push service.
- Subscriptions are per browser profile and can change. Users can clear site data, reinstall the browser, or the subscription can expire/rotate. Your backend must handle invalid subscriptions and re-subscribe when needed.
Permission UX: Principles That Prevent “Prompt Fatigue”
Notification permission is one of the most sensitive prompts on the web. Browsers actively discourage abusive prompting and may automatically block repeated prompts. A good permission UX is less about the API call and more about timing, context, and user control.
Key UX principles
- Never ask on first page load. The user has not yet formed intent or trust. Asking immediately often leads to “Block,” which is hard to recover from.
- Ask after a meaningful action. Tie the request to a user goal: “Notify me when my order ships,” “Alert me when the price drops,” “Remind me about tomorrow’s appointment.”
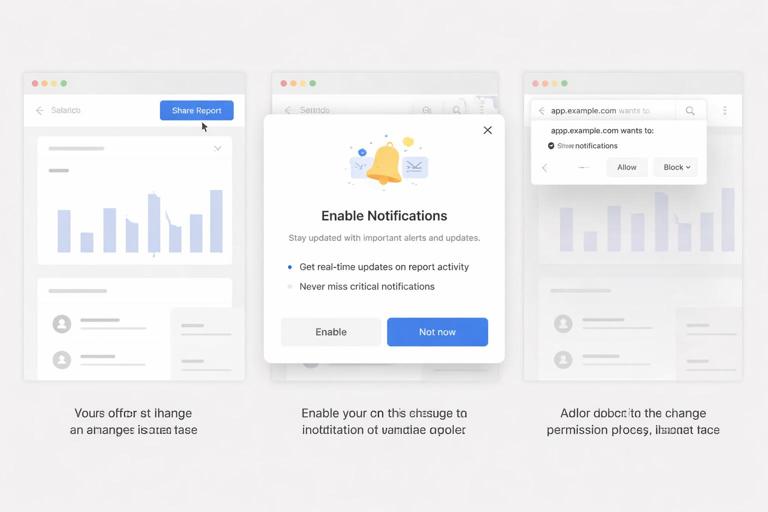
- Use a pre-permission screen (soft ask). Show an in-UI explanation first, with clear benefits and an easy “Not now.” Only call the browser permission prompt after the user clicks “Enable.”
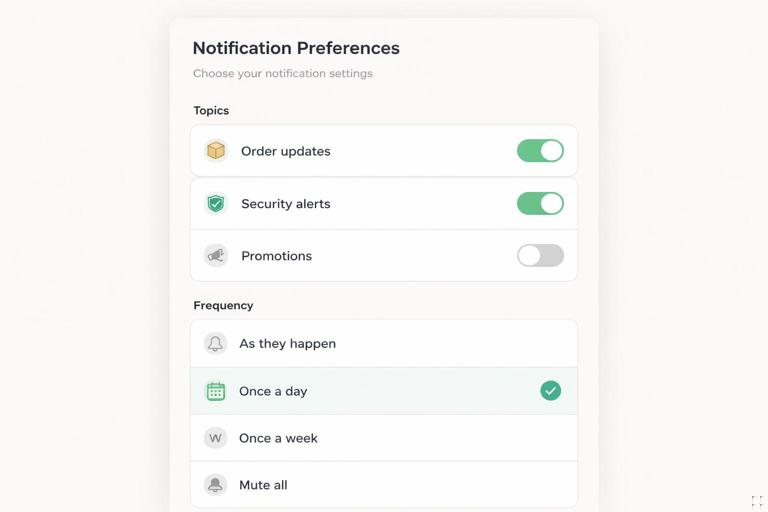
- Offer granular choices. If possible, let users choose topics (e.g., “Order updates” vs “Promotions”). This reduces opt-outs and improves relevance.
- Respect denial and provide recovery paths. If the user denies, don’t keep nagging. Provide a settings page explaining how to enable later.
- Make it reversible. Provide an in-app toggle to unsubscribe and explain how to change browser permission if needed.
Permission states and what they mean
The Notifications API exposes Notification.permission which can be:
- default: the user has not made a choice yet.
- granted: your origin can show notifications.
- denied: the user blocked notifications for your origin.
Additionally, browsers may impose “quiet” prompts or auto-block behavior if users frequently dismiss prompts. Your UX should assume that the prompt might not appear as you expect, and your UI should handle that gracefully.
Designing the “Soft Ask” Screen
A soft ask is a custom UI element (modal, bottom sheet, inline card) that explains why notifications are useful. It should be short, specific, and tied to a user action. A good pattern is:
- Title: “Get shipping updates”
- Benefit bullets: “Delivered when your order ships,” “No spam,” “You can turn this off anytime”
- Primary button: “Enable notifications”
- Secondary: “Not now”
Only after the user clicks “Enable notifications” do you call Notification.requestPermission(). This keeps the browser prompt aligned with user intent.
Example: soft ask component logic
function shouldShowSoftAsk() { // Example heuristics: user is signed in, has completed onboarding, // and has performed an action that benefits from notifications. const hasSeen = localStorage.getItem('notif_soft_ask_seen'); return !hasSeen && Notification.permission === 'default';}function markSoftAskSeen() { localStorage.setItem('notif_soft_ask_seen', '1');}Heuristics should be conservative. It’s better to ask fewer users at the right time than to ask everyone and get blocked.
Step-by-Step: Request Permission and Subscribe to Push
This section focuses on the push-specific steps without rehashing general service worker setup. The core tasks are: (1) ensure you have a service worker registration, (2) request notification permission, (3) subscribe to push with an application server key (VAPID public key), and (4) send the subscription to your backend.
1) Check prerequisites in the UI layer
Not all browsers support push, and some environments restrict it. Before showing an “Enable notifications” button, feature-detect:
function canUsePush() { return 'serviceWorker' in navigator && 'PushManager' in window && 'Notification' in window;}If canUsePush() is false, hide the option or show an explanation like “Notifications aren’t supported in this browser.”
2) Request permission (only after user intent)
async function requestNotificationPermission() { if (Notification.permission === 'granted') return 'granted'; if (Notification.permission === 'denied') return 'denied'; const result = await Notification.requestPermission(); return result;}Handle each outcome:
- granted: proceed to subscribe.
- denied: show a non-intrusive message and a link to settings instructions.
- default: the user dismissed the prompt; treat similarly to “Not now” and avoid reprompting immediately.
3) Subscribe with VAPID public key
Push subscriptions require an application server key (VAPID). You generate a VAPID key pair on your server. The browser needs the public key to create a subscription. The subscription includes an endpoint and keys used for payload encryption.
// Convert a base64url VAPID public key to a Uint8Arrayfunction urlBase64ToUint8Array(base64String) { const padding = '='.repeat((4 - (base64String.length % 4)) % 4); const base64 = (base64String + padding).replace(/-/g, '+').replace(/_/g, '/'); const rawData = atob(base64); const outputArray = new Uint8Array(rawData.length); for (let i = 0; i < rawData.length; ++i) outputArray[i] = rawData.charCodeAt(i); return outputArray;}async function subscribeToPush(registration, vapidPublicKey) { const subscription = await registration.pushManager.subscribe({ userVisibleOnly: true, applicationServerKey: urlBase64ToUint8Array(vapidPublicKey) }); return subscription;}Important: userVisibleOnly: true enforces the rule that every push must result in a user-visible notification (with limited exceptions). Browsers use this to prevent silent background abuse.
4) Send subscription to your backend
The subscription object is JSON-serializable. Send it to your server and store it. Associate it with a user account if you have authentication, or with an anonymous identifier if not.
async function saveSubscription(subscription) { const res = await fetch('/api/push/subscribe', { method: 'POST', headers: { 'Content-Type': 'application/json' }, body: JSON.stringify(subscription) }); if (!res.ok) throw new Error('Failed to save subscription');}On the server, you’ll store at least:
- endpoint
- keys.p256dh and keys.auth
- userId (or anonymous token)
- createdAt, lastUsedAt, topics (optional)
5) Put it together in a single “Enable” handler
async function enableNotificationsFlow(vapidPublicKey) { if (!canUsePush()) throw new Error('Push not supported'); const registration = await navigator.serviceWorker.ready; const permission = await requestNotificationPermission(); if (permission !== 'granted') return { enabled: false, permission }; const subscription = await subscribeToPush(registration, vapidPublicKey); await saveSubscription(subscription); return { enabled: true };}In your UI, call this only after the user clicks your soft ask’s primary button.
Service Worker: Receiving Push and Displaying Notifications
The service worker is responsible for reacting to push events and showing a notification. Even if you send a payload, you should code defensively: payloads can be missing, malformed, or too large. Keep notifications concise and include a click target.
Handle the push event
self.addEventListener('push', event => { let data = {}; try { data = event.data ? event.data.json() : {}; } catch (e) { data = { title: 'Update', body: 'You have a new notification.' }; } const title = data.title || 'Update'; const options = { body: data.body || '', icon: data.icon || '/icons/icon-192.png', badge: data.badge || '/icons/badge-72.png', data: { url: data.url || '/', notificationId: data.id || null }, actions: Array.isArray(data.actions) ? data.actions : [] }; event.waitUntil(self.registration.showNotification(title, options));});Practical tips:
- Use
data.urlto deep-link the user to relevant content. - Set a
badgefor Android-style notification badges where supported. - Keep icons local and cacheable so notifications render quickly.
Handle notification clicks
Click handling is where you connect the notification to an app experience. A common pattern is: if a relevant tab is already open, focus it and navigate; otherwise open a new window.
self.addEventListener('notificationclick', event => { event.notification.close(); const urlToOpen = event.notification.data && event.notification.data.url ? event.notification.data.url : '/'; event.waitUntil((async () => { const allClients = await clients.matchAll({ type: 'window', includeUncontrolled: true }); for (const client of allClients) { if ('focus' in client) { client.focus(); client.postMessage({ type: 'NAVIGATE', url: urlToOpen }); return; } } if (clients.openWindow) { await clients.openWindow(urlToOpen); } })());});If you use postMessage to request navigation, your app should listen for that message and route accordingly. This avoids relying on fragile URL matching and lets you handle stateful navigation.
Payload Design: What to Send and How to Keep It Useful
Push payloads should be small and purposeful. Many push services limit payload size (often a few kilobytes). You generally have two strategies:
- Send full notification content in the payload: title/body/url/actions. This is fast and works offline at receipt time, but you must keep it small and avoid sensitive data.
- Send a minimal payload with an ID: the service worker fetches details from your server when the push arrives. This enables richer content and localization, but requires network availability at delivery time and must be implemented carefully to avoid delays.
For many apps, a hybrid works well: include a user-friendly title/body plus an ID for optional refresh when online.
Example payload JSON
{ "id": "ord_12345", "title": "Order shipped", "body": "Your order #12345 is on the way.", "url": "/orders/12345", "icon": "/icons/icon-192.png", "badge": "/icons/badge-72.png", "actions": [ { "action": "view", "title": "View" }, { "action": "track", "title": "Track" } ]}In notificationclick, you can branch on event.action to handle action buttons differently (e.g., open tracking directly).
Server-Side Fundamentals: VAPID, Sending, and Handling Failures
Your server sends push messages to each subscription endpoint. The endpoint is unique per subscription and typically belongs to a push service domain. Requests must be authenticated using VAPID (Voluntary Application Server Identification). In practice, you use a library to handle JWT creation and payload encryption.
What your backend must do
- Generate and store a VAPID key pair (public/private).
- Expose the VAPID public key to the client (config endpoint or embedded at build time).
- Store subscriptions and associate them with users/topics.
- Send push messages to selected subscriptions.
- Remove invalid subscriptions when the push service returns errors like 404/410 (gone).
Example: sending with Node.js using web-push
import webpush from 'web-push';webpush.setVapidDetails( 'mailto:admin@example.com', process.env.VAPID_PUBLIC_KEY, process.env.VAPID_PRIVATE_KEY);export async function sendPush(subscription, payload) { try { await webpush.sendNotification(subscription, JSON.stringify(payload)); return { ok: true }; } catch (err) { // 410 Gone or 404 Not Found usually means subscription is no longer valid const status = err.statusCode; if (status === 410 || status === 404) { // delete subscription from DB return { ok: false, remove: true, status }; } return { ok: false, status, message: err.message }; }}Operationally, you should send pushes asynchronously (queue or background job) and record outcomes. This helps you keep your subscription list clean and avoid repeatedly sending to dead endpoints.
User Permission UX: Handling “Denied” and “Default” Without Friction
Once a user denies permission, the browser will not show the prompt again unless the user changes it in site settings. Your app should detect this and switch to an educational UI rather than a button that triggers a prompt that will never appear.
UI behavior by permission state
- granted: show “Notifications enabled” with a toggle to unsubscribe (and possibly topic controls).
- default: show your soft ask entry point (“Enable notifications”) at the right moment.
- denied: show “Notifications blocked” with steps to enable in browser settings and an alternative channel (email/SMS) if your product supports it.
Example: permission-aware rendering
function renderNotificationSettings() { const state = Notification.permission; if (state === 'granted') { return { view: 'enabled' }; } if (state === 'denied') { return { view: 'blocked_help' }; } return { view: 'soft_ask_entry' };}For “blocked_help,” include browser-agnostic instructions like “Open your browser’s site settings for this site and allow Notifications,” and optionally detect platform to show more specific steps.
Unsubscribe and Preference Management
Permission alone is not the same as being subscribed. A user can grant permission but you may still want to let them opt out by unsubscribing from push (and deleting the subscription on your server). This is important for trust and compliance.
Client-side unsubscribe
async function unsubscribeFromPush() { const registration = await navigator.serviceWorker.ready; const sub = await registration.pushManager.getSubscription(); if (!sub) return; await fetch('/api/push/unsubscribe', { method: 'POST', headers: { 'Content-Type': 'application/json' }, body: JSON.stringify({ endpoint: sub.endpoint }) }); await sub.unsubscribe();}Note that unsubscribing does not necessarily change Notification.permission. The user may still have granted permission, but you have stopped sending push messages by removing the subscription.
Topics and segmentation (practical model)
Instead of a single “on/off,” store topic preferences in your database and send pushes only for selected topics. A simple approach:
- Store
topics: ['order_updates', 'security']per subscription or per user. - Expose a settings UI where users can toggle topics.
- When sending, filter subscriptions by topic.
This reduces spam perception and improves engagement because users receive fewer, more relevant notifications.
Notification Content UX: Relevance, Frequency, and Trust
Even with perfect technical implementation, push fails if the content strategy is poor. Users judge notifications harshly because they interrupt. Design your notification program with these practical rules:
- Lead with user value. “Your package is arriving today” is better than “Check out our new features.”
- Be specific. Include context (order number, event time) but avoid sensitive personal data on lock screens.
- Control frequency. Batch low-priority updates, and avoid sending multiple notifications in a short window unless truly urgent.
- Use actions sparingly. Actions should map to real user intents (View, Track, Reply). Too many actions reduce clarity.
- Respect quiet hours. If your product has a concept of time zones and user preferences, avoid sending non-urgent notifications at night.
From a UX perspective, the permission prompt is only the beginning. The fastest way to lose permission is to send irrelevant notifications after the user trusted you.
Testing and Debugging Push in Practice
Push involves multiple systems, so debugging requires checking each layer.
Client-side checks
- Verify
Notification.permissionand that a subscription exists viaregistration.pushManager.getSubscription(). - Confirm the service worker is active and controlling the page (in DevTools Application panel).
- Log in the service worker during
pushandnotificationclickevents (DevTools can show service worker console output).
Server-side checks
- Ensure the VAPID public key used by the client matches the private key used to send.
- Inspect push send responses; remove subscriptions that return 404/410.
- Validate payload size and JSON encoding.
Simulating pushes
Many browsers allow triggering a push event from DevTools for testing service worker behavior. Use this to verify your notification rendering and click handling without needing to send real pushes from your server during early development.
Common Pitfalls and How to Avoid Them
- Prompting too early: leads to denial and long-term loss. Fix by using a soft ask and asking after intent.
- No unsubscribe UI: users feel trapped. Fix by adding a clear toggle and honoring it server-side.
- Not handling dead subscriptions: causes repeated send failures. Fix by deleting on 404/410 and re-subscribing when needed.
- Missing deep links: notifications that open the home page feel pointless. Fix by including a relevant
urland routing to the right screen. - Leaking sensitive data: lock screens can show notification text. Fix by keeping content generic for sensitive events and requiring app open for details.
- Overusing promotions: users revoke permission. Fix by topic controls, frequency caps, and prioritizing transactional value.