What “production-ready end to end” means in practice
In this walkthrough, “production-ready” means you can run the server locally, ship it to an environment, and operate it safely under real traffic. The focus is not on re-explaining GraphQL fundamentals, schema modeling, resolver patterns, caching, security, observability, testing, or deployment theory (covered earlier), but on stitching those pieces into a single coherent build: repository layout, boot sequence, request lifecycle, operational guardrails, and the practical glue code that turns a GraphQL server into a dependable service.
We will build a small but realistic “Commerce” API with users, products, and orders. The goal is to show how the server is wired: configuration, server startup, context creation, data-source initialization, plugin chain, health endpoints, background jobs, and safe defaults. You can adapt the same structure to any domain.
Project structure and runtime choices
A production-ready server benefits from a predictable layout. One workable structure is to separate “API surface” (schema and resolvers) from “infrastructure” (HTTP server, config, database clients, queues), and from “operations” (health checks, readiness, migrations, jobs). The following layout is intentionally explicit so each responsibility has a home.
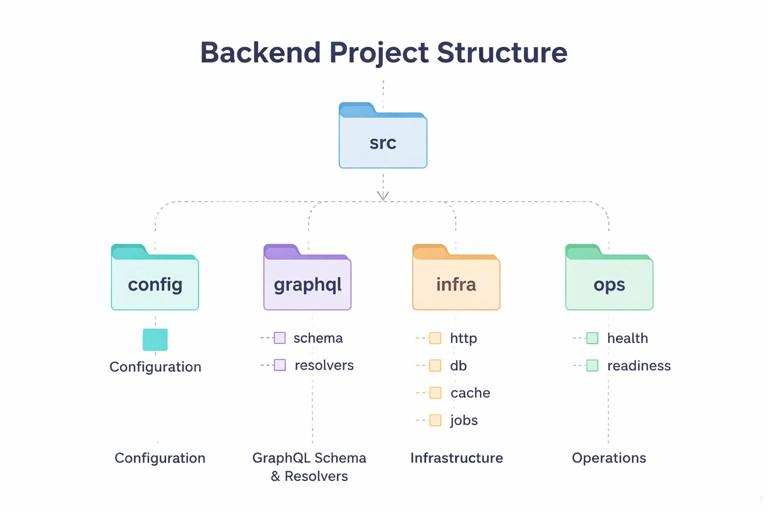
src/ config/ index.ts env.ts graphql/ schema/ *.graphql resolvers/ index.ts types/ Query.ts Mutation.ts User.ts Product.ts Order.ts infra/ http/ server.ts middleware.ts db/ client.ts migrations.ts cache/ redis.ts jobs/ worker.ts schedules.ts ops/ health.ts readiness.ts index.tsRuntime choices: Node.js with TypeScript, Apollo Server (or another GraphQL server) mounted on an HTTP framework like Express or Fastify. The exact library is less important than the pattern: a single entry point that composes configuration, infrastructure clients, and the GraphQL server, then starts listening only after dependencies are ready.
Step 1: Configuration that fails fast
Start by centralizing configuration parsing and validation. In production, “undefined env var” should not become a runtime surprise during a request. Instead, validate at boot and crash early with a clear message. Keep configuration immutable after startup to avoid inconsistent behavior across requests.
- Listen to the audio with the screen off.
- Earn a certificate upon completion.
- Over 5000 courses for you to explore!

Download the app
// src/config/env.ts import { z } from "zod"; const EnvSchema = z.object({ NODE_ENV: z.enum(["development", "test", "production"]).default("development"), PORT: z.coerce.number().default(4000), DATABASE_URL: z.string().url(), REDIS_URL: z.string().url().optional(), LOG_LEVEL: z.enum(["debug", "info", "warn", "error"]).default("info"), SERVICE_NAME: z.string().default("commerce-graphql"), }); export type Env = z.infer<typeof EnvSchema>; export function loadEnv(): Env { const parsed = EnvSchema.safeParse(process.env); if (!parsed.success) { console.error("Invalid environment configuration", parsed.error.flatten()); process.exit(1); } return parsed.data; }Then expose a config object that other modules import. Avoid reading process.env throughout the codebase; it makes behavior harder to test and reason about.
Step 2: Infrastructure clients with explicit lifecycle
Production readiness requires you to manage connections: create them once, reuse them, and close them on shutdown. Treat clients as resources with a lifecycle: init, ready, close. This becomes critical when you add background workers and when you run multiple instances.
Database client
Use a single database client instance per process. Provide a small wrapper that can be awaited during startup and closed during shutdown. If you use an ORM, the same principle applies.
// src/infra/db/client.ts import { Pool } from "pg"; import type { Env } from "../../config/env"; export type Db = { pool: Pool }; export async function createDb(env: Env): Promise<Db> { const pool = new Pool({ connectionString: env.DATABASE_URL, max: 10 }); await pool.query("select 1"); return { pool }; } export async function closeDb(db: Db) { await db.pool.end(); }Redis (optional)
Even if Redis is optional, wire it in a way that the rest of the app can handle “not configured” cleanly. This is useful for local development and for environments where you intentionally disable caching.
// src/infra/cache/redis.ts import { createClient } from "redis"; import type { Env } from "../../config/env"; export type RedisClient = ReturnType<typeof createClient>; export async function createRedis(env: Env): Promise<RedisClient | null> { if (!env.REDIS_URL) return null; const client = createClient({ url: env.REDIS_URL }); client.on("error", (err) => console.error("Redis error", err)); await client.connect(); return client; } export async function closeRedis(client: RedisClient | null) { if (client) await client.quit(); }Step 3: GraphQL server assembly as composition, not magic
Instead of instantiating the GraphQL server in a single file with many inline options, build it from smaller functions: load schema, build resolvers, create context factory, attach plugins, and return a ready-to-mount handler. This makes it testable and easier to evolve.
Schema loading
In production, you typically bundle schema files. Load them at startup and keep them in memory. If you use code-first generation, the same idea applies: build the schema once at boot.
// src/graphql/schema/index.ts import { readFileSync } from "node:fs"; import { join } from "node:path"; export function loadTypeDefs(): string { const schemaPath = join(process.cwd(), "src/graphql/schema/schema.graphql"); return readFileSync(schemaPath, "utf8"); }Resolver registry
Keep resolvers organized by type. Export a single resolver map. This is less about GraphQL basics and more about operational clarity: when a production incident points to a field, you want to find it quickly.
// src/graphql/resolvers/index.ts import Query from "./types/Query"; import Mutation from "./types/Mutation"; import User from "./types/User"; import Product from "./types/Product"; import Order from "./types/Order"; export const resolvers = { Query, Mutation, User, Product, Order };Step 4: Context factory that wires request-scoped dependencies
The context is where request-scoped objects live: authenticated user, request ID, per-request loaders, and any request-level caches. The key production concern is to ensure request isolation: no cross-request leakage, no shared mutable state, and consistent timeouts.
Define a context type and a factory that receives the HTTP request and returns the context. Include a request ID (from an incoming header or generated), and attach shared clients (db, redis) plus request-scoped helpers.
// src/graphql/context.ts import crypto from "node:crypto"; import type { Db } from "../infra/db/client"; import type { RedisClient } from "../infra/cache/redis"; export type GraphQLContext = { requestId: string; db: Db; redis: RedisClient | null; user: { id: string; roles: string[] } | null; now: Date; }; export function makeContextFactory(deps: { db: Db; redis: RedisClient | null }) { return async function context({ req }: { req: any }): Promise<GraphQLContext> { const requestId = req.headers["x-request-id"] ?? crypto.randomUUID(); const user = req.user ?? null; return { requestId, db: deps.db, redis: deps.redis, user, now: new Date() }; }; }In a real server, req.user is typically set by earlier HTTP middleware. The important part in this walkthrough is the boundary: HTTP middleware authenticates and enriches the request; GraphQL context reads the result and exposes it to resolvers.
Step 5: HTTP server with GraphQL plus operational endpoints
Production services rarely expose only GraphQL. You typically add endpoints for health, readiness, and sometimes build info. Keep these endpoints outside GraphQL so they remain available even if GraphQL is degraded, and so load balancers can check them cheaply.
// src/infra/http/server.ts import express from "express"; import { ApolloServer } from "@apollo/server"; import { expressMiddleware } from "@apollo/server/express4"; import { loadTypeDefs } from "../../graphql/schema"; import { resolvers } from "../../graphql/resolvers"; import { makeContextFactory } from "../../graphql/context"; import { healthHandler, readinessHandler } from "../../ops/health"; export async function createHttpServer(deps: any) { const app = express(); app.get("/healthz", healthHandler()); app.get("/readyz", readinessHandler(deps)); app.use(express.json({ limit: "1mb" })); const server = new ApolloServer({ typeDefs: loadTypeDefs(), resolvers }); await server.start(); app.use("/graphql", expressMiddleware(server, { context: makeContextFactory(deps) })); return { app, apollo: server }; }Note the order: JSON parsing, then GraphQL middleware. Also note that health endpoints are registered before any potentially expensive middleware. In production, you may also add request timeouts, compression, and CORS policies at the HTTP layer, but keep them explicit and centrally configured.
Step 6: Readiness checks that reflect dependency state
Health and readiness are different. Health usually means “process is alive.” Readiness means “safe to receive traffic.” Readiness should verify critical dependencies like the database. If Redis is optional, treat it accordingly: either require it in production or mark it as degraded but still ready, depending on your operational policy.
// src/ops/health.ts import type { Db } from "../infra/db/client"; export function healthHandler() { return (_req: any, res: any) => res.status(200).json({ ok: true }); } export function readinessHandler(deps: { db: Db }) { return async (_req: any, res: any) => { try { await deps.db.pool.query("select 1"); res.status(200).json({ ready: true }); } catch (e: any) { res.status(503).json({ ready: false, error: "db_unavailable" }); } }; }Step 7: A request lifecycle you can reason about
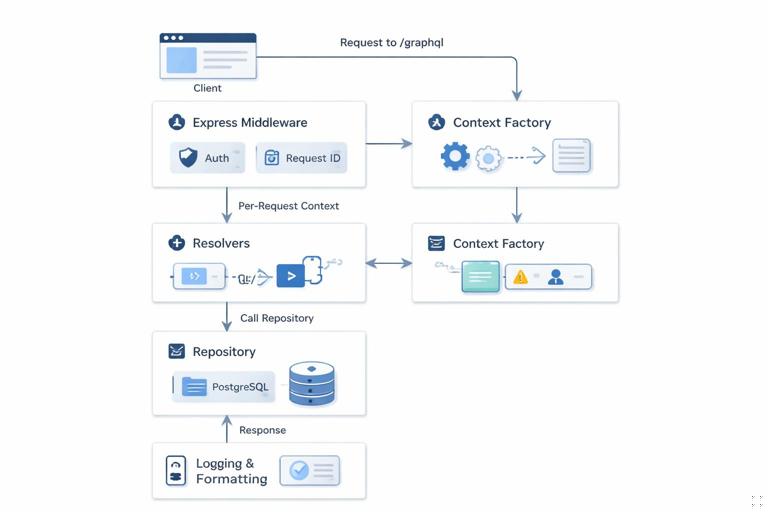
When incidents happen, you need to know what happens to a request from the moment it hits the server. A practical lifecycle for this project is: assign request ID, authenticate at HTTP layer, parse JSON, execute GraphQL, format errors, log outcome, and return response. The key is to ensure each step is deterministic and observable.
Implement request ID and authentication as Express middleware so they run for both GraphQL and any REST-like endpoints you add later. Keep middleware small and focused.
// src/infra/http/middleware.ts import crypto from "node:crypto"; export function requestId() { return (req: any, _res: any, next: any) => { req.headers["x-request-id"] = req.headers["x-request-id"] ?? crypto.randomUUID(); next(); }; } export function fakeAuthForLocalDev() { return (req: any, _res: any, next: any) => { const header = req.headers["x-user-id"]; if (header) req.user = { id: String(header), roles: ["USER"] }; next(); }; }In production you would replace fakeAuthForLocalDev with real authentication middleware, but the pattern remains: middleware enriches req, context reads it, resolvers consume it.
Step 8: Implement a minimal vertical slice (Query + Mutation + nested fields)
To validate the end-to-end wiring, implement one vertical slice that touches the database and returns nested objects. Choose a slice that resembles real usage: list products, create an order, and fetch the order with its items. The goal is not to explore schema design patterns, but to ensure the server boot, context, db access, and resolver wiring all work together.
Database access helpers
Keep SQL in a small “repository” module so resolvers remain thin. This also makes it easier to reuse logic from background jobs later.
// src/infra/db/repo/orders.ts import type { Db } from "../client"; export async function createOrder(db: Db, input: { userId: string; items: { productId: string; qty: number }[] }) { const client = await db.pool.connect(); try { await client.query("begin"); const orderRes = await client.query( "insert into orders(user_id, status) values ($1, 'PENDING') returning id, user_id, status, created_at", [input.userId] ); const order = orderRes.rows[0]; for (const item of input.items) { await client.query( "insert into order_items(order_id, product_id, qty) values ($1, $2, $3)", [order.id, item.productId, item.qty] ); } await client.query("commit"); return order; } catch (e) { await client.query("rollback"); throw e; } finally { client.release(); } } export async function getOrderById(db: Db, id: string) { const res = await db.pool.query("select id, user_id, status, created_at from orders where id = $1", [id]); return res.rows[0] ?? null; } export async function getOrderItems(db: Db, orderId: string) { const res = await db.pool.query( "select oi.order_id, oi.product_id, oi.qty, p.name, p.price_cents from order_items oi join products p on p.id = oi.product_id where oi.order_id = $1", [orderId] ); return res.rows; }Resolvers for the slice
Resolvers should translate between GraphQL arguments and repository calls, and enforce request-level invariants like “must be authenticated.” Keep them small so production debugging is straightforward.
// src/graphql/resolvers/types/Mutation.ts import { createOrder } from "../../../infra/db/repo/orders"; export default { createOrder: async (_: any, args: any, ctx: any) => { if (!ctx.user) throw new Error("UNAUTHENTICATED"); const order = await createOrder(ctx.db, { userId: ctx.user.id, items: args.input.items }); return { id: order.id }; }, };// src/graphql/resolvers/types/Query.ts import { getOrderById } from "../../../infra/db/repo/orders"; export default { order: async (_: any, args: any, ctx: any) => { if (!ctx.user) throw new Error("UNAUTHENTICATED"); const order = await getOrderById(ctx.db, args.id); if (!order) return null; if (order.user_id !== ctx.user.id) throw new Error("FORBIDDEN"); return order; }, };// src/graphql/resolvers/types/Order.ts import { getOrderItems } from "../../../infra/db/repo/orders"; export default { id: (o: any) => o.id, status: (o: any) => o.status, createdAt: (o: any) => o.created_at, items: async (o: any, _args: any, ctx: any) => { const rows = await getOrderItems(ctx.db, o.id); return rows.map((r: any) => ({ productId: r.product_id, qty: r.qty, product: { id: r.product_id, name: r.name, priceCents: r.price_cents }, })); }, };This slice proves the server can: start, accept requests, build context, authenticate, run a transaction, and resolve nested fields. Once this works, you can expand field-by-field with confidence.
Step 9: Background jobs and out-of-band work
Production systems often need to do work that should not block a GraphQL request: sending emails, syncing search indexes, generating invoices, or expiring sessions. The key is to separate the “API process” from the “worker process,” but share the same configuration and infrastructure client factories.
In this project, add a worker entry point that connects to the same database and processes a queue. Even if you don’t implement a real queue yet, structure the code so it is easy to add later. The important part is that the worker uses the same validated config and lifecycle management, and that it can be deployed and scaled independently.
// src/infra/jobs/worker.ts import { loadEnv } from "../../config/env"; import { createDb, closeDb } from "../db/client"; export async function startWorker() { const env = loadEnv(); const db = await createDb(env); const shutdown = async () => { await closeDb(db); process.exit(0); }; process.on("SIGTERM", shutdown); process.on("SIGINT", shutdown); // Polling loop placeholder setInterval(async () => { await db.pool.query("select 1"); }, 5000); }This separation prevents a common production failure mode: long-running background work consuming the same event loop and resources as request handling.
Step 10: Graceful shutdown and startup ordering
Production readiness includes predictable behavior during deploys and autoscaling. Implement graceful shutdown: stop accepting new connections, allow in-flight requests to finish for a short period, then close clients. Also ensure startup ordering: initialize dependencies first, then start listening, then mark readiness.
// src/index.ts import http from "node:http"; import { loadEnv } from "./config/env"; import { createDb, closeDb } from "./infra/db/client"; import { createRedis, closeRedis } from "./infra/cache/redis"; import { createHttpServer } from "./infra/http/server"; async function main() { const env = loadEnv(); const db = await createDb(env); const redis = await createRedis(env); const { app, apollo } = await createHttpServer({ db, redis }); const server = http.createServer(app); server.listen(env.PORT, () => console.log(`listening on :${env.PORT}`)); const shutdown = async () => { server.close(async () => { await apollo.stop(); await closeRedis(redis); await closeDb(db); process.exit(0); }); }; process.on("SIGTERM", shutdown); process.on("SIGINT", shutdown); } main().catch((e) => { console.error(e); process.exit(1); });Two practical notes: first, ensure the process exits with non-zero code on boot failure so orchestration can restart it. Second, keep shutdown idempotent; signals can arrive multiple times.
Step 11: Local developer workflow that mirrors production
To avoid “works on my machine,” make local startup resemble production: same entry point, same env validation, same health endpoints. Use a local database container and run migrations as a separate explicit step. Provide scripts that developers can run without guessing.
// package.json (scripts) { "scripts": { "dev": "ts-node-dev --respawn src/index.ts", "start": "node dist/index.js", "worker": "ts-node src/infra/jobs/worker.ts", "migrate": "node dist/infra/db/migrations.js" } }When local and production are aligned, operational issues are easier to reproduce: readiness failures, connection pool exhaustion, and startup ordering problems show up early.
Step 12: Operational guardrails as code, not tribal knowledge
At this point, you have a server that starts reliably, exposes health endpoints, and supports a vertical slice of functionality. The remaining production readiness work is to ensure guardrails are encoded in the server assembly: maximum request body size, timeouts, and consistent error formatting. Even if the specific strategies were covered earlier, the key here is to wire them into the boot process so they are always on.
Practically, this means: configure HTTP server timeouts, enforce JSON size limits, ensure the GraphQL server has the right plugins enabled, and ensure every request is tagged with requestId for correlation. The “end to end” goal is that you can point a load balancer at /readyz, send traffic to /graphql, and operate the service with predictable behavior under deploys and restarts.