What You Will Build in This Mini Project
In this mini project, you will produce a complete 45-minute lesson package that is ready to teach: a timed agenda, teacher talk track, student-facing materials, quick checks for understanding, differentiation options, and a short exit ticket. The focus is not on theory; it is on assembling a coherent set of materials that fit the clock. You will use AI as a drafting partner to generate components quickly, then you will curate, trim, and sequence them so the lesson runs smoothly in real classroom conditions.
By the end, you will have: a one-page timing plan, a slide-by-slide or section-by-section outline, a student handout, a short practice task, an answer key, and feedback language you can reuse while circulating. You will also have a “teacher dashboard” note that lists what to watch for, common misconceptions, and exactly what to do if students finish early or fall behind.
Choose a Narrow Lesson Focus (So 45 Minutes Is Realistic)
A 45-minute lesson can only do a few things well. The most common failure mode is trying to teach a full unit’s worth of ideas in one period. For this project, pick a narrow focus that can be demonstrated, practiced, and checked within a single class. Think in terms of one skill, one strategy, or one concept application.
Examples of narrow foci: solving one type of equation (two-step linear), identifying claim and evidence in a paragraph, using a specific lab safety procedure, interpreting a single graph type, writing a topic sentence, or applying one historical thinking move to a short source. The narrower the focus, the easier it is to create materials that match the time and to generate targeted practice and feedback.
Define Your Lesson Inputs Before You Prompt
AI outputs improve when you provide concrete inputs. For this mini project, gather a small “lesson input bundle” before you ask for any materials. Keep it short, but specific. You will reuse this bundle across multiple prompts so everything stays consistent.
- Listen to the audio with the screen off.
- Earn a certificate upon completion.
- Over 5000 courses for you to explore!

Download the app
Lesson Input Bundle Checklist
- Grade/level and course
- Topic and narrow focus
- Student profile (language needs, IEP/504 considerations, typical reading level, class size)
- Materials available (devices? paper? lab tools? whiteboards?)
- Constraints (no homework, limited printing, mixed attendance, etc.)
- Required format (slides, handout, stations, discussion)
- Time: exactly 45 minutes
Keep this bundle in a note so you can paste it into prompts. The goal is to prevent the AI from drifting into unrealistic activities or mismatched reading levels.
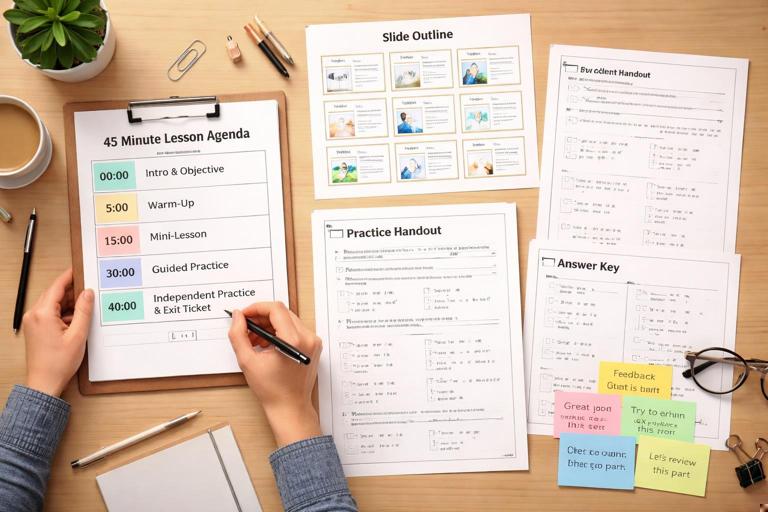
Build the Timing Skeleton First (Minute-by-Minute)
Before generating handouts or slides, create a timing skeleton. This is the backbone of the lesson. A reliable 45-minute structure often includes: a short opener, a brief model, guided practice, independent practice, and a check for understanding. Your skeleton should include time buffers and teacher moves, not just activities.
Timing Skeleton Template (45 Minutes)
- 0–3: Entry task / retrieval / warm-up
- 3–6: Share goal and success criteria in student-friendly language
- 6–14: Mini-lesson (model + think-aloud)
- 14–24: Guided practice (you lead, students respond)
- 24–38: Independent or partner practice (you circulate)
- 38–43: Quick check / exit ticket
- 43–45: Pack-up + preview next step
Adjust the template to your context. If your class needs longer transitions, shorten the independent practice slightly. If you have a lab setup, build in setup and cleanup minutes explicitly. The key is to assign minutes to everything, including “hand out papers,” “students move seats,” and “collect exit tickets.”

Prompt 1: Generate a 45-Minute Lesson Plan That Obeys the Clock
Your first AI task is to draft a lesson plan that matches your timing skeleton. You are not asking for a perfect final plan; you are asking for a draft that respects time and includes teacher actions and student actions. Make the AI commit to minute ranges and to short, teachable steps.
Copy-and-Paste Prompt: Timed Lesson Draft
Draft a 45-minute lesson plan with a minute-by-minute agenda that totals exactly 45 minutes. Use this lesson input bundle: [PASTE BUNDLE]. Use this timing skeleton: [PASTE SKELETON]. For each segment, include: teacher actions, student actions, exact directions to say (1–2 sentences), and what evidence of learning I should look for. Keep reading level appropriate for students. Do not add extra activities beyond the time limits.When you receive the draft, scan it for “time leaks.” Common leaks include long discussions without structure, too many examples in the model, or independent practice that assumes instant understanding. If the AI gives you 10 minutes of direct instruction, trim it. In a 45-minute lesson, a concise model plus active practice usually beats extended explanation.
Prompt 2: Create Student-Facing Materials That Match the Plan
Once the timing is stable, generate student-facing materials. The most important rule: the handout must match what you will actually do in class. If the plan includes a think-aloud with one example, the handout should include that same example and space for students to annotate. If the plan includes guided practice with three items, the handout should include those three items in the same order.
Copy-and-Paste Prompt: Student Handout
Create a one-page student handout for the lesson described here: [PASTE THE TIMED LESSON DRAFT]. Include: (1) a brief objective in student-friendly language, (2) a short model/example with annotations, (3) guided practice items with space for work, (4) independent practice items, and (5) an exit ticket. Keep the total length realistic for 45 minutes. Provide it in clean text formatting suitable for printing.After generating the handout, check for pacing. A quick test is to estimate time per item. If independent practice has 12 problems, and each takes 2 minutes, you have already exceeded the available time. Reduce quantity and increase quality: fewer items with better prompts, including one item that requires explanation or justification.
Prompt 3: Generate an Answer Key and “Circulation Feedback” Lines
To make the lesson teachable, you need an answer key and short feedback lines you can use while circulating. Feedback lines are short, reusable phrases that point students to the next step without giving away the answer. They also help you stay consistent across the room.
Copy-and-Paste Prompt: Answer Key + Feedback Lines
Using this student handout: [PASTE HANDOUT], create: (1) a complete answer key, (2) a list of common errors/misconceptions for each section, and (3) 8–12 short circulation feedback lines I can say to students (e.g., prompts, questions, hints) aligned to those misconceptions. Keep feedback lines brief and student-friendly.As you review, ensure the feedback lines are actionable. “Try again” is not actionable; “Check whether you distributed the negative sign to both terms” is. Also ensure misconceptions are realistic for your students, not generic. If the AI lists misconceptions that do not match your topic, revise and regenerate with a note like “Focus misconceptions on X and Y only.”
Prompt 4: Differentiate Without Creating a Second Lesson
Differentiation in a 45-minute lesson should feel like small, manageable adjustments, not a separate track. Aim for “same task, different supports” or “same skill, different entry points.” You can ask AI to generate scaffolds and extensions that plug into your existing handout.
Copy-and-Paste Prompt: Scaffolds and Extensions
Based on this lesson and handout: [PASTE], propose differentiation that does NOT require a separate lesson. Provide: (1) 3 scaffolds for students who need support (sentence frames, worked example, reduced choices, vocabulary support), (2) 3 extensions for fast finishers (deeper reasoning, error analysis, create-your-own), and (3) one plan for English learners (language objectives + supports). Keep everything aligned to the same skill and doable within the same 45-minute period.Integrate these supports directly into your materials. For example, add optional hint boxes, sentence starters, or a “challenge” question at the bottom. Avoid adding extra pages unless you have a reliable printing routine. The goal is to keep the classroom flow unified.
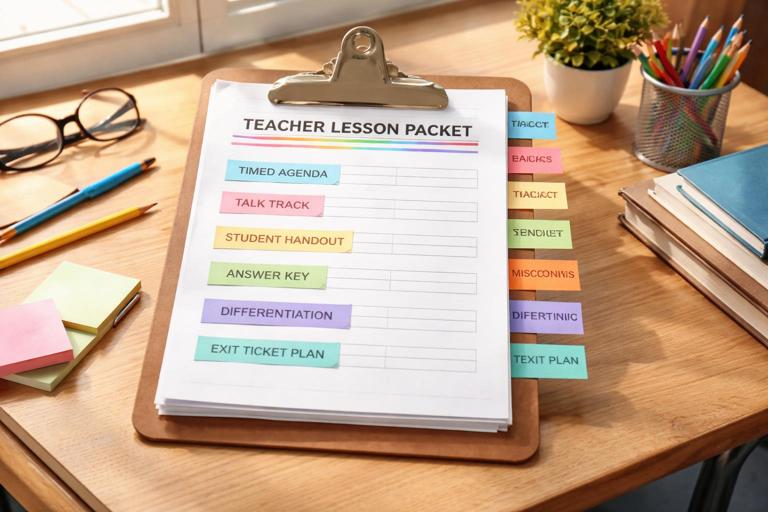
Assemble the Teacher-Ready Lesson Packet
Now you will assemble everything into a single packet you can teach from. This is where many educators lose time: materials exist, but they are scattered. Your packet should be organized in the order you will use it, with quick-reference cues.
Teacher Packet Components
- Timed agenda (one page)
- Teacher talk track (short script for key moments)
- Student handout (final)
- Answer key (final)
- Misconceptions + feedback lines (quick list)
- Differentiation notes (where to deploy supports)
- Exit ticket collection plan (how you will sort or review)
To make this packet usable, add “micro-cues” such as: “If 60% miss #2 in guided practice, reteach using Example A,” or “If students finish early, assign Extension 1.” These cues reduce decision fatigue during class.
Practical Walkthrough: Build a 45-Minute Lesson (Example You Can Adapt)
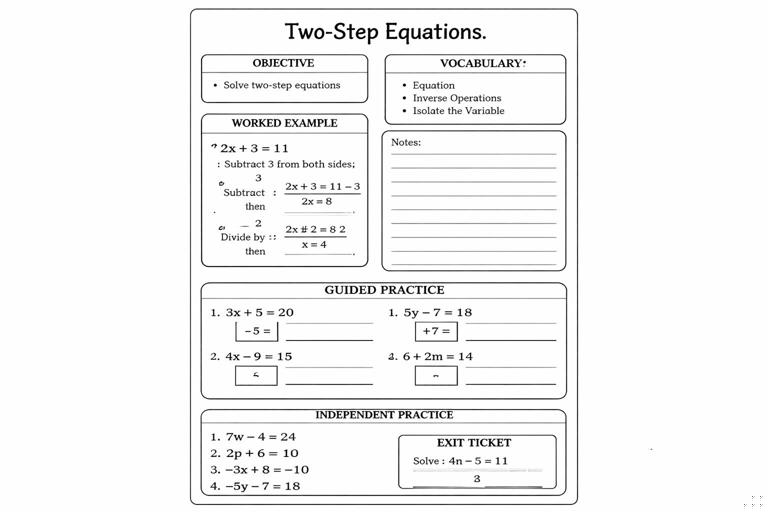
The following example shows how the pieces fit together. You can swap the topic, but keep the structure. Example topic: Grade 7 math, solving two-step equations of the form ax + b = c. Student profile: mixed readiness, some students struggle with negative numbers, two English learners needing vocabulary support, class size 28, no devices, printing available for one page per student.
Step 1: Timing Skeleton (Filled)
- 0–3: Warm-up (2 one-step equations)
- 3–6: Goal + success criteria (“I can solve ax + b = c and check my solution.”)
- 6–14: Model with think-aloud (one example, one check)
- 14–24: Guided practice (3 problems, choral responses, mini-check after each)
- 24–38: Independent practice (6 problems: 4 standard, 2 with negatives)
- 38–43: Exit ticket (2 problems: one standard, one error analysis)
- 43–45: Collect + quick preview
Step 2: Teacher Talk Track (Key Moments)
Warm-up transition (minute 3): “Pencils down. Today we move from one-step equations to two-step equations. The goal is to isolate x using inverse operations in a clear order.”
Model cue (minute 6): “Watch how I undo addition or subtraction first, then undo multiplication or division. I will say each move and why I’m doing it.”
Guided practice cue (minute 14): “You try the first step on your own, then we compare. If your first step doesn’t keep the equation balanced, we’ll fix it together.”
Step 3: Student Handout Structure (One Page)
Top section: objective and vocabulary box (isolate, inverse operations, coefficient). Model section: one worked example with two blank “why” prompts for students to fill. Guided practice: three problems with a “first step” box. Independent practice: six problems, with two marked “challenge: negatives.” Exit ticket: one solve, one “find the mistake” worked solution to critique.
Step 4: Circulation Feedback Lines (Examples)
- “What operation is currently attached to x? Which inverse undoes it?”
- “Before dividing, did you remove the constant term?”
- “Show me the step where you did the same thing to both sides.”
- “Check your sign when you subtract; what happens to +7 if you subtract 7?”
- “Try plugging your x back in. Does the left side equal the right side?”
Step 5: Differentiation Plug-Ins
Scaffold: add a mini “operation order” strip on the handout: “Undo +/− first, then ×/÷.” Scaffold: provide one partially completed problem in independent practice. English learner support: vocabulary box with simple definitions and a sentence frame: “I subtract ___ from both sides because ___.” Extension: add one equation with variables on both sides as an optional challenge, clearly labeled as extra.
Quality Control: Stress-Test the Lesson Against Real Classroom Time
Before teaching, run a quick stress test. Read your talk track out loud and time it. Many “8-minute” models become 14 minutes when spoken. Also estimate how long it takes to pass out materials, get attention, and reset after guided practice. If your plan is tight, build a 2-minute buffer by trimming independent practice quantity or shortening the opener.
Stress-Test Checklist
- Can the model be delivered in 6–8 minutes including student note-taking?
- Does guided practice include a clear response routine (hands, whiteboards, call-and-response)?
- Is independent practice short enough to finish for most students, with an extension for early finishers?
- Is the exit ticket aligned to the exact skill and quick to grade?
- Do you have a plan if students struggle at the guided practice stage?
If any answer is “no,” revise the materials before class. The goal is not perfection; it is teachability.
Prompt 5: Create a Slide/Board Outline That Matches the Handout
If you use slides or board work, generate a simple outline that mirrors the handout sections. This keeps students oriented and reduces cognitive load. The outline should include what you write, what students write, and when you pause for checks.
Copy-and-Paste Prompt: Slide/Board Plan
Create a slide-by-slide (or board section-by-section) outline for this 45-minute lesson: [PASTE TIMED PLAN + HANDOUT]. For each slide/section, include: title, what the teacher displays/writes, what students do, and a quick check question. Keep it minimal and aligned exactly to the handout order. No extra activities.After generating the outline, verify alignment: the example on the board should match the example on the handout; the guided practice order should match; the exit ticket should appear at the end with clear directions.
Make the Exit Ticket Easy to Use for Next-Day Instruction
An exit ticket is most useful when it sorts students into a few clear groups you can act on. Design it so you can quickly categorize responses: “got it,” “almost,” “needs support,” or similar. Ask AI to format the exit ticket so it is quick to scan and includes one item that reveals a common misconception.
Copy-and-Paste Prompt: Sortable Exit Ticket
Revise the exit ticket in this handout: [PASTE]. Make it 2 items total and design it so I can sort student responses into 3 groups quickly. Provide: (1) the revised exit ticket, (2) the correct answers, (3) what each wrong answer likely indicates, and (4) a 5-minute re-teach plan for the next class based on the groups.Integrate the sorting plan into your teacher packet. For example, add a note: “If students miss Item 2 due to sign errors, start next class with a 5-minute mini-lesson on negatives and balancing.” This turns the exit ticket into an instructional lever, not just a formality.
Mini Project Deliverable: Your Final 45-Minute Lesson Kit
Your final deliverable for this mini project is a cohesive kit that you can print or open and teach immediately. It should include the timed agenda, student handout, answer key, slide/board outline, differentiation plug-ins, and exit ticket sorting plan. The kit should be internally consistent: same vocabulary, same example numbers, same sequence, and tasks that fit the minutes you have.
To finalize, do one last pass to remove anything that does not directly support the narrow focus. If a section feels “nice to have” but costs time, cut it. In a 45-minute lesson, clarity and pacing are the features that make everything else work.