Why Interoperability Matters: Let HTMX Fetch, Let Alpine Orchestrate
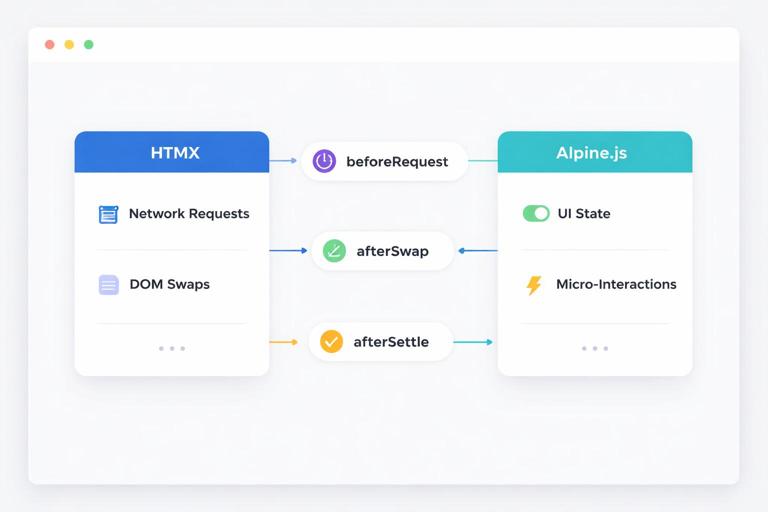
When you combine HTMX and Alpine.js, the most important design decision is deciding who “owns” which responsibilities. A practical split is: HTMX owns network requests and DOM swapping, while Alpine owns local UI state, micro-interactions, and coordination between elements. Interoperability is the glue that makes this split feel seamless: Alpine needs to react when HTMX swaps new HTML into the page, and HTMX sometimes needs to be triggered by Alpine-driven events or state changes. The key tools are events (custom and built-in) and lifecycle hooks on both sides.
Event Vocabulary: What Each Library Emits and Listens To
HTMX is event-driven: it emits events before and after requests, before and after swaps, and when errors occur. Alpine is also event-driven: it listens to DOM events, can dispatch custom events, and has lifecycle hooks for initialization and teardown. Interoperability works best when you treat events as your contract: HTMX emits “something changed in the DOM,” and Alpine responds by initializing behavior or updating state; Alpine emits “user intent happened,” and HTMX responds by making a request or reloading a fragment.
HTMX events you will use most for Alpine interoperability
- htmx:beforeRequest: fired before an HTTP request is sent; useful to set Alpine state like loading flags.
- htmx:afterRequest: fired after the request completes (success or failure); useful to clear loading flags.
- htmx:beforeSwap: fired before HTMX swaps content into the DOM; useful to inspect/modify the response or cancel swap.
- htmx:afterSwap: fired after new content is swapped; useful to re-initialize Alpine components or focus elements.
- htmx:afterSettle: fired after the DOM has “settled” (after swap + any settling delay); useful when you need layout measurements or transitions.
- htmx:responseError: fired on non-2xx responses; useful for Alpine-driven toast notifications.
Alpine hooks and event tools that pair well with HTMX
- x-init: run code when an Alpine component initializes; useful for attaching event listeners scoped to a component.
- $watch: react to Alpine state changes; useful to dispatch events that HTMX can listen to.
- $dispatch: dispatch a custom DOM event; useful to trigger HTMX requests via hx-trigger.
- x-effect: run reactive effects; useful for syncing state to attributes that HTMX uses.
- x-on (or @): listen for DOM events; useful to respond to HTMX lifecycle events.
Pattern 1: Use HTMX Lifecycle Events to Drive Alpine Loading State
A common integration need is showing loading indicators, disabling buttons, or preventing duplicate submissions. HTMX already knows when requests start and end, so let HTMX events toggle Alpine state. The trick is scoping: you want the loading state to apply to a specific component, not the entire page.
Step-by-step: component-scoped loading state using htmx:beforeRequest and htmx:afterRequest
1) Create an Alpine component that owns a loading boolean. 2) Listen for HTMX events on the component root. 3) Only react when the event originated from inside the component (so nested HTMX interactions don’t leak across components). 4) Bind UI state (disabled, spinner visibility) to loading.
<div x-data="{ loading: false }" x-on:htmx:beforeRequest.window="if ($el.contains($event.target)) loading = true" x-on:htmx:afterRequest.window="if ($el.contains($event.target)) loading = false"> <form hx-post="/profile" hx-target="#profile-fragment" hx-swap="outerHTML"> <label>Name</label> <input name="name" /> <button type="submit" x-bind:disabled="loading"> <span x-show="!loading">Save</span> <span x-show="loading">Saving...</span> </button> </form></div>This approach keeps HTMX responsible for the request while Alpine handles the presentation. The .window listener ensures you catch events even if the form is swapped out, and the $el.contains($event.target) check ensures the state only changes for requests originating inside the component.
- Listen to the audio with the screen off.
- Earn a certificate upon completion.
- Over 5000 courses for you to explore!

Download the app
Pattern 2: Re-Initialize Alpine After HTMX Swaps (and Avoid Double Initialization)
HTMX swaps in new HTML fragments. Those fragments may contain Alpine directives (x-data, x-on, etc.). Depending on how Alpine is loaded and configured, you may need to explicitly initialize Alpine on newly added nodes. Even when Alpine auto-detects mutations, you still need a strategy to avoid duplicate listeners or re-running setup logic when content is replaced frequently.
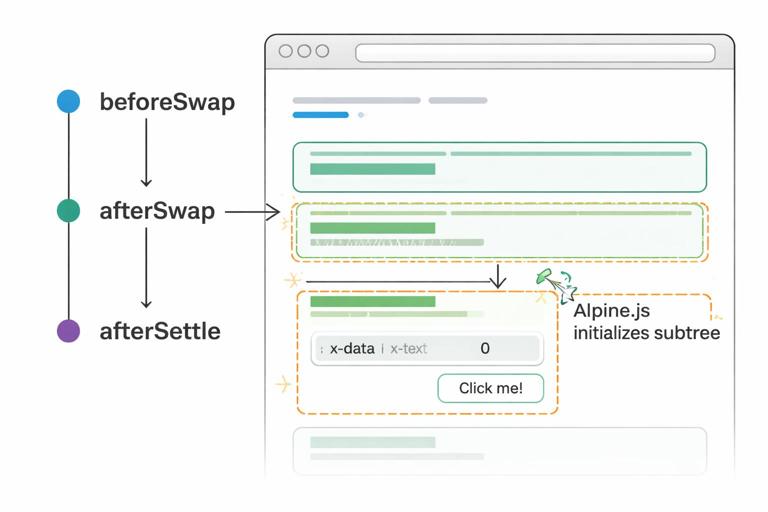
Step-by-step: initialize Alpine on swapped content using htmx:afterSwap
1) Add a global listener for htmx:afterSwap. 2) Identify the swapped-in element (available as event.detail.target in HTMX events). 3) Initialize Alpine on that subtree only. 4) Keep initialization idempotent: design Alpine components so re-rendering replaces the old DOM rather than stacking listeners.
<script>document.body.addEventListener('htmx:afterSwap', (event) => { const swappedTarget = event.detail.target; if (window.Alpine && swappedTarget) { Alpine.initTree(swappedTarget); }});</script>Use this when you know fragments can include Alpine components and you want deterministic behavior. If you already rely on Alpine’s mutation observer, you might not need it, but it can still be useful when you disable mutation observation for performance or want explicit control.
Guarding against repeated setup work inside x-init
If your Alpine component performs setup in x-init (like registering global listeners), ensure it cleans up or avoids duplicates. A simple technique is to register listeners on the element itself (so they disappear when the element is swapped out), or to store a flag on the element dataset.
<div x-data="{}" x-init="if (!$el.dataset.inited) { $el.dataset.inited = '1'; /* setup */ }"> ...</div>Pattern 3: Trigger HTMX Requests from Alpine via Custom Events
Sometimes Alpine owns the interaction logic (keyboard shortcuts, multi-control state, or derived state), and you want HTMX to fetch a fragment when Alpine decides it’s time. Instead of calling HTMX APIs directly, you can keep things declarative: dispatch a custom event from Alpine and let HTMX listen via hx-trigger.
Step-by-step: $dispatch + hx-trigger
1) Put hx-get (or hx-post) on an element that will perform the request. 2) Set hx-trigger to a custom event name. 3) From Alpine, dispatch that event on the element (or bubble it from a child). 4) Optionally include event detail to pass parameters.
<div x-data="{ q: '' }"> <input type="search" x-model="q" @keydown.enter="$dispatch('search-requested')" placeholder="Search..." /> <div id="results" hx-get="/search" hx-trigger="search-requested from:closest div" hx-include="closest div" hx-target="#results" hx-swap="innerHTML"> <!-- results fragment swaps here --> </div></div>Here, Alpine decides when to search (Enter key), and HTMX performs the request. hx-include collects the input value without Alpine needing to build query strings manually. The from:closest div selector scopes the trigger so the results area listens to the right component.
Pattern 4: Let HTMX Events Update Alpine Stores (Cross-Component Coordination)
When a fragment swap changes something that other parts of the page care about (like a cart count, unread notifications, or a “dirty” flag), you can use HTMX lifecycle events to update an Alpine store. This avoids tight coupling between fragments: the fragment swap happens, an event fires, and a store updates; any Alpine component bound to that store reacts automatically.
Step-by-step: update a global Alpine store from htmx:afterSwap
1) Create an Alpine store (or a top-level Alpine component) that holds shared state. 2) Add a convention: fragments that affect shared state include data attributes (like data-cart-count) on a predictable element. 3) After swap, read those attributes and update the store.
<script>document.addEventListener('alpine:init', () => { Alpine.store('app', { cartCount: 0 });});document.body.addEventListener('htmx:afterSwap', (event) => { const target = event.detail.target; const marker = target && target.querySelector && target.querySelector('[data-cart-count]'); if (marker) { const count = parseInt(marker.getAttribute('data-cart-count'), 10); if (!Number.isNaN(count) && window.Alpine) { Alpine.store('app').cartCount = count; } }});</script> <header> <span x-text="$store.app.cartCount">0</span></header>This pattern keeps fragments self-describing: the server renders the new count into the fragment, and the client reads it after swap. You avoid hidden coupling like “the cart endpoint must also return JSON for the header.”
Pattern 5: Use hx-on to Handle HTMX Events Inline (and Call Alpine-Friendly Code)
HTMX provides hx-on to attach event handlers declaratively in markup. This can be useful when you want behavior to travel with the fragment itself: the server returns HTML that includes the event wiring, and you don’t need a global script. You can use hx-on to dispatch custom events that Alpine listens to, or to toggle attributes that Alpine reacts to.
Step-by-step: fragment-local event wiring with hx-on and Alpine listeners
1) In the fragment root, add hx-on:htmx:afterSwap (or another event) to dispatch a custom event. 2) In an Alpine component, listen for that custom event and update local state.
<div x-data="{ saved: false }" @profile-saved.window="saved = true; setTimeout(() => saved = false, 1500)"> <div id="profile-fragment" hx-on:htmx:afterSwap="window.dispatchEvent(new CustomEvent('profile-saved'))"> <!-- swapped profile content --> </div> <p x-show="saved">Saved.</p></div>This is especially helpful when the “saved” feedback is not part of the swapped fragment, but you still want it to react to the swap completion.
Pattern 6: Focus Management and Micro-UX After Swaps with Alpine + afterSettle
After HTMX swaps content, you often want to focus an input, scroll a container, or run a small animation. These are UI concerns, so Alpine is a good place to express them. Use htmx:afterSettle when you need the DOM to be stable (for example, when CSS transitions or layout calculations matter).
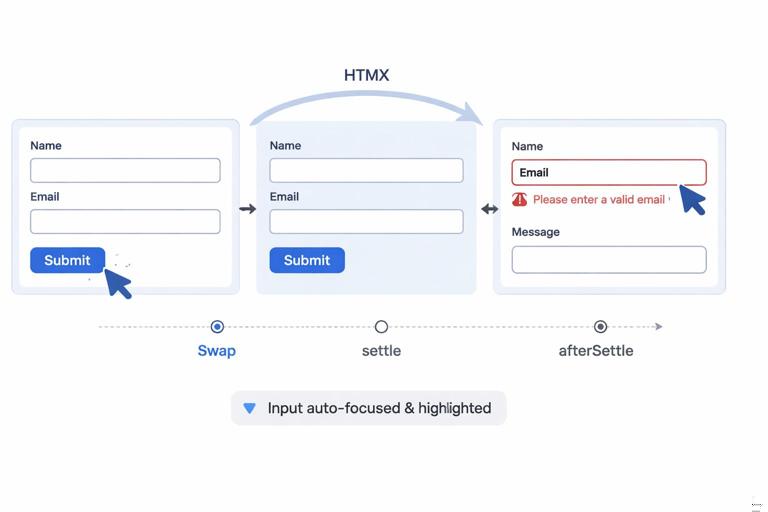
Step-by-step: focus the first invalid field after a validation swap
1) Ensure the server renders validation errors with a predictable marker (like aria-invalid="true"). 2) Listen for htmx:afterSettle. 3) If the swap happened inside your form component, find the first invalid field and focus it.
<form x-data="{}" hx-post="/account" hx-target="this" hx-swap="outerHTML" x-on:htmx:afterSettle.window="if ($el.contains($event.detail.target)) { const el = $el.querySelector('[aria-invalid=\"true\"]'); if (el) el.focus(); }"> ...</form>This keeps the server in charge of validation and markup, while Alpine enhances usability after the fragment is rendered.
Pattern 7: Passing Data Between Alpine and HTMX Without JSON APIs
Interoperability often means “Alpine has state; HTMX needs to send it.” You can do this without building JSON endpoints by letting Alpine write state into standard form controls or hidden inputs, then letting HTMX include them in requests. This keeps your server endpoints HTML-oriented while still allowing rich client-side state.
Step-by-step: sync Alpine state into hidden inputs for HTMX to submit
1) Store UI state in Alpine (like selected filters). 2) Mirror that state into hidden inputs using x-model. 3) Use HTMX to submit or fetch with hx-include or by placing the inputs inside the requesting element.
<div x-data="{ filters: { inStock: true, sort: 'newest' } }"> <label><input type="checkbox" x-model="filters.inStock"> In stock</label> <select x-model="filters.sort"> <option value="newest">Newest</option> <option value="price">Price</option> </select> <input type="hidden" name="inStock" x-model="filters.inStock"> <input type="hidden" name="sort" x-model="filters.sort"> <button hx-get="/products" hx-target="#grid" hx-include="closest div">Apply</button> <div id="grid"></div></div>The server receives standard parameters and returns an HTML fragment. Alpine remains purely client-side state, but it is expressed in HTML inputs so HTMX can submit it naturally.
Pattern 8: Handling HTMX Errors with Alpine Notifications
When requests fail, you want consistent feedback: a toast, banner, or inline message. HTMX emits error events; Alpine can render and time-dismiss notifications. Keep the error UI separate from the fragment being swapped so it doesn’t disappear when content updates.
Step-by-step: global error toast driven by htmx:responseError
1) Create an Alpine store for notifications. 2) Listen for htmx:responseError on document.body. 3) Push a message into the store. 4) Render the toast component bound to the store.
<div x-data x-init="$store.toast = { show: false, message: '' }" class="toast-host"> <div x-show="$store.toast.show" x-text="$store.toast.message"></div></div><script>document.body.addEventListener('htmx:responseError', (event) => { const status = event.detail.xhr ? event.detail.xhr.status : 0; const msg = status ? `Request failed (${status}). Please try again.` : 'Network error. Please try again.'; if (window.Alpine && Alpine.store('toast')) { Alpine.store('toast').message = msg; Alpine.store('toast').show = true; setTimeout(() => { Alpine.store('toast').show = false; }, 2500); }});</script>If you prefer not to use stores, you can place the toast in a top-level Alpine component and update it via custom events. The key is that HTMX provides the error signal, and Alpine provides the UI behavior.
Pattern 9: Coordinating Transitions: Alpine x-show with HTMX Swaps
Alpine transitions are great for showing and hiding elements, but HTMX swaps can remove elements instantly. If you want a smooth transition when replacing content, you need to decide whether the old content should animate out before the swap, or whether the new content should animate in after the swap. A practical approach is: animate in after swap using Alpine, and avoid trying to animate out content that HTMX will remove.
Step-by-step: animate newly swapped content in
1) Wrap the swapped fragment in an Alpine component that controls a visible flag. 2) Set visible to false initially. 3) On htmx:afterSwap or htmx:afterSettle, set visible to true to trigger transitions.
<div x-data="{ visible: false }" x-init="visible = false" x-on:htmx:afterSwap.window="if ($el.contains($event.detail.target)) visible = true"> <div x-show="visible" x-transition> <div id="panel" hx-get="/panel" hx-trigger="load" hx-target="#panel" hx-swap="innerHTML"></div> </div></div>This keeps the swap simple and uses Alpine for the animation. If the fragment itself contains the transition wrapper, ensure it is included in the server-rendered HTML so it appears consistently after swaps.
Interoperability Checklist: Practical Rules to Prevent Surprises
Use these rules of thumb when wiring HTMX and Alpine together. Prefer listening to HTMX events at the window or body level, but scope your reactions using $el.contains($event.target) so state changes remain local. Prefer custom events for Alpine-to-HTMX triggering, because they keep markup declarative and reduce direct API calls. Prefer reading shared state from swapped HTML (data attributes, hidden inputs) rather than inventing parallel JSON endpoints. When you need to run code after swaps, choose htmx:afterSwap for DOM availability and htmx:afterSettle for layout-dependent work. Finally, keep your Alpine components resilient to being replaced: assume the DOM can be destroyed and recreated at any time, and avoid global side effects unless you also implement cleanup.