Why controlled inputs matter in operations workbooks
Operations dashboards, trackers, and forecasts fail most often at the input layer. A metric can be calculated perfectly, but if the source entries are inconsistent (wrong dates, misspelled status values, swapped units, missing required fields), the downstream model becomes noisy and hard to trust. Controlled inputs are the set of techniques that constrain what users can enter, guide them to enter it correctly, and make incorrect entries visible immediately.
In Excel, controlled inputs are primarily implemented with Data Validation, standardized forms (a consistent input layout), and a small set of supporting patterns: helper lists, dependent dropdowns, input messages, error alerts, and conditional formatting to flag exceptions. When you combine these, you reduce rework, prevent silent errors, and make your Power Query refreshes more stable because the incoming data is predictable.
Design principles for controlled inputs
1) Constrain first, then calculate
Do not rely on formulas to “clean up” bad inputs after the fact. Instead, prevent invalid values from being entered. For example, if a field must be one of five statuses, use a dropdown list rather than allowing free text and later mapping misspellings.
2) Separate user-entered fields from calculated fields
Standardized forms work best when users can clearly see which cells they should touch. Keep input cells in a dedicated area, and keep calculated outputs locked or visually distinct. This reduces accidental overwrites and makes validation easier to apply consistently.
3) Use short, stable codes behind friendly labels
Operational categories often evolve. A stable code (e.g., “OTD_FAIL”) can remain consistent even if the display label changes (“Late Delivery” vs “Delivery Delay”). You can present friendly labels to users while storing codes for reliability in reporting and Power Query transformations.
- Listen to the audio with the screen off.
- Earn a certificate upon completion.
- Over 5000 courses for you to explore!

Download the app
4) Make required fields explicit
Users should not have to guess what is mandatory. Use input messages, visual cues (e.g., light fill color), and validation rules that block saving incomplete records (or at least flag them clearly).
Data Validation: core tools and where they fit
Data Validation is found in Data > Data Validation. It can restrict entries by type (whole number, decimal, date, time, text length), by list, or by a custom formula. It also supports an Input Message (a tooltip shown when the cell is selected) and an Error Alert (Stop/Warning/Information) shown when an invalid value is entered.
Stop vs Warning vs Information
- Stop: blocks invalid entries. Use for fields that must be correct (dates, IDs, statuses).
- Warning: allows override. Use when exceptions are possible but should be rare (e.g., quantity outside typical range).
- Information: informs but does not prevent. Use when you want guidance without enforcement.
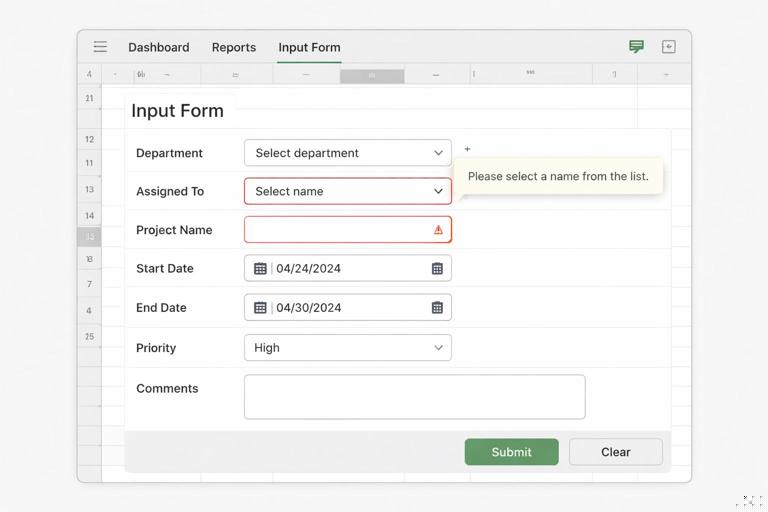
Building standardized forms (without repeating earlier workbook-structure topics)
A standardized form is a consistent input interface that feeds your operational dataset. It can be a simple “New Record” panel on a sheet, a structured row-entry area above a table, or a dedicated “Intake” sheet that users fill out. The key is consistency: same field order, same validation rules, same labels, and the same definitions.

Recommended form layout elements
- Header area: record metadata such as “Entered by”, “Entry date/time” (often auto-filled), and a unique record ID (generated).
- Field blocks: grouped logically (e.g., Requester info, Work details, Scheduling, Closure).
- Help text: short definitions or examples next to tricky fields (or via Input Message).
- Submission check: a visible “Ready?” indicator based on required fields being complete.
Even without macros, you can make a form feel guided by using dropdowns, date pick constraints, and conditional formatting that highlights missing required inputs.
Step-by-step: create a controlled input field set for a process tracker
Example scenario: you maintain a maintenance work order tracker. Users must enter: Work Order ID, Site, Priority, Requested Date, Due Date, Status, Owner, and Estimated Hours. You want to prevent invalid entries and standardize categories.
Step 1: create the allowed lists (validation sources)
Create a small area (often on a “Lists” sheet) with one column per list:
- Sites: North, South, East, West
- Priority: P1, P2, P3, P4
- Status: New, Scheduled, In Progress, Waiting Parts, Complete, Canceled
- Owners: a maintained list of technicians or teams
Keep list values exactly as you want them stored. Avoid trailing spaces and inconsistent capitalization.
Step 2: apply list validation to dropdown fields
Select the input cells for Site (or the entire Site column if users enter directly into a table). Go to Data > Data Validation:
- Allow: List
- Source: select the Sites list range
- Check In-cell dropdown
Repeat for Priority, Status, and Owner.
Step 3: add input messages that reduce ambiguity
In the Data Validation dialog, open the Input Message tab and add short guidance. Examples:
- Status: “Choose the current workflow stage. Use ‘Waiting Parts’ only when parts are the blocker.”
- Priority: “P1 = safety/critical downtime; P2 = urgent; P3 = standard; P4 = low.”
Keep messages short so users actually read them.
Step 4: validate dates with logical constraints
For Requested Date, use Allow: Date and constrain to a reasonable window if appropriate (e.g., last 365 days to next 365 days). For Due Date, you often need a rule that ensures it is not earlier than Requested Date.
Use a Custom validation formula for Due Date. Suppose Requested Date is in cell B5 and Due Date is in C5 (adjust to your layout). Select the Due Date input range and set:
- Allow: Custom
- Formula:
=OR($C5="",AND($B5<>"",$C5>=$B5))This allows blank due dates (if optional) but enforces Due Date ≥ Requested Date when both are present. If Due Date is required, remove the blank allowance:
=AND($B5<>"",$C5>=$B5)Step 5: validate numeric fields with ranges and units
Estimated Hours should be numeric and within a sensible range. Use:
- Allow: Decimal
- Data: between
- Minimum: 0
- Maximum: 24 (or whatever fits your process)
If you want to allow larger values but flag them, use a Warning alert instead of Stop.
Step 6: enforce Work Order ID format and uniqueness
IDs are a common failure point. If your Work Order ID must follow a pattern like “WO-” plus 6 digits (WO-000123), you can validate the format with a Custom rule. If the ID is in A5:
=OR($A5="",AND(LEFT($A5,3)="WO-",LEN($A5)=9,ISNUMBER(--RIGHT($A5,6))))To enforce uniqueness within a column (e.g., A:A for IDs in a table), use COUNTIF. If the ID entry cell is A5 and the ID column range is A:A (or the table column):
=COUNTIF($A:$A,$A5)=1Combine format + uniqueness:
=AND(LEFT($A5,3)="WO-",LEN($A5)=9,ISNUMBER(--RIGHT($A5,6)),COUNTIF($A:$A,$A5)=1)Apply this validation to the ID input range. Note: if you include the header row in the COUNTIF range or have blanks, test carefully. In tables, prefer structured references for clarity, but keep in mind Data Validation sometimes behaves differently with structured references depending on Excel version.
Dependent dropdowns (cascading lists) for cleaner categorization
Many operational forms require a hierarchy: Department → Line → Machine, or Region → Site → Area. Dependent dropdowns prevent users from selecting invalid combinations.
Approach A: named ranges with INDIRECT (simple, but sensitive)
This classic method uses named ranges whose names match the parent selection. Example: if the parent dropdown is “Site” with values North, South, etc., you create named ranges North, South, etc., each containing the allowed Areas.
Then set Data Validation for the dependent cell (Area) to:
=INDIRECT($B5)Where B5 is the Site cell. This works but has drawbacks: it breaks if names contain spaces or special characters, and INDIRECT is volatile (can slow large workbooks).
Approach B: dynamic arrays with FILTER (more robust)
If you have Microsoft 365, you can build a dependent list using FILTER and reference a spill range. Suppose you have a mapping table with columns Site and Area. In a helper cell (e.g., H5), generate the list of Areas for the selected Site in B5:
=SORT(UNIQUE(FILTER(Map[Area],Map[Site]=$B5)))This spills a clean list. Then set Data Validation for the Area input cell to reference the spill range (e.g., H5#). This avoids INDIRECT and is easier to maintain. Keep the helper spill range near the form or on a helper sheet.
Required fields and completeness checks
Data Validation can block invalid values, but it does not automatically enforce “all required fields must be filled before the record is considered valid” unless you implement a check.
Technique: a “Ready” indicator using COUNTA
Assume required fields are in B5:B12. In a visible cell, compute:
=IF(COUNTA(B5:B12)=ROWS(B5:B12),"READY","MISSING")You can then apply conditional formatting to show READY in green and MISSING in red. If some fields can be blank, exclude them from the required range or create a more explicit check.
Technique: explicit required-field formula
For mixed requirements (some required, some conditional), create a formula that returns TRUE only when the record is acceptable. Example: Due Date required only when Status is Scheduled or In Progress:
=AND($B5<>"",$C5<>"",$D5<>"",OR(NOT(OR($E5="Scheduled",$E5="In Progress")),$F5<>""))Where B5/C5/D5 are required basics, E5 is Status, and F5 is Due Date. Use this formula in a “Ready?” cell and in conditional formatting rules to highlight missing items.
Make invalid data visible: Circle Invalid Data and conditional formatting
Even with validation, invalid data can enter via paste, imports, or older entries created before rules existed. Excel provides Data > Data Validation > Circle Invalid Data to visually mark cells that violate current rules.
Also add conditional formatting to flag issues that validation cannot catch easily, such as:
- Overdue items: Due Date < TODAY() and Status not Complete/Canceled
- Stale items: Status unchanged for N days
- Outliers: Estimated Hours > typical threshold
Example conditional formatting formula for overdue (Due Date in C, Status in D, applied to rows):
=AND($C5<>"",$C5<TODAY(),NOT(OR($D5="Complete",$D5="Canceled")))Standardize text inputs when free text is unavoidable
Some fields must be free text (problem description, root cause notes). You can still control them:
- Text length validation to prevent overly short entries (e.g., at least 15 characters for a meaningful description).
- Prohibit leading/trailing spaces via custom validation.
- Disallow certain characters if they break downstream systems (e.g., pipes, tabs).
Minimum length example (Description in E5):
=OR($E5="",LEN(TRIM($E5))>=15)No leading/trailing spaces example:
=OR($E5="",$E5=TRIM($E5))Copying validation safely across ranges and new rows
A common failure is that validation exists for current rows but not for new entries. To keep validation consistent:
- Apply validation to the entire intended input range (e.g., a full column range in a table column, or a generous row range in a form).
- When adding new fields, use Paste Special > Validation to copy only the validation rules to other cells.
- Periodically use Circle Invalid Data to detect gaps.
If users paste data from emails or other sheets, encourage Paste Special > Values into validated cells. Note that pasting can still overwrite validation in some cases; if this is a recurring issue, consider protecting the sheet while leaving input cells unlocked.
Protecting the form while keeping it usable
Controlled inputs work best when users cannot accidentally modify labels, formulas, or list sources. Use worksheet protection to lock everything except input cells.
Step-by-step: protect a standardized form
- Select input cells and set them to Unlocked (Format Cells > Protection > uncheck Locked).
- Leave all other cells locked (default).
- Go to Review > Protect Sheet.
- Allow only necessary actions (typically Select unlocked cells, maybe Sort/Filter if needed).
This does not replace validation, but it prevents structural drift in the form over time.
Validation patterns that support Power Query stability
Power Query refreshes are more reliable when columns have consistent data types and categories. Controlled inputs help you maintain:
- Consistent date columns: no mixed text dates and true dates.
- Consistent numeric columns: no “N/A” text in numeric fields; use blanks and handle them explicitly.
- Consistent categories: dropdown lists prevent new misspellings that create extra categories in pivots and visuals.
- Stable keys: uniqueness validation reduces duplicate IDs that can cause join explosions.
When exceptions must be captured (e.g., unknown owner), include an explicit “Unknown” or “Unassigned” option in the list rather than allowing blanks or free text. This makes exceptions measurable and easier to filter.

Practical mini-recipes (copy/paste ready)
Allow only weekdays for a date field
If the date is in B5 and weekends are not allowed:
=AND($B5<>"",WEEKDAY($B5,2)<=5)Allow only times within a shift window
If Start Time is in C5 and must be between 06:00 and 18:00:
=AND($C5>=TIME(6,0,0),$C5<=TIME(18,0,0))Force selection from list (no manual typing)
Use list validation and set Error Alert to Stop. Also ensure the list does not include blanks. If you must allow blank (optional field), include a blank option intentionally by leaving the first list item empty or by using a helper list that includes an empty string.
Prevent duplicates in a “one record per day per site” log
If Site is in B, Date is in C, and you want unique combinations per row:
=COUNTIFS($B:$B,$B5,$C:$C,$C5)=1Apply this as Custom validation to either Site or Date (or both). This is useful for daily KPI logs where duplicates create double counting.
Common pitfalls and how to avoid them
Validation sources move or get edited
If the list range changes, dropdowns may break or include blanks. Keep lists in a stable area and consider naming the ranges. If multiple people maintain lists, protect the list sheet and allow edits only in the list column cells.
Users paste over validation
Train users to paste values only, and protect the sheet structure. If you distribute templates, periodically reapply validation using Paste Special > Validation from a “golden” row.
Custom formulas use wrong relative references
When applying a custom validation formula to a range, Excel evaluates it relative to the active cell at the time you set the rule. Use $ to lock columns (and sometimes rows) appropriately. Test by selecting different cells in the range and trying edge cases.
Dropdowns become too long
Very long lists reduce usability. Consider hierarchical dropdowns (dependent lists) or split categories into two fields (e.g., Category and Subcategory). Keep the stored values standardized and short.