What “Safety-Proofing” Means (and What It Does Not)
Safety-proofing is the process of reducing predictable injury risks by matching the environment to a child’s current abilities. The key idea is that risk changes faster than many adults expect: a baby who could not roll yesterday may roll today; a toddler who could not reach the counter last week may climb this week. Safety-proofing is not about creating a “zero-risk” home or school (which is impossible), and it is not a substitute for supervision. It is a practical system that combines three actions: (1) anticipate what the child can do next, (2) remove or block hazards that become reachable, and (3) check environments repeatedly because conditions change (visitors, deliveries, seasonal gear, renovations, new toys, new routines).
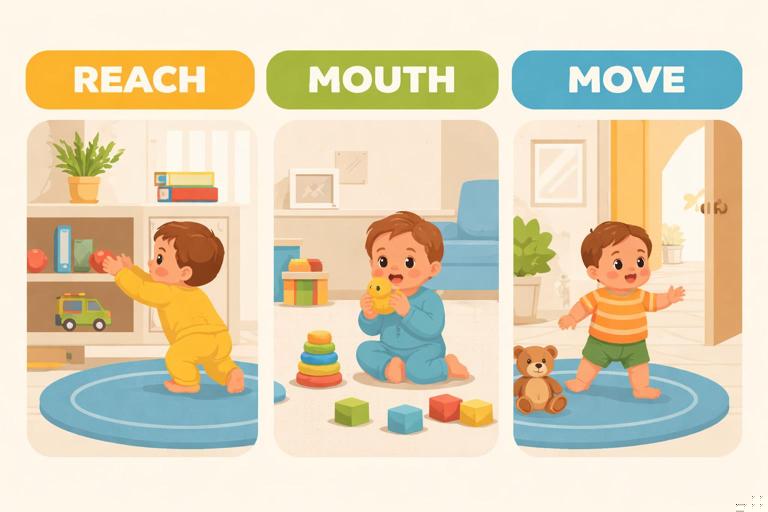
A useful way to think about safety-proofing is the “Reach–Mouth–Move” model: children explore by reaching, putting things in their mouth, and moving into new spaces. Each developmental stage changes reach height, grip strength, mobility, and curiosity. Your safety plan should change accordingly.
How to Use Developmental Stages Without Relying on Age Alone
Age ranges are helpful, but children develop at different speeds. Instead of focusing only on age, watch for capability milestones that trigger new hazards:
- Rolling (fall risk from beds, changing tables, sofas)
- Sitting and pivoting (grabbing cords, pulling objects down)
- Crawling (access to floor-level hazards, stairs, pet bowls)
- Pulling to stand (furniture tip-over, window access, hot surfaces)
- Walking/running (falls, doors, outdoor access)
- Climbing (counters, shelves, bunk beds, playground structures)
- Tool use (using chairs, toys, sticks to reach higher)
- Social independence (opening doors, going to friends’ houses, online challenges that lead to risky behavior)
When you notice a new capability, do a quick “environment reset” the same day. Many injuries happen during the short window between a new skill and an updated environment.
Step-by-Step: A Repeatable Safety-Proofing Walkthrough
Step 1: Choose the Child’s Viewpoint
Get down to the child’s height and move through the space the way they do. For infants and toddlers, this often means crawling or kneeling. For school-age children, it means checking what they can access by climbing or using furniture as a step.
- Listen to the audio with the screen off.
- Earn a certificate upon completion.
- Over 5000 courses for you to explore!

Download the app
Step 2: Do a “3-Foot Sweep” and a “6-Foot Sweep”
- 3-foot sweep: scan the floor and low surfaces for small objects, cords, unstable furniture, open containers, sharp edges, and reachable chemicals.
- 6-foot sweep: scan higher surfaces for items that can fall, be pulled down, or be climbed to reach (tablecloths, appliance cords, heavy décor, unsecured TVs).
Step 3: Identify Hazards by Category
Use consistent categories so you do not miss “non-obvious” risks:
- Falls: stairs, windows, balconies, furniture climbing, slippery rugs
- Strangulation/entrapment: cords, blind strings, gaps in furniture, crib spaces
- Sharp/impact: corners, glass, tools, sports equipment
- Heat/electric: stoves, kettles, heaters, outlets, chargers
- Water: tubs, buckets, pools, ponds, pet water bowls
- Traffic/outdoor: driveways, bikes, scooters, parking lots
- Weapons: firearms, knives, archery equipment
- Pets/animals: feeding areas, litter boxes, leashes, bite risk zones
Step 4: Apply the “Eliminate–Separate–Secure–Supervise” Ladder
- Eliminate: remove the hazard entirely (best option).
- Separate: keep child and hazard in different zones (gates, locked doors).
- Secure: anchor, lock, cover, or contain (cabinet locks, furniture straps).
- Supervise: use when the first three are not possible, but do not rely on supervision alone for high-impact hazards.
Step 5: Recheck After Changes
Trigger a recheck after: guests visit (purses, medications), holidays (decorations, cords), moving furniture, new pets, new sports gear, home repairs, or when a child learns a new skill.
Safety-Proofing by Developmental Stage
Newborn to Rolling Infant: “Stationary, Then Suddenly Not”
Primary risks come from falls from elevated surfaces, unsafe sleep spaces, and adult items placed “just for a moment.” Even before rolling, babies can wiggle and shift.
- Falls: never rely on a baby staying put on a bed, couch, or changing surface. Set up a changing station with supplies within arm’s reach so you do not turn away.
- Hot liquids: create a “no hot drink over baby” rule. Use travel mugs with secure lids and keep mugs away from edges.
- Cords and dangling items: keep phone chargers, lamp cords, and curtain cords out of reach of any surface where baby lies or is carried.
- Carriers and seats: place infant seats on the floor, not on tables or counters. Check that straps are used correctly every time.
Practical example: If you change diapers on a bed, place a basket with wipes, diapers, and cream on the bed itself, not on a dresser across the room. The goal is to remove the “one step away” moment.
Sitting, Scooting, Crawling: “Everything on the Floor Is a Toy”
Once a child can move, the floor becomes their main exploration zone. Hazards that were “not a problem” become immediate.
- Small objects: do daily floor checks in high-traffic areas (living room, kitchen, entryway). Pay attention after visitors, older siblings’ play, or craft time.
- Stairs: use barriers at top and bottom. Keep stairs clear of objects that can be stepped on or thrown.
- Low cabinets and drawers: separate safe items (plastic bowls) from unsafe items (cleaners, sharp tools). A helpful strategy is to create one “yes drawer” with safe kitchen items so the child can explore without constant “no.”
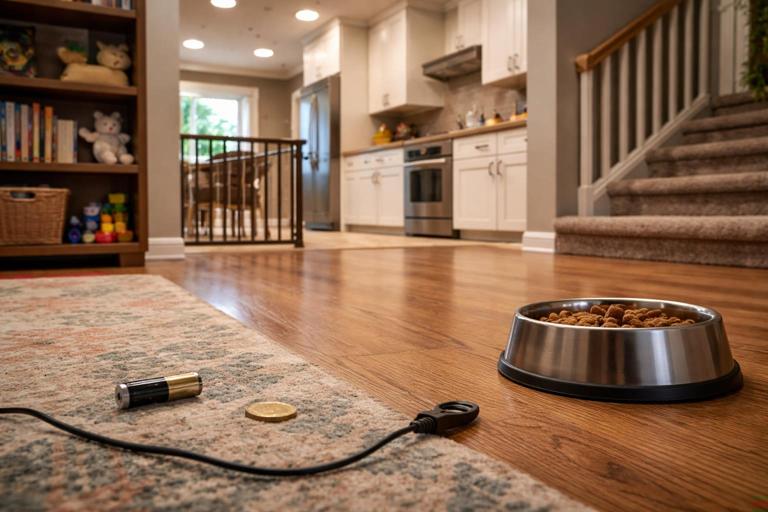
- Pet zones: keep pet food, water bowls, and litter boxes in a separated area. Crawlers are drawn to these.
- Furniture stability: crawling children pull up on anything. Anchor heavy furniture and keep unstable items off low shelves.
Step-by-step quick check for crawlers:
- Start at the entryway: remove coins, keys, batteries, and small accessories from reachable surfaces.
- Move to the living room: check under couches and coffee tables for small items.
- Scan cords: bundle and route behind furniture; avoid dangling loops.
- Check the floor in the kitchen: especially near the trash and dishwasher area.
Pulling to Stand and Early Walking: “Upward Reach + Wobbly Balance”
Children now access higher surfaces and are prone to falls. They also grab for stability, which can pull objects down.
- Tip-over prevention: anchor dressers, bookshelves, and TVs. Avoid placing tempting items (remote controls, toys) on top of furniture that invites climbing.
- Tablecloths and runners: remove or shorten; children pull them to bring items down.
- Kitchen hazards: create a child-free zone around cooking areas using gates or physical separation. Turn pot handles inward and keep hot appliances away from edges.
- Windows: keep furniture away from windows. Use window guards where appropriate and ensure windows cannot open wide enough for a child to fit through.
- Doors: finger pinch points become common. Use door stoppers or hinge guards in high-use areas.
Practical example: If a toddler uses the oven door as a step, treat the kitchen as a restricted zone during cooking. Physical separation is more reliable than repeated verbal reminders at this stage.
Toddler to Preschool: “Climbing, Throwing, Testing Limits”
At this stage, children can move quickly, climb creatively, and may resist restrictions. Safety-proofing shifts from blocking access to designing safer routines and zones.
- Climbing routes: look for “ladder patterns” (drawer handles, stacked bins, chairs near counters). Remove climb aids or secure them.
- Bathroom access: keep bathrooms closed or supervised. Store grooming tools and cosmetics out of reach. Keep containers emptied and put away after use.
- Outdoor exits: toddlers can open doors. Use high latches where allowed and ensure fences and gates close reliably.
- Play areas: check for hard edges near active play zones. Use rugs or mats to reduce injury from falls, but secure rugs to prevent slipping.
- Tool and hobby items: keep scissors, small magnets, button batteries, and craft supplies in locked storage.
Step-by-step: “Toddler-proofing the living room”
- Anchor the TV and any tall furniture.
- Move breakables and heavy décor off low shelves.
- Bundle cords and place power strips in covered boxes.
- Create a defined play zone with soft flooring and a limited set of toys.
- Remove climbable furniture near windows or balconies.
School-Age Children: “Independence, Tools, and Peer Influence”
School-age children may follow rules better, but they also use tools, experiment, and spend time in other environments (friends’ homes, school, sports). Safety-proofing becomes a combination of environment checks and clear household systems.
- Kitchen and appliances: set rules for microwave use, stove access, and hot drinks. Store sharp tools consistently and teach safe carry and placement (e.g., knives never left in sinks).
- Sports and wheeled activities: create a “gear station” near the exit so helmets and protective gear are easy to grab. Check that equipment is intact and fits.
- Science kits and crafts: store chemicals, glues, and solvents in a designated area with adult oversight. Keep small components contained.
- Internet-driven challenges: while not “physical safety-proofing” in the classic sense, it affects real-world risk. Monitor for dares involving choking games, fire, chemicals, or dangerous stunts; set clear boundaries and check supplies (matches, aerosols).
Practical example: If a child is allowed to make instant noodles, store bowls that are stable and have handles, and set a rule that hot water is poured only with an adult present until the child demonstrates consistent safe behavior.
Early Teens: “Adult-Sized Reach, Still-Developing Judgment”
Teens can access everything physically. Safety-proofing focuses on high-impact hazards and shared responsibility: driving environments, substances, parties, and sports.
- Medication and substance storage: keep prescription medications, alcohol, cannabis products, and nicotine products secured. Track quantities of high-risk medications.
- Garage and workshop: lock tools, blades, and chemicals; store fuels properly; ensure good ventilation for any hobby work.
- Fire safety: ensure smoke/CO alarms are functional; keep lighters and matches controlled if there are younger children or if risky behavior is a concern.
- Water and outdoor risk: teens may swim unsupervised. Set clear rules about swimming with a buddy, weather, and avoiding alcohol or drugs near water.
Environmental Risk Checks: Room-by-Room and Setting-by-Setting
Kitchen Risk Check
- Heat sources: keep hot items away from edges; manage appliance cords so they cannot be pulled.
- Sharp tools: store knives and scissors in a locked drawer or high block; avoid leaving blades in sinks where hands cannot see them.
- Heavy objects: store heavy pots low to reduce falling hazards when pulled.
- Trash: use a lidded, secured trash can; keep compost bins out of reach.
- “Drop zone” control: designate a high shelf for keys, coins, and batteries so they do not land on counters within reach.
Bathroom Risk Check
- Access control: keep doors closed or use childproof handles as needed.
- Storage: keep razors, nail tools, cosmetics, and cleaning products secured.
- Slip hazards: use non-slip mats; wipe water promptly; keep step stools stable with non-slip feet.
- Containers: empty and store buckets or large containers after use; do not leave them filled.
Bedroom and Sleep Areas Risk Check
- Furniture anchoring: dressers and bookshelves should be secured, especially if drawers can be used as steps.
- Cords and strings: keep monitor cords, chargers, and blind cords routed safely and out of reach.
- Small items: for mixed-age households, keep older siblings’ small toys in closed bins and set a “play only at the table” rule for tiny pieces.
Living Room / Family Room Risk Check
- Tip-over and pull-down: anchor TVs and shelves; remove climbable furniture near hazards.
- Glass and sharp edges: consider corner guards and stable furniture placement; keep glass décor out of reach.
- Candles and fireplaces: use barriers and keep ignition sources controlled; maintain a clear zone around heaters.
Laundry Room and Utility Areas Risk Check
- Restricted access: these areas often contain concentrated hazards. Keep doors locked or use high latches.
- Appliance safety: keep washer/dryer doors closed; store detergent and pods secured and out of sight.
- Tools and hardware: keep loose screws, nails, and small parts in sealed containers.
Garage, Shed, and Workshop Risk Check
- Lock and label zones: create a locked cabinet for chemicals and a separate locked area for tools.
- Stability: store heavy items low; secure ladders; keep cords coiled.
- Vehicle movement: establish a rule that children stand in a designated “safe spot” when cars are moving in driveways.
Outdoor Areas Risk Check (Yard, Driveway, Balcony)
- Fencing and gates: check latches, gaps, and self-closing function regularly.
- Climbables: move bins, chairs, and planters away from fences and railings.
- Play equipment: check for loose bolts, sharp edges, and adequate impact-absorbing ground cover.
- Driveway: treat it as a traffic zone; keep toys and chalk play away from vehicle paths.
School and Childcare Environmental Checks
In schools and childcare settings, you may not control the environment fully, but you can still perform meaningful checks and advocate for fixes.
- Arrival and pickup: observe traffic flow, visibility, and where children wait. Identify blind spots and unsafe crossing patterns.
- Classroom: look for unsecured tall furniture, accessible cords, and storage of art supplies.
- Playground: check surfacing condition, equipment spacing, and whether age-appropriate areas are separated.
- All-purpose rooms: folding chairs, stacked equipment, and rolling carts can create tip and pinch hazards.
Practical example: If you notice a bookshelf in a classroom that wobbles when pushed, report it and request anchoring. A simple stability fix can prevent a severe injury.
High-Risk “Change Moments” That Deserve Extra Checks
Visitors and Gatherings
Guests bring bags, medications, and small items that end up within reach. Before guests arrive, set up a “guest item station” on a high shelf or in a closed room where purses, coats, and luggage are placed immediately.
- Do a floor sweep after guests leave (especially near seating areas).
- Check bathrooms for items left behind (cosmetics, pills).
Holidays and Decorations
Seasonal décor adds cords, breakables, and small detachable parts.
- Route decorative light cords out of reach and avoid dangling loops.
- Place breakable ornaments high; avoid small detachable decorations at toddler height.
- Secure trees and large décor to prevent tipping.
Renovations and Deliveries
Tools, nails, packaging, and open doors create temporary hazards.
- Create a “work zone” that is physically separated.
- Do end-of-day sweeps for screws, blades, and debris.
- Break down boxes promptly; remove plastic wrap and straps.
Building a Simple Safety-Proofing System You Can Maintain
Create Zones: “Yes Spaces” and “Not Yet Spaces”
A “yes space” is an area where a child can play with minimal intervention because hazards are removed and furniture is stable. A “not yet space” is restricted by gates, closed doors, or supervision rules. This reduces constant correction and makes it more realistic to maintain safety during busy times (cooking, phone calls, caring for another child).
Use Checklists That Match Your Life
Long lists are often abandoned. Use short, repeatable checklists:
- Daily (2 minutes): floor sweep in main area; check that gates are latched; remove small objects from reachable surfaces.
- Weekly (10 minutes): test window guards/locks; check furniture anchors; scan cords and power strips; check outdoor gate latches.
- Monthly (15 minutes): rotate toys and remove broken items; reassess storage as the child grows; check that “safe zones” still match the child’s abilities.
Plan for Mixed-Age Households
When older and younger children share space, the environment must protect the youngest without overly restricting the oldest.
- Contain small parts: require small-piece toys to be used only at a table and stored in a lidded bin on a high shelf.
- Create separate play zones: a toddler zone with large toys and a school-age zone with small parts.
- Teach “reset habits”: older children do a quick cleanup before leaving a room, focusing on small objects.
Document and Communicate Across Caregivers
Safety-proofing fails when one caregiver changes the setup without telling others. Use simple communication tools:
- A shared note listing restricted zones and where key items are stored.
- A rule that gates and locks are returned to the same position after use.
- A “new skill alert” habit: when a child learns to climb, open doors, or reach counters, everyone updates the environment that day.
Practical Mini-Scenarios: Applying the System
Scenario 1: The New Climber
You notice your toddler dragging a chair to the counter.
- Eliminate: remove lightweight chairs from the kitchen during cooking times.
- Separate: add a gate or keep the toddler in a “yes space” while you cook.
- Secure: move tempting items (snacks, remotes) off counters that motivate climbing.
- Recheck: look for alternative climb aids (step stools, bins) and relocate them.
Scenario 2: After a Birthday Party
Older kids played with small toys and party favors.
- Do a 3-foot sweep under couches and tables.
- Empty trash promptly and check for loose small parts.
- Reset the “small parts live here” storage bin and close the lid.
Scenario 3: New School Year, New Backpack Habits
A school-age child drops their backpack near the entryway.
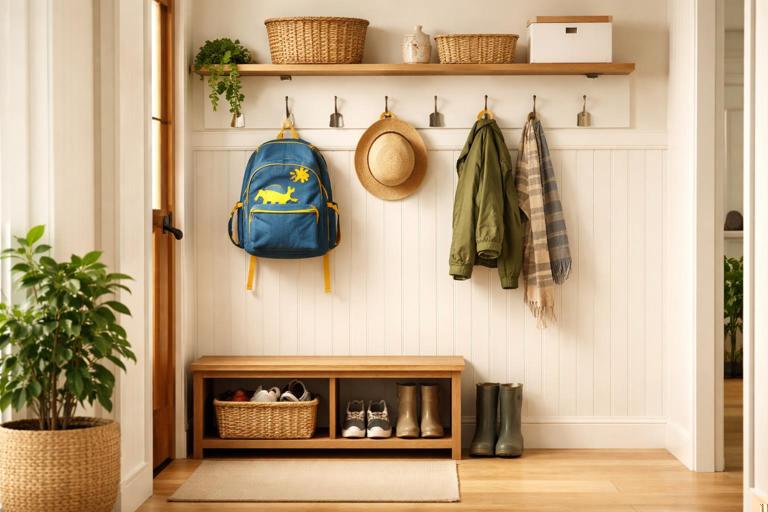
- Create a hook or shelf above toddler reach for backpacks.
- Make a routine: backpack goes up immediately; small items (coins, batteries, earbuds) go into a closed container.
- Weekly check: empty backpack pockets to prevent small items migrating to the floor.