What “Resource Loading” Really Means in a Construction Schedule
A CPM schedule can be logically correct and still be impossible to build if the labor, equipment, or key subcontractor crews are overbooked. Resource loading is the process of assigning resources (typically crews and major equipment) to scheduled activities so you can see demand over time and verify that the plan is feasible at the crew level.
In practical construction scheduling, resource loading is less about perfect accounting and more about answering jobsite questions early: Do we have enough carpenters to frame two areas at once? Are we double-booking the excavator? Are we expecting the same superintendent to run two critical operations simultaneously? If the answer is “yes,” you either change the schedule logic, change the sequencing, add resources, or accept a longer duration.
Resource loading can be done at different levels of detail:
- High-level loading: one crew per trade (e.g., “Concrete crew,” “Framing crew”) to check major conflicts.
- Crew-level loading: specific crew types and sizes (e.g., “(1) 4-person framing crew,” “(2) 2-person punch crews”).
- Equipment loading: cranes, lifts, excavators, skid steers, concrete pumps, etc.
- Key person loading: superintendent, project engineer, safety manager, QC inspector—useful when staffing is tight.
The goal of this chapter is to help you load resources in a way that supports decision-making and then run crew-level feasibility checks that catch impossible overlaps before they become field delays.

Resource Loading vs. Cost Loading (Don’t Confuse Them)
Resource loading is about capacity (how many crews/hours you need each day or week). Cost loading is about money (planned value, cash flow, earned value). They can be connected, but you can do effective resource loading without building a full cost-loaded schedule.
- Listen to the audio with the screen off.
- Earn a certificate upon completion.
- Over 5000 courses for you to explore!

Download the app
For crew feasibility, you mainly need:
- Activity start/finish dates (from the CPM schedule)
- Assigned crew type(s)
- Crew size or planned labor hours
- Working calendar assumptions (days/week, holidays, shifts)
Define Your Resource Model (Simple, Consistent, Useful)
Before assigning resources, define a small set of standard resources that match how you actually staff work. A common mistake is creating too many resource names (e.g., “Carpenter A,” “Carpenter B,” “Carpenter C”) when you really schedule by crews. Another mistake is making resources too generic (e.g., “Labor”) so conflicts are hidden.
Step 1: Choose the resource types you will track
For most residential and small-to-mid commercial projects, start with:
- Trade crews: earthwork, concrete, framing, roofing, drywall, painting, flooring, MEP rough-in, MEP trim, firestopping, insulation, doors/hardware, glazing, site utilities, paving, landscaping.
- Shared equipment: excavator, skid steer, crane, telehandler, boom lift, scissor lift, concrete pump.
- Key supervision: superintendent, foreman (if shared), QA/QC (if required).
Step 2: Decide the unit of measure
Pick one primary unit so reports are readable:
- Crews (recommended for feasibility): “1 framing crew” assigned to an activity.
- People: “4 carpenters” assigned to an activity.
- Labor hours: “160 labor-hours” over the activity duration.
Crews are often easiest for feasibility checks because the question is usually “Can the same crew do both?” rather than “Can we split 1.7 crews?”
Step 3: Set a realistic availability (capacity)
Availability is the maximum you can have at once. Examples:
- Framing crew availability: 1 crew (your subcontractor can only staff one crew on your project at a time)
- Scissor lift availability: 2 lifts (owned/rented)
- Superintendent availability: 1 (cannot be in two places at once)
Availability can be time-phased (e.g., you can get a second drywall crew only after a certain date). If your software supports it, use resource calendars; if not, document the assumption and enforce it during reviews.
How to Assign Resources to Activities (Practical Rules)
Resource assignments should reflect how the field will execute the work. Use these rules to keep loading meaningful:
- Assign the controlling crew: If multiple trades touch an activity, assign the crew that controls the pace. Example: “MEP rough-in in Area A” might be controlled by electricians if they lead and others follow; or split into separate activities by trade if you need clearer control.
- Don’t over-detail micro-tasks: If your schedule has many small activities, resource loading becomes noisy. Consider rolling up micro-tasks into a work package activity that matches how the crew works in the field.
- Use consistent crew naming: “Drywall Crew” vs “Drywall (Hang)” vs “Drywall (Finish)”—choose a standard that matches your subcontractor staffing.
- Match calendars: If concrete pours happen Saturdays but framing does not, reflect that in the resource or activity calendar; otherwise, your demand chart will mislead you.
Example: Assigning crews to a small commercial interior build-out
Suppose you have activities like:
- Frame interior partitions (10 days)
- Rough-in electrical (8 days)
- Rough-in plumbing (6 days)
- Rough-in HVAC (7 days)
- Drywall hang (6 days)
- Drywall finish (8 days)
Resource assignments might be:
- Frame interior partitions → 1 Framing crew (4-person)
- Rough-in electrical → 1 Electrical crew (3-person)
- Rough-in plumbing → 1 Plumbing crew (2-person)
- Rough-in HVAC → 1 HVAC crew (3-person)
- Drywall hang → 1 Drywall crew (5-person)
- Drywall finish → 1 Drywall finish crew (4-person)
If the same subcontractor provides hang and finish with the same people, you might instead model one “Drywall crew” resource and assign it to both activities so overlaps are flagged.
Resource Loading Outputs You Should Actually Use
Once resources are assigned, you need outputs that help you make decisions quickly. The most useful are:
- Resource histogram: shows demand (crews/people/hours) by day or week.
- Resource usage table: lists which activities are consuming a resource in a given time window.
- Over-allocation report: flags where demand exceeds availability.
For construction, weekly views are often more actionable than daily views, but daily is helpful for short, high-impact equipment like cranes or pumps.
Crew-Level Feasibility Checks: What You Are Proving
A crew-level feasibility check is a structured review to confirm that the schedule can be executed with the crews and equipment you can realistically obtain. You are proving four things:
- No impossible overlaps: the same crew/equipment is not scheduled in two places at the same time unless you truly have two crews.
- Reasonable crew continuity: crews are not starting/stopping excessively due to fragmented sequencing.
- Workface readiness: when a crew is scheduled to start, the area is actually ready (access, preceding work complete, inspections planned, materials available).
- Production realism: the implied production rate (quantity per day) is consistent with crew size and site conditions.
A Step-by-Step Method to Run Crew-Level Feasibility Checks
Step 1: Pick the “constraint resources” first
Not every trade needs deep analysis. Start with resources that most often create schedule failure:
- Small subcontractors with limited crews (e.g., firestopping, glazing, specialty finishes)
- Shared equipment (crane, lift, excavator)
- Inspection-dependent trades (e.g., MEP rough-in if inspections are bottlenecks)
- Key supervision (superintendent/foreman) if you are running multiple zones
Load these resources first and run checks before spending time on every minor trade.
Step 2: Set the time window and granularity
Choose a window where conflicts matter:
- Look-ahead window: next 3–6 weeks (weekly granularity) for near-term staffing.
- Peak period window: the busiest phase (e.g., rough-in, finishes) where stacking trades is common.
- Critical transitions: mobilization, turnover, phased occupancy, commissioning periods.
Use weekly buckets for labor and daily buckets for single pieces of equipment that cannot be split.
Step 3: Generate an over-allocation list and identify the cause
When a resource is over-allocated, don’t immediately “level” the schedule automatically. First, identify why it happened. Common causes:
- Parallel areas assumed but not staffed: schedule shows Area A and Area B framing at the same time, but only one framing crew exists.
- Trade stacking without access: multiple trades planned in the same small space simultaneously.
- Hidden rework/inspection time: crews are scheduled back-to-back with no allowance for inspections, punch, or corrections.
- Calendar mismatch: activity calendar assumes 6 days/week but crew works 5.
Step 4: Decide the resolution strategy (four practical options)
For each over-allocation, choose one of these strategies:
- Re-sequence: change the order of work so the same crew can move logically from one area to the next.
- Split the activity: break a large activity into Area A / Area B so you can stagger starts and maintain continuity.
- Add capacity: add a second crew, overtime, or a second piece of equipment (confirm availability and cost impact).
- Accept a longer duration: if capacity cannot be increased, the schedule must reflect reality.
Document the decision. If you “add a crew,” note who confirmed it and when it becomes available.
Step 5: Apply changes and re-check until conflicts are gone
After adjustments, re-run the over-allocation report. The goal is not to eliminate every minor spike; it is to eliminate spikes that represent impossible execution or high risk.
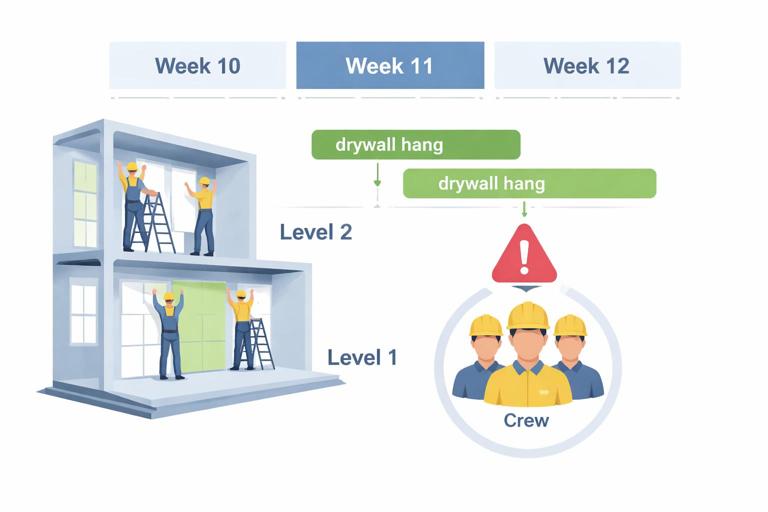
Worked Example: One Drywall Crew, Two Areas, Impossible Overlap
Scenario: You have two floors (Level 1 and Level 2). The schedule currently shows:
- Drywall hang Level 1: Week 10–11
- Drywall hang Level 2: Week 11–12
You only have one drywall hanging crew committed. In Week 11, the crew is assigned to both activities (over-allocation).
Feasibility check result
Week 11 demand = 2 drywall hang crews; availability = 1. The plan is infeasible.
Resolution options
- Re-sequence: Move Level 2 hang to start Week 12, after Level 1 completes. This may push downstream painting/finishes on Level 2.
- Split activities: If Level 1 is large, split into “Level 1 hang – East” and “Level 1 hang – West” so the crew can finish a portion and release areas earlier for inspections and above-ceiling close-in, while still avoiding double-booking.
- Add capacity: Confirm a second hang crew for Week 11–12. If confirmed, set availability to 2 for that window and keep the overlap.
The key is that the schedule should reflect the chosen reality: either you truly have two crews, or you do not.
Checking Crew Continuity (Avoiding Start-Stop Waste)
Even if there are no direct overlaps, a schedule can still be inefficient if it fragments a crew’s work into short bursts separated by gaps. This causes remobilization, lost productivity, and coordination overhead.
Continuity check method
- For each major crew, list its assigned activities in chronological order.
- Look for gaps of 1–3 days that are not intentional (weather, cure time, inspection hold).
- Look for repeated mobilizations to the same area (e.g., framing returns multiple times due to late MEP coordination).
When you find fragmentation, consider combining small tasks into a single work package or adjusting sequencing so the crew can complete a zone before moving on.
Production Rate Reality Check (Quantity-to-Crew Sanity Test)
Crew feasibility is not only about overlaps; it is also about whether the implied production is believable. A quick sanity test ties quantities to durations and crew size.
Step-by-step
- Step A: Identify the measurable quantity (e.g., linear feet of wall framed, square feet of drywall hung, number of doors installed).
- Step B: Compute planned production rate: Quantity ÷ Duration (in workdays).
- Step C: Compare to expected field production for that crew size under your site conditions.
- Step D: If the plan is aggressive, decide whether to increase crew size, add overtime, improve access/logistics, or extend duration.
Example: 12,000 SF of drywall hang planned in 5 workdays implies 2,400 SF/day. If your typical 5-person crew averages 1,800 SF/day in similar conditions, the schedule is likely underestimating time unless you add manpower or improve conditions (material staging, lift availability, clear access).
Workface Readiness Checks Tied to Crew Starts
A common failure mode is scheduling a crew to start when the workface is not ready. Resource loading helps you see the impact: if the crew cannot start, it either sits idle (wasted cost) or moves elsewhere (creating unplanned resequencing).
Practical readiness checklist for each crew start
- Access: area open, safe, and not blocked by other trades or stored materials.
- Predecessor completion: preceding work truly complete in that zone (not “90%”).
- Inspections: required inspections scheduled and realistically timed.
- Materials: long-lead and bulk materials on site, staged, and protected.
- Information: latest drawings/RFIs/submittals released; no known design holds.
- Temporary services: power, lighting, heat (if needed), water, hoisting.
When a readiness item is uncertain, treat it like a risk to the crew plan. You may choose to add a buffer, create a “ready-to-start” gate activity, or sequence alternative work so the crew remains productive.
Resource Leveling: Use It Carefully (Manual First, Then Tool)
Resource leveling is the process of adjusting activity dates to resolve over-allocations based on resource limits. Many scheduling tools can level automatically, but automatic leveling can create unintended consequences: it may push critical work, break logical flow, or create long gaps.
Recommended approach
- Manual first: resolve the big conflicts by resequencing, splitting, or adding capacity with intent.
- Then level: if you use automatic leveling, constrain it with rules (only within float, only for selected resources, respect activity priorities).
- Review the result: verify that the leveled schedule still matches how you will build and does not create unrealistic stop-start patterns.
Common Crew-Level Pitfalls and How to Avoid Them
Pitfall 1: Assuming crews can be split without loss
Splitting a 4-person crew into two 2-person crews may reduce productivity more than expected due to supervision, layout, and tool constraints. If you plan to split crews, reflect the productivity impact by adjusting durations or production rates.
Pitfall 2: Ignoring travel and mobilization time
Specialty subs may lose half a day mobilizing, unloading, or setting up. If the schedule assigns them many short activities across scattered areas, the plan may be technically feasible but practically inefficient. Combine work into longer, continuous blocks where possible.
Pitfall 3: Overloading shared access equipment
Even if each trade has enough labor, one scissor lift or one material hoist can become the true constraint. Load key equipment resources and check daily conflicts, especially during above-ceiling rough-in and high-bay work.
Pitfall 4: Treating “crew availability” as unlimited
If you do not set availability limits, the schedule will never show conflicts. Establish realistic caps (even if approximate) and update them when subcontractors confirm staffing changes.
How to Document and Communicate Resource Feasibility
Resource loading only helps if it drives decisions. Use a simple communication package for internal and subcontractor coordination:
- Weekly resource histogram for top 5–10 constraint resources
- Two-week crew plan: which areas each crew will be in, by day
- Conflict log: over-allocations found, decision taken (resequence/add crew/extend), owner, due date
- Assumption list: crew counts, shift assumptions, equipment counts, and any time-phased availability
When meeting with subcontractors, focus on specific questions tied to the loaded schedule: “In Week 11, the plan requires two drywall hang crews. Can you staff two? If not, which week can the second crew start, or should we resequence Level 2?”
Mini-Template: Crew Feasibility Check Worksheet
Resource: ___________________________ Availability: ____ crews (or ____ people) Calendar: ____________ Time Window: ____________ Granularity: Daily / Weekly 1) Peak demand period(s): ______________________________________________ 2) Over-allocation occurrences (date/week → activities): - ______________________________________________________________ - ______________________________________________________________ 3) Root cause (overlap / access / calendar / inspection / other): ______________________________________________________________ 4) Resolution chosen (resequence / split / add capacity / extend): ______________________________________________________________ 5) Required confirmations (subcontractor, rental, staffing): ______________________________________________________________ 6) Schedule updates made (activity IDs/areas affected): ______________________________________________________________ 7) Re-check result (remaining risk spikes?): ______________________________________________________________