Why release strategies matter in Kubernetes
In Kubernetes, “deployment” is not the same as “release.” A deployment is the act of applying manifests (or a Helm upgrade) so the cluster runs a new version. A release is the controlled exposure of that new version to real traffic, with guardrails that limit blast radius and provide fast rollback. Release strategies are the techniques you use to decide who gets the new version, when they get it, and how you detect and respond to problems.
Safer deployments focus on three outcomes: reducing the number of users affected by a bad change, detecting issues quickly using signals that reflect user experience, and making rollback or forward-fix routine and low-risk. Kubernetes provides primitives (ReplicaSets, Services, labels, readiness gates, autoscaling hooks), and tools like Helm and GitOps controllers provide repeatability and auditability. The release strategy ties these together into a predictable workflow.
Core building blocks you will use
Stable vs. candidate workloads
Most strategies rely on running two versions at once: a stable version that currently serves production traffic, and a candidate version you are validating. In Kubernetes this is typically represented as two Deployments (or two ReplicaSets) with different labels, for example app=myservice, track=stable and app=myservice, track=canary. Traffic selection is then done by a Service selector, an Ingress/controller feature, or a service mesh.
Readiness, liveness, and startup probes as release gates
Probes do not guarantee correctness, but they prevent obvious failures from receiving traffic. Readiness is especially important: it controls whether a Pod is considered a valid endpoint. For safer releases, ensure readiness checks reflect real dependencies (for example, ability to serve requests and reach required downstreams) without becoming too slow or flaky.
Progress deadlines and rollout controls
Kubernetes Deployments include controls such as maxUnavailable, maxSurge, and progressDeadlineSeconds. These influence how quickly new Pods replace old ones and how long Kubernetes waits before marking a rollout as failed. Even if you use advanced strategies like canary, these settings matter for the underlying Pod replacement behavior.
- Listen to the audio with the screen off.
- Earn a certificate upon completion.
- Over 5000 courses for you to explore!

Download the app
Metrics-based verification
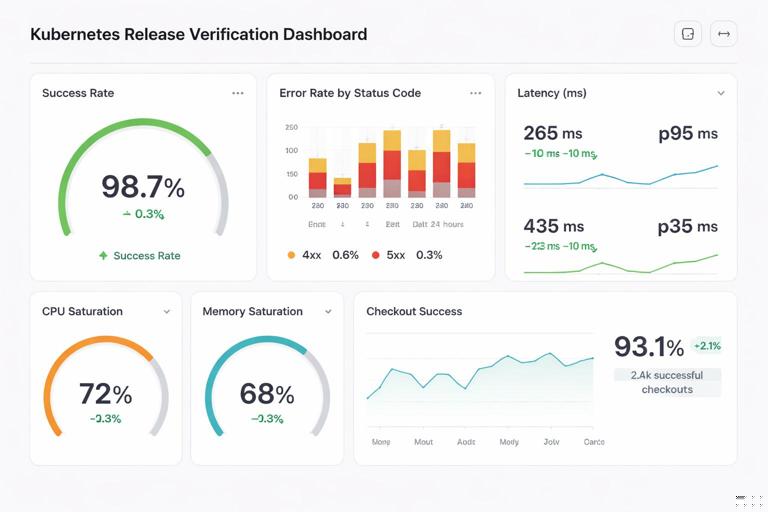
Safer releases require objective signals. Common release verification signals include request success rate, error rate by status code, latency percentiles, saturation (CPU/memory), and business-level metrics (checkout success, login rate). The key is to define a small set of “release SLOs” that you can evaluate quickly after each step.
Rolling updates: the baseline strategy
A rolling update replaces Pods gradually within a single Deployment. This is the default for Kubernetes and often sufficient for low-risk changes. It is not a canary by itself because traffic is spread across old and new Pods based on how many are running, not by explicit percentage routing. Still, it can be made safer with conservative settings and automated verification.
Configure a safer rolling update
Use a Deployment strategy that limits disruption and prevents rapid replacement if the new version is unhealthy.
apiVersion: apps/v1
kind: Deployment
metadata:
  name: myservice
spec:
  replicas: 10
  progressDeadlineSeconds: 300
  strategy:
    type: RollingUpdate
    rollingUpdate:
      maxSurge: 2
      maxUnavailable: 0
  minReadySeconds: 10
  template:
    metadata:
      labels:
        app: myservice
    spec:
      containers:
      - name: myservice
        image: myrepo/myservice:1.2.3
        readinessProbe:
          httpGet:
            path: /ready
            port: 8080
          periodSeconds: 5
          failureThreshold: 3
maxUnavailable: 0ensures capacity is maintained during rollout (useful for latency-sensitive services).maxSurgeadds extra Pods temporarily so you can bring up new Pods before terminating old ones.minReadySecondsforces Pods to be ready for a minimum time before being considered available, filtering out “flap” readiness.progressDeadlineSecondscauses the rollout to fail if it stalls, which your automation can treat as a stop signal.
Operational workflow for rolling updates
- Apply the change (Helm upgrade or GitOps sync).
- Watch rollout status:
kubectl rollout status deploy/myservice. - Verify key metrics for a short window (for example 5–15 minutes depending on traffic).
- If issues appear, rollback quickly:
kubectl rollout undo deploy/myservice(or revert in Git and let GitOps reconcile).
Rolling updates are simple, but they have two limitations: you cannot easily target a specific cohort of users, and rollback may still create churn if the new version partially rolled out before detection.
Blue/green deployments: switch traffic in one step
Blue/green runs two complete environments (blue = current, green = new). You validate green while blue continues serving production. When ready, you switch traffic to green in a single, controlled action. This reduces the time users are exposed to a potentially bad version, and rollback is a fast switch back to blue.
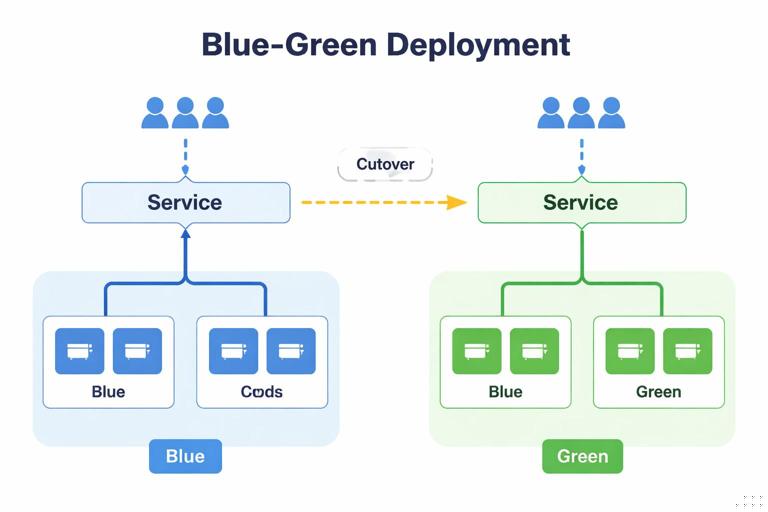
How blue/green maps to Kubernetes
A common pattern is two Deployments with different labels and a single Service that points to one of them. Switching is done by changing the Service selector. This is simple and works without a service mesh, but it is a “hard cutover” (100% at once).
Step-by-step: blue/green with Service selector switch
Step 1: Create two Deployments
apiVersion: apps/v1
kind: Deployment
metadata:
  name: myservice-blue
spec:
  replicas: 10
  selector:
    matchLabels:
      app: myservice
      color: blue
  template:
    metadata:
      labels:
        app: myservice
        color: blue
    spec:
      containers:
      - name: myservice
        image: myrepo/myservice:1.2.2
---
apiVersion: apps/v1
kind: Deployment
metadata:
  name: myservice-green
spec:
  replicas: 10
  selector:
    matchLabels:
      app: myservice
      color: green
  template:
    metadata:
      labels:
        app: myservice
        color: green
    spec:
      containers:
      - name: myservice
        image: myrepo/myservice:1.2.3
Step 2: Point the Service to blue
apiVersion: v1
kind: Service
metadata:
  name: myservice
spec:
  selector:
    app: myservice
    color: blue
  ports:
  - port: 80
    targetPort: 8080
Step 3: Validate green without production traffic
- Run smoke tests against green directly (for example via a temporary Service
myservice-greenor port-forward to a green Pod). - Run load tests if needed to ensure performance characteristics.
- Check logs and metrics for green Pods under test traffic.
Step 4: Switch traffic
kubectl patch service myservice -p '{"spec":{"selector":{"app":"myservice","color":"green"}}}'Step 5: Keep blue for fast rollback
Do not delete blue immediately. Keep it running for a defined soak period. If issues appear, switch the Service selector back to blue.
Trade-offs and safety tips
- Blue/green doubles resource usage during the release window; plan capacity accordingly.
- Because cutover is instant, ensure you have strong pre-cutover validation and a clear rollback trigger.
- Consider session handling: if clients rely on long-lived connections, a cutover can cause reconnect storms. Plan for connection draining and graceful termination.
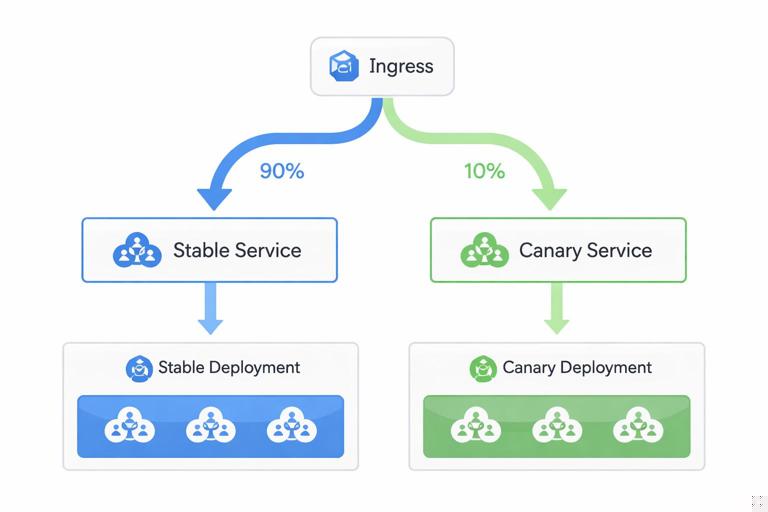
Canary releases: expose a small percentage first
Canary releases gradually shift traffic to the new version. This is often the best balance between safety and speed: a small subset of users experiences the change first, you evaluate real production signals, and then you increase exposure in steps.
In Kubernetes, canary can be implemented at different layers: by running two Deployments and splitting traffic at the ingress layer, by using a service mesh for weighted routing, or by approximating traffic split via replica ratios (less precise). The more explicit your traffic routing, the more reliable your canary percentages will be.
Canary with two Services and an ingress/controller that supports weights
Many ingress controllers support weighted backends (often via annotations or custom resources). The exact YAML varies by controller, but the conceptual model is consistent: route 90% to stable Service and 10% to canary Service, then adjust weights.
Step 1: Create stable and canary Deployments
apiVersion: apps/v1
kind: Deployment
metadata:
  name: myservice-stable
spec:
  replicas: 10
  selector:
    matchLabels:
      app: myservice
      track: stable
  template:
    metadata:
      labels:
        app: myservice
        track: stable
    spec:
      containers:
      - name: myservice
        image: myrepo/myservice:1.2.2
---
apiVersion: apps/v1
kind: Deployment
metadata:
  name: myservice-canary
spec:
  replicas: 2
  selector:
    matchLabels:
      app: myservice
      track: canary
  template:
    metadata:
      labels:
        app: myservice
        track: canary
    spec:
      containers:
      - name: myservice
        image: myrepo/myservice:1.2.3
Step 2: Create stable and canary Services
apiVersion: v1
kind: Service
metadata:
  name: myservice-stable
spec:
  selector:
    app: myservice
    track: stable
  ports:
  - port: 80
    targetPort: 8080
---
apiVersion: v1
kind: Service
metadata:
  name: myservice-canary
spec:
  selector:
    app: myservice
    track: canary
  ports:
  - port: 80
    targetPort: 8080
Step 3: Configure weighted routing
Configure your ingress/controller to split traffic between the two Services. Start with a small weight (for example 1–10%). Then increase in steps (10% → 25% → 50% → 100%).
Step 4: Define automated checks per step
- Error rate: compare canary vs stable (if possible) and absolute thresholds.
- Latency: p95/p99 should not regress beyond a defined budget.
- Saturation: CPU throttling, memory pressure, queue depth.
- Domain metrics: for example “successful payments per minute.”
Step 5: Promote or rollback
- Promote: scale stable down and canary up (or replace stable image with the canary version and remove canary resources).
- Rollback: set canary weight to 0% and investigate; stable continues serving.
Canary by replica ratio (approximation)
If you cannot do weighted routing, you can run stable and canary behind the same Service selector and rely on the kube-proxy load balancing across endpoints. This approximates a percentage split based on the number of ready endpoints. For example, 9 stable Pods and 1 canary Pod yields roughly 10% canary traffic. This is not precise (connection reuse and uneven client distribution can skew results), but it can still reduce risk.
Progressive delivery with automated analysis
Manual canaries are error-prone: people forget to check the right dashboards, wait too long, or promote too quickly. Progressive delivery automates the steps and the analysis. The system advances the rollout only if metrics stay within acceptable bounds; otherwise it pauses or rolls back.
What to automate
- Step schedule: define increments (for example 5%, 25%, 50%, 100%) and wait times.
- Metric queries: define how to compute error rate, latency, and other signals for stable and canary.
- Judgment: define pass/fail thresholds and how many consecutive failures trigger rollback.
- Notifications: alert the team when a rollout pauses or fails.
Practical gating pattern: “pause and verify”
Even without a dedicated progressive delivery controller, you can implement a safe pattern in your CI/CD pipeline:
- Deploy canary resources (or update image) and wait for readiness.
- Shift a small amount of traffic (or scale canary to 1–2 Pods).
- Pause the pipeline for an analysis window.
- Run automated checks (synthetic requests plus metric thresholds).
- If checks pass, proceed to the next step; if they fail, revert traffic and stop.
This pattern works well with GitOps: the pipeline can open a pull request that changes weights/replicas step-by-step, and automation can merge only when checks pass, leaving an audit trail.
Feature flags as a release safety lever
Release strategies control deployment exposure, but sometimes you need to control feature exposure independently. Feature flags allow you to ship code that is disabled by default, then enable it gradually for specific users or cohorts. This reduces the need for emergency rollbacks when only one feature is problematic.
How to combine flags with canary
- Deploy the new version via canary at low traffic.
- Keep risky features off initially; validate baseline behavior and performance.
- Enable the feature for internal users first, then a small external cohort.
- Increase both traffic weight and feature exposure gradually.
This approach is especially effective when the change includes a new dependency or a new code path that is hard to fully exercise in pre-production.
Database and stateful change strategies (without rehashing config/secrets)
Stateful changes are where releases often fail. Even if your Kubernetes rollout is perfect, a schema change or data migration can break older versions or cause performance regressions. Safer releases require planning for compatibility across versions.
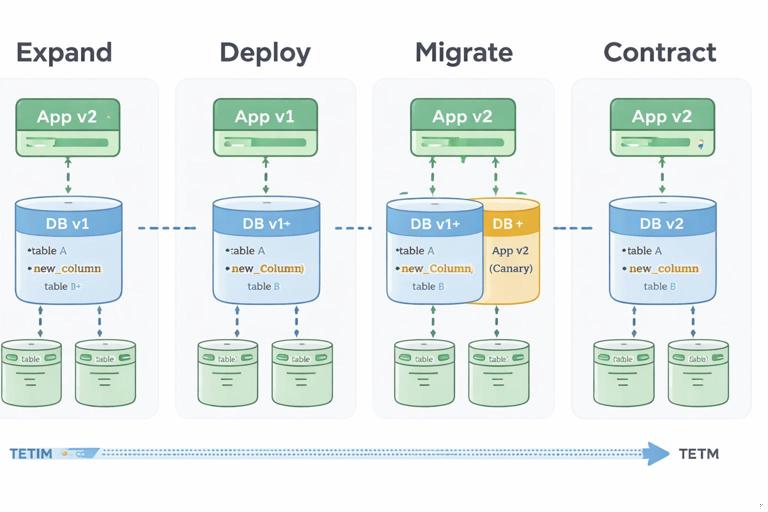
Expand/contract (backward-compatible) migrations
A common safe approach is to split changes into phases:
- Expand: add new columns/tables/indexes in a backward-compatible way; keep old behavior working.
- Deploy: release application code that can read/write both old and new structures.
- Migrate: backfill data asynchronously; monitor load and correctness.
- Contract: remove old columns/paths only after all versions that depend on them are gone.
This aligns naturally with canary: the canary version can start writing to the new structure while stable continues using the old, as long as reads remain compatible.
Job-based migrations with controlled execution
When you must run a migration as a Kubernetes Job, treat it as a release step with explicit gating:
- Run the Job in a controlled window.
- Ensure it is idempotent (safe to retry).
- Set resource requests/limits to avoid starving the cluster.
- Verify post-migration invariants (row counts, checksums, application-level probes) before shifting traffic.
Rollbacks, roll-forwards, and incident-friendly releases
A rollback is only “fast” if it is operationally simple and does not introduce new risk. In Kubernetes, you can rollback by reverting a Deployment revision, switching Service selectors (blue/green), or setting canary weight to 0%. But you should decide in advance when to rollback versus roll forward.
When rollback is the right move
- Clear regression in error rate or latency immediately after exposure.
- Crash loops, readiness failures, or resource exhaustion caused by the new version.
- Unexpected dependency behavior that requires investigation.
When roll-forward is safer
- The new version includes a required data migration that cannot be undone easily.
- The issue is isolated and can be fixed quickly with a small patch.
- Rollback would reintroduce a known vulnerability or critical bug.
Practical rollback mechanics to rehearse
- Deployment rollback: ensure you keep revision history and know the command path your team uses (CLI vs Git revert).
- Blue/green switchback: ensure the previous environment is still healthy and scaled.
- Canary abort: ensure you can set weight to 0% quickly and that stable capacity is sufficient.
Rehearse these actions in a non-production cluster so the team can execute them under pressure without improvisation.
Release guardrails: policies and checks that prevent risky changes
Pre-deploy validation
- Policy checks: enforce that containers have resource requests/limits, probes, and non-root settings where required.
- Manifest sanity: prevent accidental changes like removing PodDisruptionBudgets or lowering replica counts below safe minimums.
- Image provenance: ensure the image tag/digest matches what was built and scanned.
Runtime guardrails during rollout
- Pod disruption controls: ensure voluntary disruptions do not take down too many Pods during a rollout.
- Autoscaling awareness: ensure HPA/VPA behavior won’t mask problems or amplify them (for example, scaling up a broken version).
- Rate limiting: protect downstreams from sudden traffic shifts, especially during blue/green cutover.
Choosing a strategy: practical guidance
Use rolling updates when
- Changes are low risk and easily reversible.
- You have strong readiness checks and good monitoring.
- Traffic patterns are stable and you can tolerate gradual exposure.
Use blue/green when
- You want a fast, deterministic rollback (switch back).
- You can afford temporary double capacity.
- You can validate the new version thoroughly before cutover.
Use canary/progressive delivery when
- You need to minimize blast radius and learn from real traffic.
- You want automated promotion/rollback based on metrics.
- You release frequently and want a repeatable, low-touch process.
In practice, teams often combine strategies: a rolling update for internal services, canary for user-facing APIs, and blue/green for high-risk components where instant rollback is critical. The safest approach is the one you can execute consistently, with clear gates and rapid recovery paths.