Why Nosebleeds and Dental Injuries Need Special First Aid
Nosebleeds (epistaxis) and dental injuries are common in home, playground, and school settings. They can look dramatic because the face and mouth bleed easily, and children may panic when they see blood or taste it. The main goals of first aid are to control bleeding, protect the airway from blood swallowing or choking, reduce pain and swelling, and preserve teeth and oral tissues so a dentist can repair them.
Two principles guide care in these situations: apply the right kind of pressure in the right place, and avoid actions that worsen bleeding or damage tissues. For nosebleeds, that means pinching the soft part of the nose while the child leans forward. For dental injuries, that means controlling bleeding with gentle pressure and keeping knocked-out or broken tooth fragments moist and protected.
Nosebleeds (Epistaxis): What’s Happening and Common Triggers
Most childhood nosebleeds come from the front part of the nose where small blood vessels sit close to the surface. These vessels can break from minor trauma or irritation. Common triggers include nose picking, dry air, colds and allergies, minor bumps to the nose, and vigorous blowing. Less commonly, nosebleeds can be heavier or recurrent due to clotting problems or certain medications.
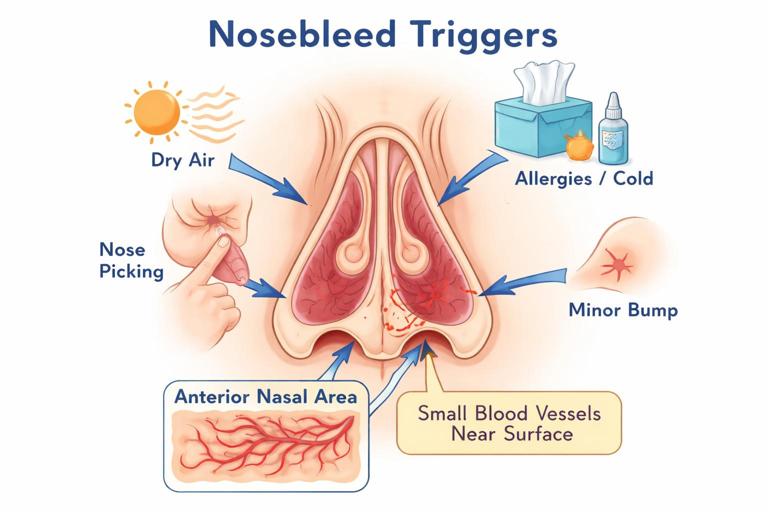
Blood may drip from one nostril or both. Some blood may run backward into the throat, especially if the child is lying down or tilting the head back. This can cause coughing, gagging, or vomiting of swallowed blood, which looks alarming but is usually not dangerous by itself.
What Not to Do for a Nosebleed
- Do not tilt the head back. This sends blood into the throat and increases swallowing, coughing, and nausea.
- Do not pack the nose with tissues or cotton deep inside. Removing it can restart bleeding and can leave material behind.
- Do not have the child blow their nose during active bleeding or immediately after it stops.
- Do not apply pressure to the bony bridge of the nose. Pressure must be on the soft part below the bone.
Step-by-Step: How to Stop a Nosebleed
1) Position and calm
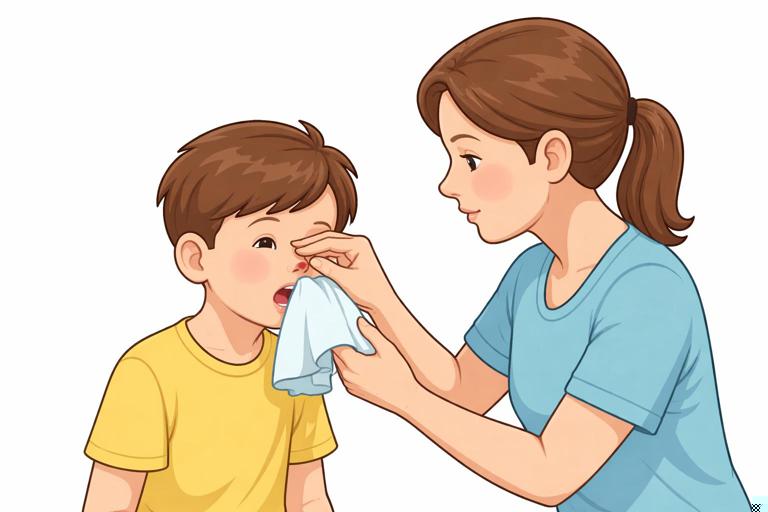
Have the child sit upright and lean slightly forward. This reduces blood pressure in the nose and helps blood drain out of the nostrils rather than into the throat. Encourage slow breathing through the mouth. If available, place a towel or tissues under the nose to catch blood.
- Listen to the audio with the screen off.
- Earn a certificate upon completion.
- Over 5000 courses for you to explore!

Download the app
2) Pinch the correct spot
Using your thumb and index finger, pinch the soft part of the nose (the lower half, just below the bony bridge). Press the nostrils together firmly. The goal is to compress the bleeding vessels against the septum.
3) Hold continuous pressure for long enough
Maintain steady pressure for 10 minutes without checking. Use a clock or timer. Many nosebleeds continue because pressure is released too soon to “see if it stopped.” If bleeding continues after 10 minutes, reapply pressure for another 10 minutes.
4) Add cold to reduce swelling (optional support)
A cold pack on the bridge of the nose or cheeks may help by reducing swelling and discomfort, but it does not replace pinching the soft part of the nose. Wrap cold packs in cloth to protect skin.
5) After bleeding stops: protect the clot
For the next few hours, discourage nose blowing, picking, heavy exertion, hot showers, or hot drinks, which can dilate vessels and restart bleeding. If the inside of the nose looks dry, a small amount of saline spray or a thin layer of petroleum jelly at the nostril opening (not deep inside) can reduce irritation, especially in dry climates.
Practical example: playground bump
A child runs into another child and starts bleeding from one nostril. Sit them on a bench, lean them forward, pinch the soft part of the nose for 10 minutes, and keep them from talking or crying hard if possible. If bleeding stops, keep them from blowing their nose during the walk back inside and monitor for renewed bleeding.
When a Nosebleed Needs Medical Evaluation
Seek urgent medical care if any of the following apply:
- Bleeding does not stop after 20 minutes of correct, continuous pressure.
- The nosebleed follows a significant facial injury, and you suspect a broken nose or facial fracture (deformity, severe swelling, bruising around eyes, clear fluid from nose, or severe pain).
- Bleeding is heavy (rapid flow, large clots) or the child appears pale, weak, dizzy, or unusually sleepy.
- The child has trouble breathing, is choking on blood, or cannot keep blood from pooling in the mouth.
- There is a known bleeding disorder, the child is on blood-thinning medication, or bruising/bleeding occurs easily elsewhere.
- Nosebleeds are frequent and hard to control, suggesting dryness, allergy irritation, or another underlying problem that needs assessment.
Dental Injuries: Types and Why Speed Matters
Dental injuries range from small chips to teeth being pushed out of position or completely knocked out. The mouth bleeds readily, and lips and gums can swell quickly. The most time-sensitive injury is a knocked-out permanent tooth (avulsion). The best chance of saving it is immediate replantation or rapid storage in an appropriate liquid and urgent dental care.
It is essential to know whether the tooth is a baby (primary) tooth or a permanent tooth. Baby teeth are usually not replanted because doing so can damage the developing permanent tooth underneath. Permanent teeth are candidates for replantation if conditions are safe.
Quick guide to common dental injuries
- Chipped or fractured tooth: a piece breaks off; sensitivity to cold/air may occur.
- Loose tooth: tooth moves but remains in place.
- Displaced tooth: tooth is pushed sideways, inward, or outward.
- Avulsed tooth: tooth is completely out of the socket.
- Soft tissue injury: cuts to lips, tongue, cheeks, or gums; may hide tooth fragments.
Immediate Priorities for Dental Injuries
1) Control mouth bleeding safely
Have the child sit up and lean slightly forward to avoid swallowing blood. Use clean gauze or a folded clean cloth and apply gentle, steady pressure to the bleeding area. If the bleeding is from the gum around a tooth, have the child bite down on gauze. Replace gauze if it becomes soaked, but keep pressure continuous.
2) Rinse gently, don’t scrub
If there is dirt or grit, a gentle rinse with clean water or saline can help you see the injury. Avoid vigorous swishing, which can dislodge clots or worsen bleeding.
3) Reduce swelling and pain
Apply a cold pack to the outside of the cheek or lip in short intervals. This helps swelling and discomfort. Avoid placing ice directly on gums or teeth.
4) Look for tooth fragments and check lip cuts
When a tooth chips, fragments can embed in the lip. If a lip cut occurred at the same time as a tooth fracture, gently evert the lip (turn it outward) and look for a hard fragment under the skin. Do not dig for it; note it for the dentist.
Chipped or Broken Tooth: Tooth-Saving Steps
Step-by-step
- Rinse the mouth gently with clean water to remove blood and debris.
- Find and save any broken pieces. Handle fragments carefully and store them in milk or saline if possible, or wrap in clean, damp gauze. Bring them to the dentist.
- Control bleeding with gauze pressure if the gum is bleeding.
- Use a cold pack on the cheek to reduce swelling.
- Avoid very hot, cold, or sugary foods if the tooth is sensitive. Soft foods are best.
- Arrange prompt dental evaluation the same day, especially if there is pain, visible yellow dentin or red pulp, or sharp edges cutting the tongue or lip.
Practical example: small chip during sports
A child chips a front tooth on a ball. The tooth edge is sharp and the lip is slightly bleeding. Rinse gently, apply gauze to the lip, save the fragment in milk, and cover the sharp edge temporarily with dental wax if available (or sugar-free chewing gum as a short-term barrier) until a dentist smooths or repairs it.
Loose or Displaced Tooth: Stabilize and Get Dental Care
If a tooth is loose or pushed out of position, avoid wiggling it. Do not attempt to straighten a displaced tooth unless a dental professional instructs you to do so. The goal is to protect the tooth and surrounding bone and get urgent dental care.
Step-by-step
- Have the child avoid biting with the injured tooth.
- If bleeding is present, apply gentle gauze pressure.
- Use a cold pack on the cheek.
- Offer soft foods only and avoid using straws, which can increase bleeding in some mouth injuries.
- Seek urgent dental evaluation the same day. Teeth that are displaced may need repositioning and splinting.
Knocked-Out Tooth (Avulsion): Decide Baby vs Permanent, Then Act Fast
This is the most urgent dental emergency. The tooth’s root surface contains living cells that help it reattach. These cells die quickly if the tooth dries out. Time and moisture are critical.
Step 1: Identify whether it’s a permanent tooth
As a rough guide, front permanent incisors often appear around ages 6 to 8, but timing varies. If you are unsure, treat it as a permanent tooth until a dentist advises otherwise, but be cautious: replanting a baby tooth is generally avoided. If you cannot confidently identify the tooth type, prioritize rapid dental consultation while keeping the tooth properly stored.
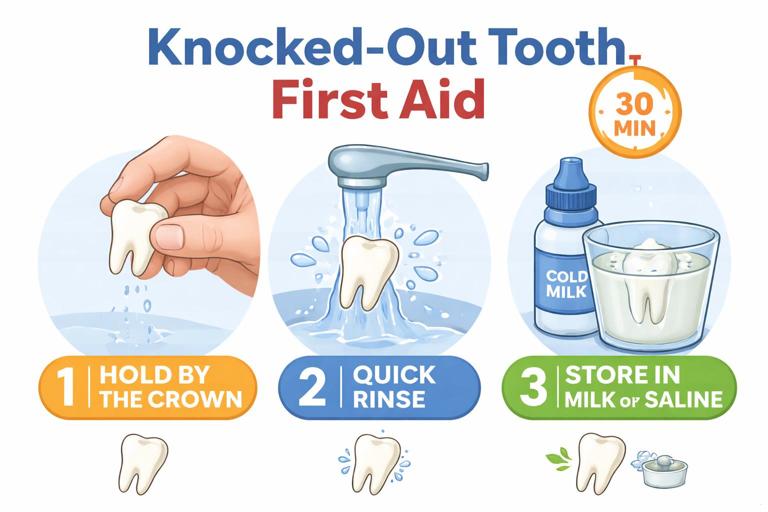
Step 2: Handle the tooth correctly
- Pick up the tooth by the crown (the chewing/biting part), not the root.
- Do not scrub, scrape, or sterilize the tooth.
- If the tooth is dirty, rinse it briefly with clean running water or saline for a few seconds. Do not use soap or chemicals.
Step 3A: If it is a permanent tooth and the child is cooperative, consider immediate replantation
Immediate replantation offers the best chance of saving the tooth when it can be done safely. The child must be alert and able to follow instructions, and there should be no risk of choking.
- Orient the tooth correctly (front surface forward). If unsure, do not force it.
- Gently insert the tooth into the socket using light pressure.
- Have the child bite down on gauze or a clean cloth to hold it in place.
- Go to an emergency dentist immediately.
Step 3B: If you cannot replant, store the tooth in the right medium
If replantation is not possible, keep the tooth moist and get urgent dental care. Best options include:
- Cold milk (preferred and widely available).
- Saline solution.
- A tooth preservation kit if available.
- As a last resort, the child’s saliva: place the tooth in the space between the cheek and gums only if the child is old enough not to swallow it. Do not do this for very young children due to choking risk.
Avoid storing the tooth dry (in a tissue) and avoid plain water for long storage, as it can damage root cells.
Step 4: Care for the mouth while transporting
- Control bleeding from the socket with gentle gauze pressure.
- Use a cold pack on the cheek.
- Do not let the child eat hard foods.
- Go to a dentist or emergency dental service immediately; minutes matter.
Practical example: tooth knocked out at school
A 9-year-old falls and a front tooth is on the ground. A staff member picks it up by the crown, gives it a quick rinse, and places it in a cup of cold milk from the cafeteria. The child bites gauze to control socket bleeding while the caregiver contacts the family and arranges immediate dental transport. This approach protects the tooth’s viability far better than wrapping it in a dry tissue.
Bleeding Control for Mouth and Gum Injuries
Mouth bleeding can seem heavy because saliva mixes with blood. Effective control depends on steady pressure and time.
Step-by-step
- Have the child sit up and lean forward slightly.
- Place folded gauze (or a clean cloth) directly on the bleeding site.
- Apply firm, continuous pressure for 10 minutes without lifting to check.
- If bleeding continues, replace with fresh gauze and repeat pressure.
- For tongue or lip cuts, pressure can be applied from both sides if possible (for example, gauze outside the lip and gauze inside).
If a tooth socket is bleeding after an avulsion, biting on gauze is often effective. If the child cannot tolerate gauze, a clean cloth can be used. Avoid frequent peeking, which breaks clots.
When Dental Injuries Need Urgent or Emergency Care
Seek urgent dental or emergency evaluation if any of the following are present:
- A permanent tooth is knocked out, loose, or displaced.
- There is uncontrolled bleeding after 10 to 20 minutes of steady pressure.
- The child has difficulty breathing or is choking on blood or tooth fragments.
- You suspect a jaw fracture (difficulty opening mouth, bite feels “off,” facial asymmetry, significant swelling, or pain with jaw movement).
- A tooth fracture exposes inner layers (yellow dentin or red pulp) or causes significant pain.
- There are deep cuts to the tongue, lip, or gums that gape open or continue to bleed.
- The injury involves contamination (dirt, gravel) or an animal/human bite to the mouth.
- The child has signs of significant facial injury along with dental trauma (for example, severe swelling, bruising, or altered tooth alignment).
Special Situations and Practical Tips
Dental injuries during braces or orthodontic appliances
Braces can cause lip and cheek cuts during impacts. If a wire is poking, cover it with orthodontic wax if available. Do not cut wires unless instructed by an orthodontic professional. Control bleeding with gauze and seek orthodontic advice promptly.
What to do if a tooth is “missing” after trauma
If a tooth cannot be found, consider that it may be embedded in the lip, lodged in clothing, or in the mouth. If the child is coughing, gagging, wheezing, or having trouble breathing, treat it as a possible inhalation risk and seek emergency evaluation. If the child swallowed the tooth and is otherwise well, it is usually not dangerous, but dental evaluation is still needed for the socket and to confirm the tooth was not inhaled.
Reducing repeat nosebleeds at home or school
- Address dryness: use a humidifier at night in dry seasons and consider saline spray.
- Trim fingernails and discourage nose picking.
- Teach gentle nose blowing and avoid forceful blowing during colds.
- For children with frequent nosebleeds, discuss evaluation with a clinician to rule out chronic irritation, allergies, or less common causes.
Building a small “face injury” kit for home or classroom
- Disposable gloves and hand sanitizer.
- Gauze pads and a roll of gauze.
- Saline (single-use pods are convenient).
- Cold pack (instant or freezer pack).
- Small clean container with lid (for tooth fragments) and access plan for milk.
- Orthodontic wax (useful even without braces for sharp tooth edges).
Quick Reference: Nosebleed vs Dental Injury Actions
Nosebleed
- Sit upright, lean forward.
- Pinch soft part of nose for 10 minutes without checking.
- Repeat once if needed.
- Avoid head back, deep packing, and nose blowing afterward.
Dental injury
- Control bleeding with gauze pressure; sit forward.
- Rinse gently; do not scrub.
- Save fragments; keep moist.
- For knocked-out permanent tooth: replant if safe or store in milk/saline and go immediately.