Why “Stabilize and Refer” Matters for Bones, Joints, and the Spine
In infants and children, injuries to bones, joints, and the spine can look deceptively mild at first. A child may still walk on a fractured foot, or a toddler may keep using an injured arm while crying intermittently. The safest approach for suspected fractures, sprains, dislocations, and spinal injuries is to prevent further harm by limiting movement, supporting the injured area in the position found, and arranging appropriate medical evaluation. “Stabilize and refer” means you focus on protection and comfort rather than trying to “fix” alignment, test range of motion, or push through pain.
Children’s bones have growth plates (areas of developing cartilage near the ends of long bones). Injuries that seem like “just a sprain” can involve a growth plate and may require specific treatment to prevent long-term problems. Likewise, spinal injuries are uncommon but high-stakes; unnecessary movement can worsen damage. Your role is to recognize patterns that suggest serious injury, immobilize as best you can with available materials, and get the child to the right level of care.

Recognizing the Difference: Fracture vs Sprain vs Dislocation
Fracture (broken bone)
A fracture can be complete or incomplete (such as a “greenstick” fracture, more common in children). It may be closed (skin intact) or open (bone ends or deep tissue exposed through a wound). Signs and clues include:
- Pain at a specific point on the bone, especially when touched.
- Swelling and bruising that increases over minutes to hours.
- Deformity: an unusual angle, shortening, or rotation of a limb.
- Loss of function: refusal to use the limb, inability to bear weight, or guarding.
- Crepitus (a grating sensation) is possible but do not try to elicit it.
- In infants and toddlers: persistent crying with movement, refusal to crawl/stand, or not using an arm after a pull or fall.
Sprain/strain (ligament or muscle/tendon injury)
Sprains involve ligaments (connecting bone to bone), commonly at the ankle, knee, or wrist. Strains involve muscles or tendons. Signs include:
- Pain around a joint rather than along the bone shaft.
- Swelling and tenderness, often without obvious deformity.
- Pain with movement or weight-bearing.
- Sometimes a “pop” at the moment of injury (more common in older children/teens).
Important: In children, a growth plate injury can mimic a sprain. If pain is significant, the child cannot use the limb normally, or there is point tenderness near the end of a bone, treat it like a fracture and refer.
- Listen to the audio with the screen off.
- Earn a certificate upon completion.
- Over 5000 courses for you to explore!

Download the app
Dislocation (bone out of joint)
Dislocations often involve the shoulder, elbow, fingers, or kneecap. Signs include:
- Obvious joint deformity or “out of place” appearance.
- Severe pain and inability to move the joint.
- Numbness/tingling beyond the joint if nerves are stretched or compressed.
Do not attempt to relocate a dislocated joint. Stabilize in the position found and seek urgent medical care.
Red Flags That Require Urgent Evaluation
Seek urgent medical assessment (emergency department or urgent care depending on local guidance) when any of the following are present:
- Obvious deformity, suspected fracture, or inability to bear weight/use the limb.
- Open wound near a suspected fracture, or bone visible.
- Severe swelling, rapidly increasing bruising, or pain that is out of proportion.
- Numbness, tingling, weakness, or inability to move fingers/toes.
- Pale, cool, or blue fingers/toes; delayed capillary refill; weak or absent pulse beyond the injury.
- Injury involving the neck or back, or symptoms suggesting spinal involvement (see spinal section below).
- High-energy mechanism (fall from height, vehicle collision, sports collision) even if symptoms seem mild.
- Child is very young and cannot reliably describe pain, especially after a significant fall.
When in doubt, treat as a fracture/spinal injury and refer. It is safer to immobilize and be told “it’s a sprain” than to miss a fracture or spinal injury.
General Step-by-Step: Stabilizing a Suspected Fracture or Sprain
Step 1: Keep the child still and calm
Position the child comfortably and discourage walking or using the injured part. Pain and fear increase muscle tension and can worsen displacement. Use simple, reassuring instructions and avoid repeated examinations by multiple adults.
Step 2: Expose and inspect gently
Remove jewelry (rings, bracelets, tight shoes) early if swelling is expected. If clothing must be removed, cut it rather than pulling it over a painful limb. Look for swelling, bruising, deformity, and wounds.
Step 3: Check circulation, sensation, and movement beyond the injury (CSM)
Before and after splinting, check:
- Circulation: skin color and temperature of fingers/toes; capillary refill (press nail bed until it blanches, release, and observe return of color); compare to the other side.
- Sensation: ask if the child feels touch on fingers/toes; note numbness or tingling.
- Movement: ask the child to wiggle fingers/toes if it does not cause severe pain; do not force movement.
Document mentally what you find. Any worsening after splinting means the splint may be too tight or the position needs adjustment.
Step 4: Immobilize in the position found
Do not straighten a deformed limb. Immobilize the joints above and below a suspected fracture (for example, for a forearm injury, immobilize wrist and elbow). For a sprain, immobilize the joint itself and limit weight-bearing.
Step 5: Cold and elevation (when appropriate)
Apply a cold pack wrapped in cloth for short intervals to reduce pain and swelling. Elevate the injured limb if it does not increase pain and does not require moving a suspected fracture into a new position. Avoid tight wraps that could compromise circulation.
Step 6: Arrange medical evaluation and safe transport
Choose transport that minimizes movement and pain. For lower-limb injuries, avoid having the child hop. Use a stroller, wheelchair, or carry if safe. For suspected spinal injury, do not transport in a private vehicle unless instructed by emergency services; keep the child still and wait for trained responders.
Improvised Splinting: Practical Techniques with Common Items
A splint’s job is to prevent movement, reduce pain, and protect soft tissues. You can create effective splints using household or school supplies. The key principles are padding, support, and secure (but not tight) fastening.
Materials you can use
- Rigid supports: cardboard, a magazine rolled and taped, a ruler, a wooden board, a folded clipboard, a thick book, a stick.
- Soft supports: towels, clothing, blankets, foam, gauze rolls.
- Fasteners: cloth strips, triangular bandage, scarves, belts, tape (avoid tape directly on skin if possible).
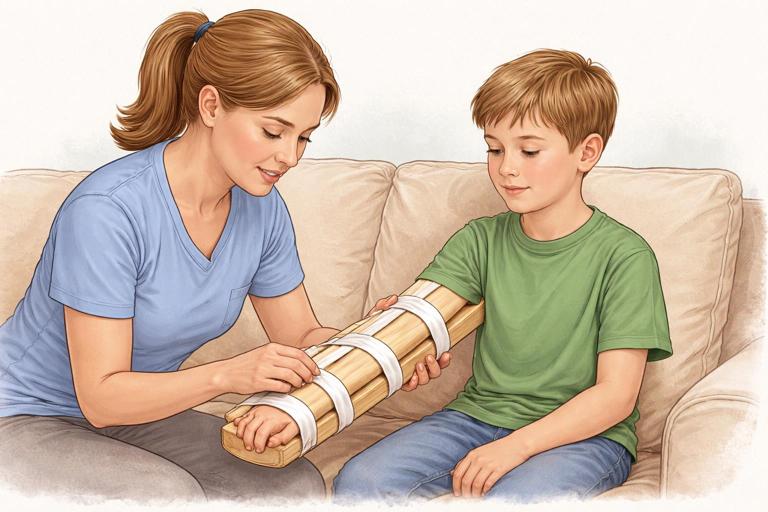
How to splint an arm (forearm/wrist)
Example: child falls from playground equipment and holds the wrist, refusing to rotate the forearm.
- Place the forearm across the child’s body in a comfortable position, palm facing in or down as tolerated.
- Pad a rigid support (cardboard or magazine) and place it along the forearm from below the elbow to past the wrist.
- Secure with cloth strips above and below the injury and at the wrist, avoiding knots directly over the injury.
- Use a sling: a triangular bandage or scarf supporting the forearm, with the hand slightly elevated above elbow level if comfortable.
- Optional swathe: secure the arm to the chest with another cloth wrap to limit shoulder movement.
- Recheck CSM in fingers.
How to splint a lower leg/ankle
Example: child twists ankle during sports and cannot bear weight.
- Keep the ankle in the position found; do not force it to a “neutral” angle.
- Pad both sides of the lower leg and ankle with towels or clothing.
- Place rigid supports along the sides from below the knee to beyond the foot if possible.
- Secure with wide wraps above and below the ankle and around the lower leg; ensure toes remain visible for circulation checks.
- Recheck CSM in toes.
If you do not have rigid materials, a soft splint can still help: wrap the ankle with padding and a snug (not tight) elastic bandage, then keep the child non-weight-bearing and refer for evaluation.
How to immobilize a finger
Example: finger jammed by a ball, swollen and painful.
- Remove rings immediately.
- Buddy-tape the injured finger to the adjacent finger with padding between them.
- Do not tape over the knuckles so tightly that movement is impossible; the goal is support, not strangulation.
- Check fingertip color and warmth.
Clavicle (collarbone) injuries
Clavicle fractures are common after falls onto the shoulder. The child may support the arm and tilt the head toward the injured side.
- Use a sling to support the arm and reduce pull on the collarbone.
- Add a swathe to secure the arm against the torso.
- Do not attempt to “square the shoulders” or force posture correction.
Open Fractures and Wounds Near a Suspected Fracture
An open fracture (or a fracture with a nearby deep wound) has a higher risk of infection and bleeding. Treat it as urgent.
- Do not push protruding bone back in.
- Cover the wound with a sterile dressing or the cleanest cloth available.
- Control bleeding with gentle pressure around the wound; avoid pressing directly on exposed bone.
- Immobilize the limb as found, padding around the wound site.
- Monitor for signs of poor circulation beyond the injury.
Growth Plate Considerations: When “Just a Sprain” Isn’t
In children, pain near the end of a long bone (near the wrist, ankle, knee, or elbow) after a fall or twist can indicate a growth plate injury. These injuries may not look dramatic but can affect bone growth if untreated.
Practical rule: if the child has point tenderness near a joint, significant swelling, or cannot use the limb normally within a short period, immobilize and refer for imaging and evaluation. Avoid “testing” the joint by asking the child to repeatedly move it through full range.
Suspected Spinal Injuries: Recognition and Immediate Actions
When to suspect a spinal injury
Suspect injury to the neck or back when there is a concerning mechanism or symptoms suggesting spinal involvement. Examples include:
- Fall from height (bunk bed, stairs, playground structure) or diving impact.
- Vehicle collision, including bicycle or scooter struck by a car.
- Sports collision with head/neck impact (football, hockey, gymnastics, trampoline accidents).
- Any injury where the child reports neck or back pain, or you observe neck stiffness or abnormal head position.
- Numbness, tingling, weakness, or difficulty moving arms/legs.
- Loss of bladder/bowel control after injury.
- Altered alertness after trauma, making symptoms unreliable.
Immediate priorities: minimize movement
Your main job is to prevent the spine from moving. Do not ask the child to sit up, stand, or “walk it off.” If the child is found lying down, keep them lying down. If found sitting, keep them sitting and supported; do not reposition unless there is an immediate danger.
Manual stabilization of the head and neck
If you suspect a neck injury, stabilize the head in the position found using your hands:
- Kneel behind the child’s head (or at the side if space is limited).
- Place your hands on both sides of the child’s head, gently holding it still.
- Do not force the head to center if the child resists or pain increases.
- Continue until trained help takes over.
If the child is wearing a helmet (bike/sports), do not remove it unless it prevents airway access or the child is vomiting and you cannot manage safely with the helmet on. Helmet removal can cause neck movement; it is best done by trained responders with assistance.
If the child must be moved due to immediate danger
Only move the child if staying in place is more dangerous (fire, traffic, unstable structure). Use the simplest method that keeps the head, neck, and torso aligned:
- Use a firm surface if available (a door, board, or rigid stretcher-like item).
- Have multiple helpers if possible: one person stabilizes the head/neck, others move the shoulders/hips/legs together.
- Avoid twisting; move as a unit.
In real homes and schools, perfect technique may not be possible. The guiding principle is “as little movement as possible, keep the body aligned.”
School and Home Scenarios: Applying Stabilize-and-Refer
Scenario 1: Playground fall with forearm deformity
A 7-year-old falls from monkey bars and the forearm looks bent. The child is crying and guarding the arm.
- Keep the child seated and still; support the arm against the body.
- Check fingers for color, warmth, and ability to wiggle.
- Pad and splint the forearm in the position found; add a sling and swathe.
- Remove bracelets if present.
- Arrange urgent medical evaluation; do not allow the child to walk around holding the arm.
Scenario 2: Ankle twist during soccer, swelling increases
An 11-year-old twists an ankle, cannot bear weight, and swelling appears quickly.
- Stop play; seat the child.
- Check toes for circulation and sensation.
- Immobilize with a padded splint or supportive wrap; keep non-weight-bearing.
- Cold pack wrapped in cloth; elevate if comfortable.
- Refer for evaluation because inability to bear weight and significant swelling can indicate fracture or growth plate injury.
Scenario 3: Trampoline collision with neck pain
A 9-year-old collides heads on a trampoline and immediately complains of neck pain and tingling in one arm.
- Stop all movement; have the child remain still.
- Stabilize the head/neck in the position found.
- Do not remove the child from the trampoline unless there is immediate danger; prevent others from jumping.
- Arrange emergency evaluation; continue stabilization until help arrives.
What Not to Do (Common Mistakes)
- Do not “test” the injury by asking the child to move it repeatedly or bear weight “to see if it’s broken.”
- Do not attempt to straighten a deformed limb or push a bone back in.
- Do not attempt to relocate a dislocated joint.
- Do not apply tight circumferential wraps that can cut off circulation as swelling increases.
- Do not give food or drink if urgent surgery might be needed (follow local medical advice; when in doubt, keep the child NPO until evaluated).
- Do not ignore numbness, tingling, coolness, or color change beyond the injury; these are urgent signs.
Monitoring While Waiting for Care
After immobilizing, continue to observe the child and the injured area:
- Recheck CSM every 10–15 minutes if waiting for transport or help.
- Watch for increasing pain, increasing swelling, or new numbness/tingling.
- Keep the child warm with a blanket; shock can occur with painful injuries or bleeding.
- Keep the injured limb supported during any movement or transfer.
If symptoms worsen rapidly, the splint may be too tight or swelling may be compromising circulation. Loosen wraps slightly while maintaining support, and seek urgent reassessment.
Quick Reference: Splinting Checklist
1) Keep still; support the injured part in the position found. 2) Remove rings/shoes if swelling expected. 3) Check CSM (circulation, sensation, movement) beyond injury. 4) Pad rigid supports; immobilize joint above and below (fracture) or the joint (sprain). 5) Secure snugly, not tightly; keep fingers/toes visible. 6) Recheck CSM after splinting. 7) Cold pack wrapped in cloth; elevate if comfortable. 8) Refer for medical evaluation; use safe transport with minimal movement.