Mini Case Study Setup: A Realistic Project and the Scheduling Goal
This mini case study follows a small-to-mid commercial interior build-out from kickoff through closeout. The purpose is not to re-teach how to build a schedule from scratch, but to show how the schedule behaves across the full project lifecycle: how it is packaged for kickoff, how it is used to drive coordination, how it is adapted as the job transitions from rough-in to finishes, and how it becomes the backbone for closeout and punch list completion.
Project snapshot
- Type: 8,500 SF tenant improvement (office + conference rooms + break area)
- Delivery: Design-bid-build with a GC and multiple subs
- Contractual target: Substantial Completion by a fixed date to allow tenant move-in
- Key stakeholders: Owner rep, architect, MEP engineer, GC PM/superintendent, major subs (framing/drywall, electrical, mechanical, plumbing, fire alarm, sprinkler, flooring, paint, millwork), building management
Scheduling objective for this chapter: show how the schedule evolves from a kickoff artifact into a daily management tool, then into a closeout checklist that drives inspections, commissioning, training, O&M turnover, and punch list closure.
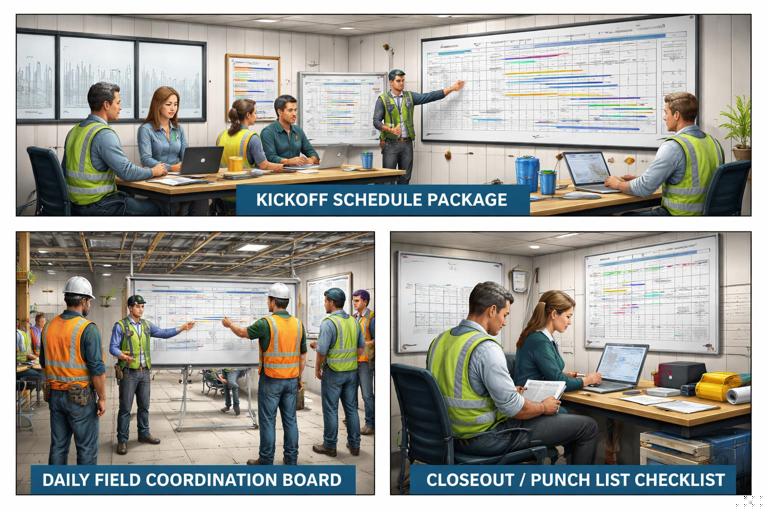
Kickoff: Turning the Schedule into a Coordination Contract
At kickoff, the schedule is more than a bar chart. It is a shared agreement about how the team will sequence work, when decisions must be made, and what “done” means at each milestone. The GC’s first move is to translate the schedule into a kickoff package that makes responsibilities and near-term actions unambiguous.
Kickoff deliverables built from the schedule
- Milestone map: a one-page view showing major phase gates (demo complete, rough-in complete, above-ceiling inspection, drywall close, finishes start, commissioning start, substantial completion, owner move-in, final completion).
- Responsibility matrix tied to milestones: who owns each milestone deliverable (e.g., “Above-ceiling inspection passed” is owned by GC + MEP subs; “As-builts submitted” owned by each trade; “Training completed” owned by equipment vendors and commissioning agent if applicable).
- Decision log schedule: a list of owner/architect decisions with “need-by” dates (finish selections, hardware sets, signage, IT room requirements, access control devices). This is not re-explaining procurement; it is showing how decisions are scheduled as work products.
- Meeting cadence aligned to phases: weekly OAC, weekly subcontractor coordination, daily huddles during high-density phases, and a dedicated closeout meeting starting before substantial completion.
Kickoff step-by-step: how the superintendent uses the schedule in week 1
- Step 1: Identify the first two phase gates (e.g., “Demo complete” and “Layout verified”). These become the first two “must-hit” dates communicated to all trades.
- Step 2: Convert the first 3–4 weeks into a constraint list: access hours, elevator reservations, noise restrictions, dumpster placement, hot work permits, and any building management requirements. Each constraint gets an owner and a due date.
- Step 3: Establish a submittal/approval “ready-to-build” checkpoint: the superintendent and PM confirm that the first wave of materials and shop drawings are approved or at least released for fabrication where allowed.
- Step 4: Create a field-ready “two-week pull plan” from the schedule: not a new planning method, but a practical extraction of near-term tasks with clear handoffs (e.g., “Framer completes wall layout in Area A by Tuesday 3 PM so electrical can start rough-in Wednesday AM”).
Early Execution: Using the Schedule to Drive Trade Coordination
Once work starts, the schedule’s value comes from how it forces clarity on handoffs. In this case study, the first major coordination risk is above-ceiling congestion: ductwork, sprinkler mains, cable tray, lighting, and fire alarm devices competing for space. The schedule must support coordination by making the “ceiling close” gate explicit and enforceable.
- Listen to the audio with the screen off.
- Earn a certificate upon completion.
- Over 5000 courses for you to explore!

Download the app

Practical example: Above-ceiling coordination as a scheduled deliverable
Instead of treating coordination as an informal process, the GC schedules a set of “coordination deliverables” that must be completed before ceiling close. These deliverables are not just paperwork; they are prerequisites to physical progress.
- Coordination drawing freeze date: last day to change routing without a formal change process.
- In-ceiling mockup/field fit check: a selected corridor bay is installed early to validate clearances and access panels.
- Ceiling close readiness walk: GC + MEP leads walk each zone and sign off that inspections are passed, photos taken, and access requirements met.
The schedule is updated to reflect these as discrete activities with owners. This prevents a common failure mode: drywall crews arriving on time while MEP is “almost done,” creating rework and ceiling removals later.
Step-by-step: scheduling the building inspection path without re-teaching inspection planning
In this project, the building department requires an above-ceiling inspection before insulation and drywall close. The schedule is used to manage the inspection path as a chain of readiness steps.
- Step 1: Define “inspection-ready” criteria for each zone (labels installed, supports complete, test results available, access panels framed, firestopping in place where required).
- Step 2: Schedule an internal pre-inspection 1–2 days before the official inspection. The pre-inspection is treated as a gate: if it fails, the official inspection is rescheduled immediately rather than “hoping it passes.”
- Step 3: Schedule the inspection request date as a visible activity so it is not forgotten amid production work.
- Step 4: Schedule a “post-inspection close” activity to capture corrections quickly and avoid losing momentum.
Mid-Project Transition: Rough-In to Finishes Without Losing Control
The most common schedule drift in tenant improvements occurs during the transition from rough-in to finishes. The work changes character: more trades overlap, more owner/architect decisions surface, and quality expectations become visible. The schedule must shift from “production sequencing” to “area turnover management.”
Area turnover strategy in the schedule
Instead of treating the building as one continuous workfront, the GC divides it into zones (e.g., East offices, West offices, conference suite, break area, corridors). Each zone has a mini-sequence: rough complete, inspection passed, close walls, prime/paint, ceilings, lights/devices, flooring, trim, final touch-ups. The schedule is then used to enforce turnover rules:
- Rule: One trade cannot “camp” in a zone. If a trade misses its window, it must re-enter later through a controlled rework list.
- Rule: Zone turnover requires a checklist (photos above ceiling, test reports, tagged devices, access panels installed, firestopping complete).
- Rule: Finishes start only after a defined readiness gate to avoid damage and rework.
Practical example: Finish decisions and late changes
During finishes, the owner requests a change: upgraded carpet tile in the conference suite and a feature wall paint color. The schedule is used to manage the change impact in a controlled way:
- Identify the affected zone (conference suite) and the activities that depend on the finish (flooring install, base, furniture move-in).
- Insert a “decision final” date and a “material on site” date as explicit activities, then align the zone turnover so other zones can proceed.
- Protect the overall milestone by resequencing: shift painting and ceiling work in other zones forward while the conference suite waits for materials.
The key lesson is that the schedule is not only a forecast; it is a negotiation tool that makes tradeoffs visible: “If we change this finish now, we can still hit substantial completion if we swap the conference suite sequence with the west offices.”
Pre-Closeout Planning: Starting Closeout Before Substantial Completion
Closeout fails when it is treated as a post-construction administrative task. In this case study, closeout is scheduled as a parallel workstream that begins while finishes are underway. The schedule includes closeout activities with clear acceptance criteria and owners.
Closeout workstream components tied to the schedule
- Testing and commissioning activities: functional tests, TAB (if applicable), life safety tests, emergency lighting tests, fire alarm acceptance, sprinkler inspections.
- Documentation deliverables: O&M manuals, warranty letters, attic stock, as-built markups, equipment start-up sheets, inspection sign-offs.
- Owner training: scheduled sessions for building systems (thermostats/BMS interface if present, electrical panels, shutoffs, specialty equipment).
- Turnover packages by system: instead of one giant binder at the end, the GC schedules partial turnovers (e.g., HVAC package due two weeks before substantial completion).
Step-by-step: building a “closeout-ready” schedule segment
- Step 1: List turnover deliverables by system (HVAC, electrical, plumbing, fire/life safety, architectural finishes) and assign each to a responsible party.
- Step 2: Add “draft due” and “final due” dates for each package. Draft due dates occur before substantial completion so gaps can be corrected without delaying final completion.
- Step 3: Schedule training as an activity with prerequisites: training cannot occur until systems are operational and spaces are accessible and safe.
- Step 4: Add a “GC closeout audit” activity: the PM/superintendent checks that each required document is present and matches installed conditions (model numbers, serial numbers, locations).
Punch List: Scheduling Quality Closure Like Production Work
Punch list management is where many projects lose days or weeks because the work is small, scattered, and dependent on access and coordination. The schedule must treat punch list as a planned sequence with zones, owners, and verification steps, not as an open-ended “fix it when you can.”
Types of punch lists in this case study
- Pre-punch (GC internal): created before the architect/owner walk to reduce the official list size.
- Architect/owner punch: formal list tied to substantial completion acceptance.
- Life safety punch: AHJ/building management items that must be corrected for approvals.
- Commissioning/functional punch: issues found during testing (controls tuning, balancing adjustments, device labeling).
Step-by-step: turning punch list into a schedule-driven workflow
- Step 1: Define zones and access rules: each zone has a daily access window and a “clean/secure” requirement at day end.
- Step 2: Convert punch items into work packages: group by trade and location (e.g., “West offices: door hardware adjustments + touch-up paint + ceiling tile replacements”). This reduces mobilization waste.
- Step 3: Assign a “ready for re-inspection” date per zone: the schedule includes a verification activity where the superintendent confirms completion before calling the architect back.
- Step 4: Add a re-inspection cadence: for example, architect walk every Tuesday/Friday. The schedule is aligned so trades finish items 24 hours before each walk.
- Step 5: Track “open-to-close cycle time” as a performance metric: how many days from item logged to verified complete. The schedule is adjusted if cycle time increases (often a sign of access conflicts or unclear responsibility).
Practical example: punch list bottleneck and schedule response
During punch, the team discovers a bottleneck: door hardware issues are preventing sign-off in multiple zones. The schedule response is to create a focused micro-plan:

- Lock hardware scope: confirm which items are warranty vs. install vs. design clarification.
- Prioritize egress and life safety doors: schedule these first to avoid inspection delays.
- Set a daily verification loop: hardware sub completes fixes by noon; superintendent verifies by 2 PM; remaining issues are escalated same day.
This approach prevents the common pattern where the same doors appear on punch lists repeatedly because fixes are partial or unverified.
Substantial Completion to Final Completion: Managing the Gap
Substantial completion is not the end of schedule management; it is a milestone that often introduces new constraints: partial occupancy, furniture moves, IT installation, and heightened sensitivity to noise and dust. The schedule must explicitly manage the “gap period” between substantial and final completion.
What changes after substantial completion in the schedule
- Access constraints tighten: work may be limited to nights/weekends or specific rooms.
- Protection and cleanliness tasks increase: floor protection, dust control, daily cleanup become scheduled activities, not assumptions.
- Responsiveness expectations rise: small issues must be addressed quickly to maintain owner confidence and avoid backcharges.
Step-by-step: scheduling the final completion path
- Step 1: Create a “final completion checklist” activity group that includes remaining punch, final inspections, final lien waivers, final as-builts, and warranty start documentation.
- Step 2: Schedule a “document cure period”: time to correct rejected closeout submittals (missing serial numbers, incomplete test reports, unsigned warranties).
- Step 3: Schedule final authority sign-offs: building management acceptance, AHJ final, architect final certification if required.
- Step 4: Schedule demobilization and restoration: remove temporary protection, patch/paint touch-ups from protection removal, final clean, and return of keys/badges.
Artifacts You Would See on This Project (Examples You Can Replicate)
The following are examples of schedule-adjacent artifacts used in the case study to keep the project moving from kickoff to closeout. They are not templates; they are the types of outputs that make the schedule actionable.
Example: zone turnover checklist (excerpt)
Zone: West Offices 1–12  | Turnover Gate: Ready for Finishes  | Date: ________  | Verified by: ________
- Above-ceiling photos captured and filed (location labeled)
- Firestopping complete at all penetrations (spot-checked)
- Pressure tests complete (plumbing) and recorded
- Duct leakage/TAB pre-check complete (if applicable)
- Device boxes set to finish plane; cover plates staged
- Ceiling grid areas clear; access panels framed where required
- Inspection stickers posted; corrections closed
- Floor swept; debris removed; materials staged outside zone
Example: punch list daily plan (excerpt)
Date: ________  | Re-inspection: Tue/Fri 10:00 AM  | Goal: Close 40 items/day
Zone priorities:
1) Corridors (life safety signage, ceiling tiles, paint touch-ups)
2) Conference Suite (hardware, AV rough-in plates, base)
3) Break Area (plumbing trim, GFCI labels, caulk)
Trade assignments:
- Paint: Corridors touch-up complete by 12:00
- Hardware: Conference doors 201–208 complete by 2:00
- Electrical: Device plates + labeling in Break Area by 3:00
Verification:
- Superintendent walk at 3:30; photos of completed items uploaded
Key Takeaways Embedded in the Case Study Workflow
This case study demonstrates a practical mindset: the schedule is not only a planning artifact; it is a lifecycle management system. At kickoff it becomes a coordination contract; during execution it enforces readiness gates and zone turnovers; during closeout it becomes a deliverable tracker; and during punch it becomes a production plan for small, scattered work.