Why Cuts, Bruises, and Soft-Tissue Injuries Are So Common at School
Playgrounds, gym classes, hallways, and sports fields create the perfect mix of speed, hard surfaces, and crowded movement. Most injuries are minor, but they can look dramatic because children bleed easily from small cuts, develop large bruises from small impacts, and react strongly to pain or fear. “Soft-tissue injuries” is a practical umbrella term for damage to skin, muscle, and the tissues under the skin (including small blood vessels). In school settings, the most frequent problems are superficial cuts and scrapes, bruises (contusions), and muscle bumps or minor strains from falls, collisions, or equipment contact.
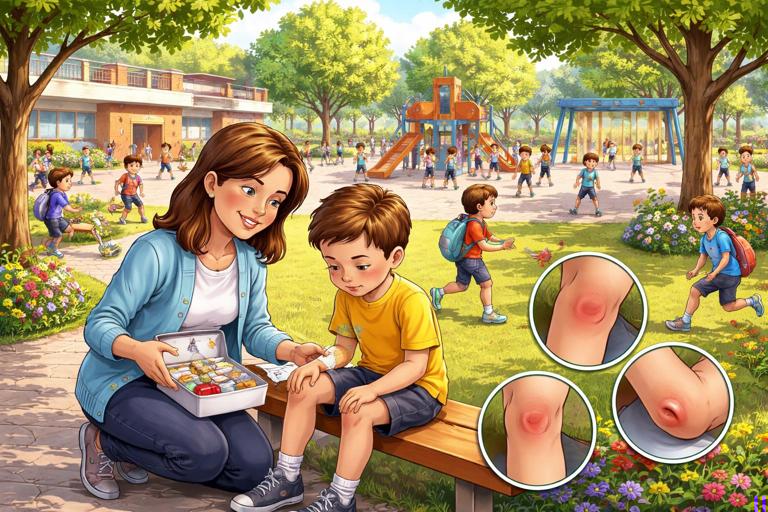
Your goals in these incidents are to protect the child from further harm, control bleeding, clean and protect the wound, reduce swelling and pain, and recognize when the injury is more than “just a scrape.” Because this chapter focuses on everyday incidents, it emphasizes what to do on-site with typical first-aid supplies and how to document and communicate clearly with caregivers.
Common Mechanisms in School and Playground Settings
Typical ways these injuries happen
Falls onto rough surfaces (asphalt, gravel, turf): scrapes (“road rash”), shallow cuts, embedded dirt.
Collisions (running into peers, poles, benches): bruises, lip/cheek bites, “goose egg” swelling on limbs.
Equipment contact (swings, balls, climbing structures): localized bruising, pinches, small lacerations.
Continue in our app.- Listen to the audio with the screen off.
- Earn a certificate upon completion.
- Over 5000 courses for you to explore!

Download the app
Friction injuries (slides, ropes, monkey bars): blisters, abrasions on palms, forearms, thighs.
Minor crush/pinch injuries (doors, playground gates): bruising, swelling, small cuts around fingers.
Why they may look worse than they are
Scalp and face bleed a lot even from small cuts because of rich blood supply.
Bruises spread as blood tracks under the skin; the visible area can grow over hours.
Kids’ skin is delicate, so abrasions can look raw and painful.
Fear and embarrassment can amplify crying and make it harder to assess.
Quick On-Scene Approach for Minor Incidents (School-Friendly)
In a busy school environment, a simple structure helps you stay consistent. Think: stop the activity, check the area, check the child, then treat.
1) Stop the activity and make the area safe
Pause play, move other children back, and prevent crowding.
If the child is on equipment or in a traffic area (hallway, court), guide them to a safer spot if they can walk comfortably.
Put on gloves if available before touching blood or open skin.
2) Look for the main problem you can treat on-site
Bleeding? Identify where it’s coming from and how heavy it is.
Skin damage? Abrasion, cut, blister, or puncture?
Swelling and tenderness? Suggests bruise or deeper soft-tissue injury.
Function? Can they move the limb normally and use it in a simple way (wiggle fingers, bend elbow, walk a few steps)? If not, treat as more than minor and refer per your setting’s protocol.
3) Calm and position
Have the child sit if they feel shaky or if there is visible bleeding.
Use simple choices: “Do you want to hold the gauze or should I?” This improves cooperation.
Keep the injured part supported and still while you prepare supplies.
Cuts and Scrapes (Abrasions and Minor Lacerations)
How to tell what you’re seeing
Abrasion: top layer of skin scraped off; oozing, dirt embedded, “raw” appearance.
Minor laceration: a cut with separated skin edges; may bleed steadily.
Puncture: small surface hole with deeper track (e.g., pencil tip, nail, thorn). These can look small but carry higher infection risk.
Step-by-step: managing a typical playground scrape
This sequence works well for knees, elbows, palms, and shins.
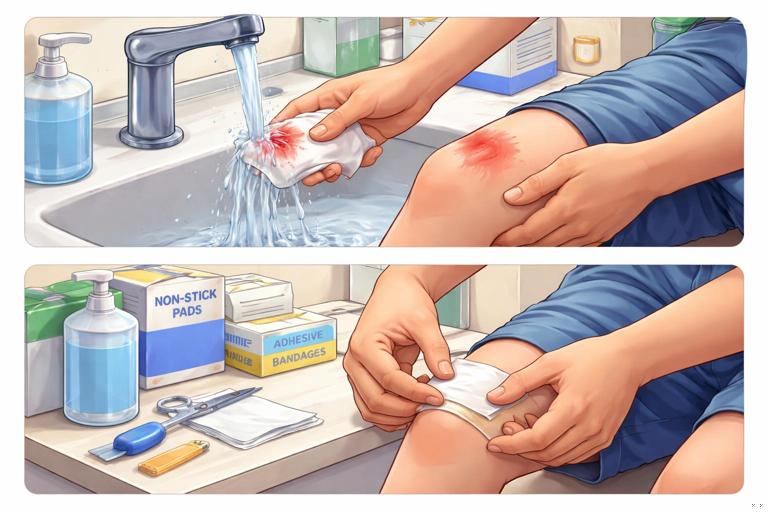
Step 1: Control bleeding. Apply gentle, steady pressure with gauze or a clean cloth. For most scrapes, bleeding slows quickly once pressure is applied.
Step 2: Rinse thoroughly. Use clean running water or saline if available. Rinsing is the most important cleaning step. Let water flow over the wound to lift dirt away.
Step 3: Remove visible debris. If small particles remain, use damp gauze to wipe outward from the center. If grit is deeply embedded and won’t rinse out easily, the child may need medical cleaning to prevent “tattooing” and infection.
Step 4: Clean the surrounding skin. Wash around the wound with mild soap and water, keeping soap out of the raw area as much as possible.
Step 5: Dry and protect. Pat dry around the wound. Apply a thin layer of appropriate ointment if permitted by your setting’s policy and the child’s allergies are known. Cover with a non-stick pad or an adhesive bandage sized to fully cover the abrasion.
Step 6: Recheck comfort and movement. Ask the child to gently bend and straighten the joint. Adjust dressing so it doesn’t pull or limit movement.
Step 7: Give simple care instructions. “Keep it covered for the rest of the day. If the bandage gets wet or dirty, change it.”
Step-by-step: managing a small cut with steady bleeding
Step 1: Direct pressure. Press with gauze for several minutes without peeking. “Peeking” breaks clots and restarts bleeding.
Step 2: Elevate if practical. If it’s an arm or leg and the child can tolerate it, raise the limb above heart level while maintaining pressure.
Step 3: Once bleeding slows, rinse. Rinse with clean water/saline. Avoid aggressive scrubbing inside the cut.
Step 4: Close and cover if appropriate. If the cut edges are clean and come together easily, adhesive wound-closure strips may help (only if you are trained and your policy allows). Otherwise, cover with a sterile dressing.
Step 5: Monitor for re-bleeding. If blood soaks through, add more gauze on top and keep pressure. Do not remove the original pad.
When a cut or scrape needs more than routine first aid
Escalate according to your school policy and local medical guidance when you see any of the following:
Bleeding that does not stop with sustained direct pressure.
A cut with gaping edges, visible fat, or a flap of skin that won’t lay flat.
Embedded debris you cannot rinse out (gravel, glass, wood splinters deep in the wound).
Animal or human bites (higher infection risk and special follow-up needs).
Puncture wounds (especially from dirty objects) or wounds through shoes.
Wounds on high-risk areas: eyelids, lips with border involvement, genitals, or over joints where movement keeps reopening the cut.
Signs of infection developing later: increasing redness, warmth, swelling, pus, red streaking, worsening pain, or fever.
Bruises and Contusions
What a bruise is and what to expect
A bruise forms when small blood vessels break under the skin due to impact. The skin may look blue, purple, or red at first, then change to green/yellow as it heals. Swelling can appear quickly, and the bruise may spread beyond the point of impact over the next day. Pain is usually worst early and improves steadily.
Step-by-step: first aid for a typical bruise
Step 1: Check function. Ask the child to move the nearby joint and use the limb in a simple way. If they cannot use it normally, treat it as potentially more serious and refer.
Step 2: Apply cold. Use a cold pack wrapped in cloth (never directly on skin). Apply for about 10–20 minutes, then remove. In school settings, shorter intervals may be more practical; reapply later if needed.
Step 3: Gentle compression if tolerated. A light elastic wrap can reduce swelling for some injuries, but it should never cause numbness, tingling, increased pain, or color change in fingers/toes.
Step 4: Elevate if practical. Elevation can reduce throbbing and swelling for arm/leg bruises.
Step 5: Reassess after 10–15 minutes. Pain should begin to settle. If pain escalates or function worsens, escalate care.
Bruise patterns that deserve extra attention
Rapidly enlarging swelling or a very firm “tight” area, which can suggest a deeper bleed.
Severe pain out of proportion to the visible bruise.
Bruising with numbness/tingling below the injury, suggesting pressure on nerves or circulation issues.
Bruises in unusual locations (behind the ear, around the eyes, on the neck) following a fall or collision—these may signal a more significant injury and should be evaluated per protocol.
Frequent unexplained bruises or bruises in patterns (e.g., clear handprint/strap-like marks). In a school setting, follow safeguarding/mandatory reporting procedures.
Soft-Tissue Injuries Beyond Bruises: Bumps, Strains, and Overuse
Muscle bumps and “charley horse” impacts
A direct blow to a muscle (common in sports) can cause localized pain, swelling, and stiffness. The child may limp or guard the area but still be able to move.
Immediate care: cold pack, rest from activity, and gentle positioning for comfort.
Watch for: increasing swelling, worsening pain, or inability to bear weight, which may indicate a more significant injury.
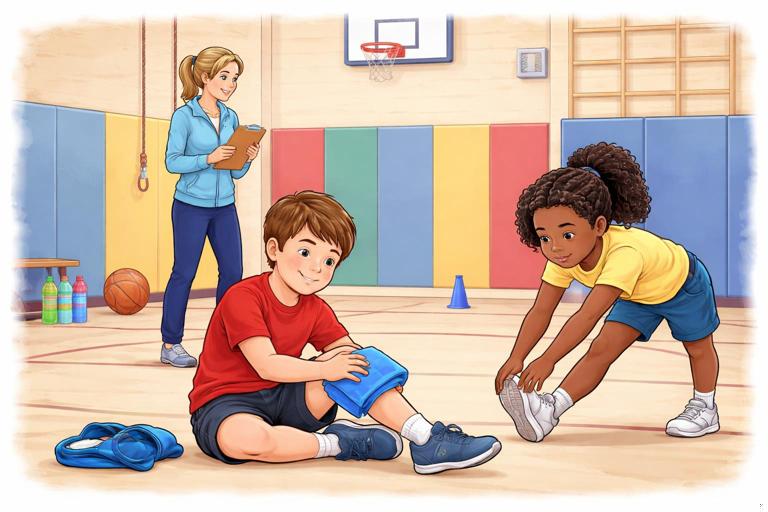
Minor strains from sudden movement
A strain is a stretch or small tear in muscle or tendon. In school, this may happen during sprinting, jumping, or awkward landings. The child often reports a “pull” sensation and pain with specific movements.
On-site care: stop the activity, apply cold, and encourage gentle rest. Avoid forcing stretches.
Practical example: A child sprints in PE and grabs the back of the thigh. Have them sit, apply a wrapped cold pack to the area, and keep them out of running for the remainder of class. Notify caregivers to monitor and consider medical evaluation if walking remains painful later.
Overuse aches (recess and sports seasons)
Some “soft-tissue injuries” are not from one big fall but from repeated stress: sore shins after lots of running, wrist soreness from repeated cartwheels, or heel pain during growth spurts. These often present as gradually increasing pain rather than a single moment of injury.
On-site approach: reduce activity, apply cold after activity if sore, and document patterns (when it happens, what triggers it).
Escalate if pain persists, worsens, or affects normal walking/hand use.
Blisters, Friction Burns, and “Rope/Slide” Injuries
Recognizing friction injuries
Friction injuries occur when skin rubs against a surface, creating a painful raw patch (abrasion) or a fluid-filled blister. Common examples include palms from monkey bars, heels from new shoes, and thighs from slides.
Step-by-step: blister care in a school setting
Step 1: Clean the area. Wash with mild soap and water or rinse with clean water.
Step 2: Decide whether to leave it intact. An intact blister roof protects against infection. In general, do not pop blisters at school.
Step 3: Protect from rubbing. Cover with a blister dressing or a non-stick pad secured so it won’t slide.
Step 4: If it has opened. Rinse gently, leave any attached skin flap in place if it lays flat, cover with a non-stick dressing, and keep it clean and protected.
Rope burns and slide burns
Care: rinse, remove debris, cover with a non-stick dressing. These can sting intensely; slow, gentle rinsing helps.
Referral: large friction injuries, wounds with embedded dirt you can’t remove, or injuries that limit hand use may need medical evaluation.
Pinch and Minor Crush Injuries (Fingers, Doors, Equipment)
Fingers are frequently caught in doors, bench hinges, and playground gates. Even when bones are not broken, soft tissues can swell quickly and become very painful.
Step-by-step: first aid for a pinched finger
Step 1: Remove from the source and inspect. Look for cuts, nail damage, and swelling. Check finger color and warmth.
Step 2: Cold pack. Apply wrapped cold for 10–20 minutes.
Step 3: Cover any small cuts. Rinse and bandage.
Step 4: Check movement and sensation. Ask the child to gently bend and straighten the finger. Ask if they feel tingling or numbness.
Step 5: Escalate if needed. Significant swelling, nail-bed injury, deformity, persistent severe pain, numbness, or inability to move normally warrants medical evaluation.
Wound Dressing Choices and Practical Tips
Choosing the right cover
Small scrape or cut: adhesive bandage that fully covers the wound.
Larger abrasion: non-stick pad plus gauze wrap or cohesive wrap.
High-movement areas (knees, elbows): flexible fabric bandages or a non-stick pad secured with wrap; avoid tight tape that restricts bending.
Hands: secure dressings so the child can still grip; consider finger bandages for small finger cuts.
Keeping dressings in place at school
Dry the surrounding skin well before applying adhesive.
For sweaty or wet skin, use a non-stick pad and wrap rather than relying on adhesive alone.
For knees/elbows, apply the dressing with the joint slightly bent so it doesn’t pull when the child moves.
Managing pain without medication
Cold packs, rest from play, and comfortable positioning are often enough for minor injuries.
Distraction helps: slow breathing, counting, or having the child hold the cold pack.
Follow your setting’s policy regarding any medication; do not improvise.
Infection Prevention in Busy Group Settings
Hygiene steps that matter most
Gloves for any contact with blood or open wounds.
Hand hygiene before and after care (soap and water or sanitizer when appropriate).
Use clean water/saline for rinsing; avoid sharing towels.
Dispose of bloody materials according to school procedure.
What to tell caregivers to watch for
When you notify caregivers, give specific, practical monitoring points: increasing redness, warmth, swelling, pus, worsening pain the next day, or the child feeling unwell. Also mention if debris could not be fully removed or if the wound was a puncture or bite, since follow-up may be needed.
Documentation and Communication (What to Record and Say)
What to document
Time and location of incident (playground, gym, classroom).
Mechanism (fell while running, collided with another child, scraped on asphalt).
Injury description (size, location, bleeding amount, swelling).
Care provided (rinsed with water, applied gauze pressure, cold pack, dressing type).
Child’s response (calmed, returned to class, sat out of recess).
Any referral/parent contact and instructions given.
Example caregiver message
Today at 12:20 on the playground, Sam fell while running and scraped the right knee (about 3 cm). We rinsed the area with clean water, removed visible dirt, applied a non-stick pad and wrap, and used a cold pack briefly for comfort. Sam walked normally afterward and returned to class. Please change the dressing if it becomes wet/dirty and watch for increasing redness, warmth, swelling, drainage, or worsening pain.Prevention Strategies That Fit School Life
Playground and recess habits
Encourage “walk zones” near swings and slide exits to reduce collisions.
Teach children to look behind before stepping off swings or jumping down.
Promote appropriate footwear (closed-toe shoes for active play when possible).
Use age-appropriate equipment and supervise high-traffic areas.
Sports and PE habits
Warm-up routines reduce sudden strains.
Hydration and rest breaks reduce clumsiness from fatigue.
Teach safe falling and spacing for games with running and chasing.