Why environment management matters
Most teams run the same application in multiple Kubernetes environments: development (fast feedback), staging (pre-production validation), and production (reliability and performance). Environment management is the discipline of keeping these environments consistent where it matters (APIs, deployment mechanics, operational controls) while allowing intentional differences (scale, data, integrations, risk controls). Done well, it reduces “works in staging” surprises, makes rollbacks predictable, and lets teams iterate quickly without weakening production safety.
In Kubernetes, environment management is not just “different namespaces.” It is a set of decisions about cluster topology, isolation boundaries, promotion flow, policy enforcement, and how you express environment-specific differences without forking your deployment definitions into unmaintainable copies.
Core principles
1) Define what must be identical vs what may differ
Start by classifying settings into two buckets:
- Invariant across environments: container image digests, Kubernetes API versions, labels/annotations used by automation, health probes, service ports, resource request/limit ratios (often), and baseline security posture.
- Environment-specific: replica counts, autoscaling thresholds, ingress hostnames, external integration endpoints, feature flags, data sources, and operational controls like disruption budgets or stricter network policies in production.
This classification prevents accidental drift. For example, if staging runs a different image tag than production, you are not validating what you will ship. Conversely, if development is forced to match production scale and strict policies, iteration slows to a crawl.
2) Prefer promotion over reconfiguration
A common failure mode is “rebuild for prod.” Instead, build once and promote the same artifact. In Kubernetes terms, that means the same image digest moves from dev to staging to prod, and the deployment manifests are largely the same, with controlled overlays for environment-specific values.
- Listen to the audio with the screen off.
- Earn a certificate upon completion.
- Over 5000 courses for you to explore!

Download the app
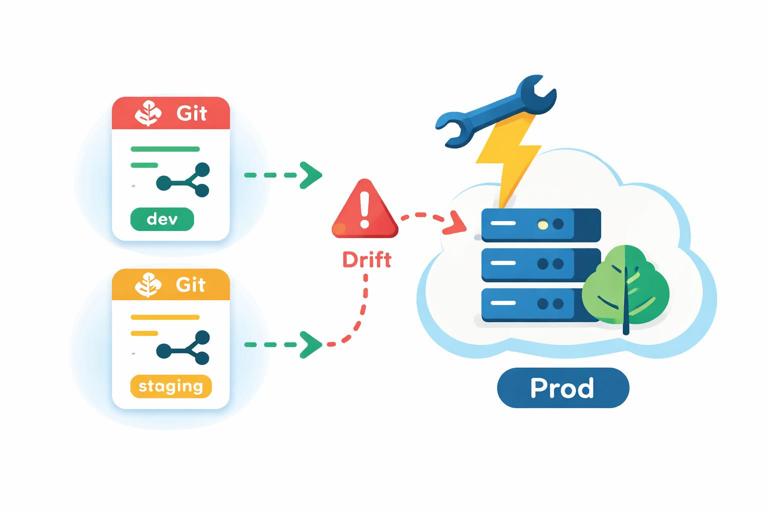
3) Make drift visible and enforceable
Environment drift is inevitable unless you continuously detect and correct it. GitOps-style reconciliation, policy-as-code, and standardized base manifests help ensure that what is running matches what you intended. Even if you are not using full GitOps tooling, you can still apply the same idea: environments should be reproducible from version-controlled definitions, and manual changes should be exceptional and auditable.
4) Separate concerns: platform vs application
Environment management becomes easier when you distinguish:
- Platform layer: cluster add-ons (ingress controller, DNS, observability stack, policy engines), shared namespaces, and cluster-wide policies.
- Application layer: app namespaces, deployments, services, and app-specific policies.
Platform changes should be rare and carefully rolled out; application changes happen frequently. Keeping these layers separate reduces blast radius and makes promotion workflows clearer.
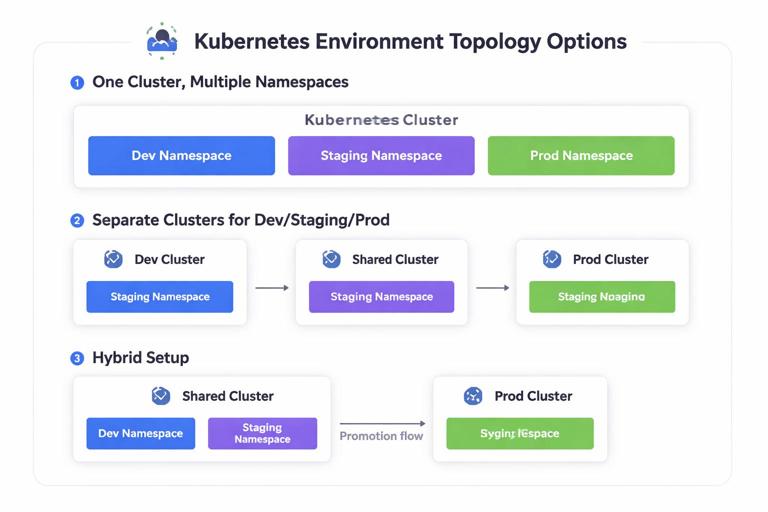
Environment topology options
Option A: One cluster, multiple namespaces
This is common early on. Each environment is a namespace (or set of namespaces) within a single cluster.
- Pros: cheaper, simpler operations, easy to share cluster add-ons.
- Cons: weaker isolation, noisy-neighbor risks, harder to guarantee staging parity with production, and mistakes can cross boundaries (RBAC, network policy, resource quotas).
Use this when you have strong namespace isolation controls and the risk profile allows it.
Option B: Separate clusters per environment
Development, staging, and production each get their own cluster.
- Pros: strong isolation, production safety, easier to enforce different policies, staging can mirror production cluster settings.
- Cons: higher cost, more operational overhead, more moving parts (DNS, identity, observability federation).
This is typical for teams with compliance needs or higher reliability requirements.
Option C: Hybrid
Often you will see: shared dev cluster (multiple namespaces), dedicated staging cluster, and dedicated production cluster. This balances cost and safety while keeping staging close to production.
Standardizing environments with bases and overlays
The key to maintainability is to avoid copying manifests into “dev/”, “staging/”, and “prod/” directories with small edits. Instead, define a base that represents the application’s desired state, then apply overlays that only express differences.
Two common approaches are Kustomize overlays and Helm values files. Since Helm authoring has been covered elsewhere, focus here on the concept and the operational workflow: a shared base plus per-environment overlays, with promotion driven by image digest and controlled values.
Example: Kustomize base and overlays
Directory structure:
apps/myapp/ base/ deployment.yaml service.yaml kustomization.yaml overlays/ dev/ kustomization.yaml patch-replicas.yaml staging/ kustomization.yaml patch-replicas.yaml prod/ kustomization.yaml patch-replicas.yaml patch-pdb.yamlBase kustomization:
apiVersion: kustomize.config.k8s.io/v1beta1kind: Kustomizationresources: - deployment.yaml - service.yamlcommonLabels: app.kubernetes.io/name: myapp app.kubernetes.io/part-of: storefrontDev overlay that changes replicas and adds a label:
apiVersion: kustomize.config.k8s.io/v1beta1kind: KustomizationnameSuffix: -devnamespace: myapp-devresources: - ../../basepatches: - path: patch-replicas.yamlcommonLabels: env: devReplica patch:
apiVersion: apps/v1kind: Deploymentmetadata: name: myappspec: replicas: 1Prod overlay can add a PodDisruptionBudget and higher replicas:
apiVersion: kustomize.config.k8s.io/v1beta1kind: KustomizationnameSuffix: -prodnamespace: myapp-prodresources: - ../../base - pdb.yamlpatches: - path: patch-replicas.yamlcommonLabels: env: prodThis pattern keeps the base consistent and makes environment differences explicit and reviewable.
Step-by-step: designing an environment promotion workflow
Step 1: Define environments and their purpose
Write down what each environment is for and what “done” means there:
- Development: fast iteration, feature branches, ephemeral preview deployments if possible, lower resource usage.
- Staging: integration testing, performance smoke tests, release candidate validation, mirrors production policies where feasible.
- Production: customer traffic, strict SLOs, controlled change windows (if needed), strongest guardrails.
Be explicit about what is allowed: can developers exec into pods in production? Can they apply manifests directly? Who can approve promotions?
Step 2: Choose isolation boundaries
Decide whether you use separate clusters or namespaces. If using namespaces, implement guardrails:
- ResourceQuotas and LimitRanges per namespace to prevent dev workloads from starving staging/prod.
- RBAC roles that prevent accidental writes to prod namespaces.
- NetworkPolicies to prevent cross-environment traffic unless explicitly needed.
If using separate clusters, standardize cluster add-ons and versions to reduce “it’s the cluster” differences.
Step 3: Standardize naming and labeling
Consistent naming and labels make automation and observability easier. Adopt a minimal set of labels across all environments:
app.kubernetes.io/name,app.kubernetes.io/instance,app.kubernetes.io/versionenv(dev/staging/prod)teamorownerfor routing alerts
Ensure the same label keys exist in every environment so dashboards and alert rules can be reused.
Step 4: Decide what changes per environment
Create a simple matrix for each service:
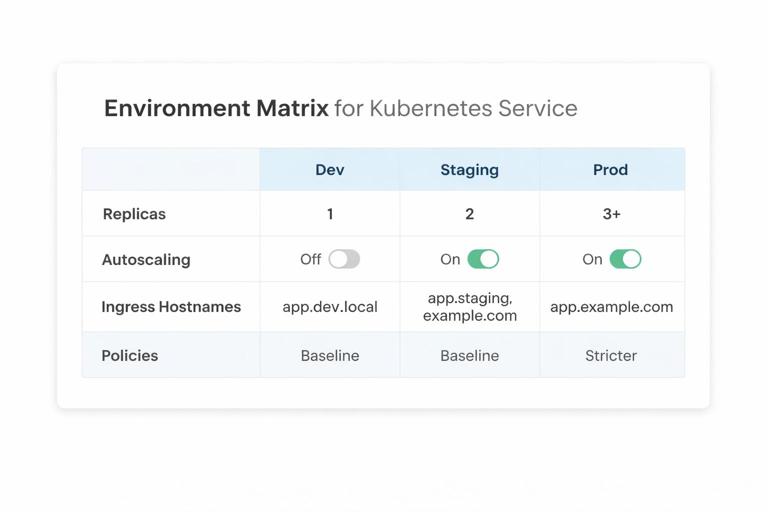
- Replicas: dev=1, staging=2, prod=3+
- Autoscaling: off in dev, on in staging/prod
- Ingress hostnames: dev uses internal DNS or preview domains; prod uses public domains
- Policies: baseline everywhere, stricter in prod (e.g., deny-all egress with explicit allow lists)
Keep this matrix in the repo (e.g., ENVIRONMENTS.md) so changes are intentional and reviewed.
Step 5: Implement promotion as a change in Git
Promotion should be a pull request that updates the environment overlay to point to a new image digest (or version) and, if needed, a small set of environment-specific knobs. Avoid “promoting” by rebuilding images or manually applying kubectl commands.
Example patch that updates the image in a Kustomize overlay:
apiVersion: kustomize.config.k8s.io/v1beta1kind: Kustomizationimages: - name: ghcr.io/acme/myapp newName: ghcr.io/acme/myapp newTag: 1.8.3In a stricter setup, you would use image digests rather than tags to guarantee immutability:
images: - name: ghcr.io/acme/myapp digest: sha256:3b2f...9a1cStaging promotion merges first; production promotion is a separate PR after validation.
Keeping staging close to production without copying production risk
Data strategy: production-like shape, not production data
Staging needs realistic data volume and distribution to catch performance and query issues, but copying production data can create privacy and compliance problems. Common approaches:
- Synthetic datasets generated to match production cardinality and edge cases.
- Sanitized snapshots where sensitive fields are irreversibly masked.
- Subset sampling with strict anonymization and access controls.
Whatever you choose, document it and automate refreshes so staging does not silently degrade into an unrealistic environment.
External dependencies: emulate or isolate
Staging often fails because it talks to different third-party services than production. Options include:
- Use sandbox endpoints from providers (payments, email, SMS) and ensure feature parity.
- Contract tests against mocked services, but periodically validate against real sandbox APIs.
- Traffic replay into staging for read-only paths (careful with side effects).
Make these differences explicit in overlays and ensure observability can distinguish staging traffic from production.
Policy differences across environments (guardrails)
Environment management is also about deciding which guardrails apply where. A practical pattern is “baseline everywhere, stricter as you move right.”
RBAC and access
- Dev: broader write access for developers within dev namespaces; allow debugging tools.
- Staging: limited write access; break-glass procedures for urgent debugging.
- Prod: minimal write access; changes via PR-based workflow; restrict exec/port-forward to on-call roles.
Even if you allow kubectl exec in dev, ensure production requires elevated approval and is audited.
Resource controls
Use quotas and limits to prevent accidental overconsumption. Production may also require:
- Guaranteed QoS for critical workloads (requests close to limits).
- PriorityClasses to ensure critical pods schedule first.
- Stricter PodDisruptionBudgets to maintain availability during node maintenance.
Network controls
In development, you may allow broad egress for convenience. In production, you often want explicit egress allow lists and tighter ingress rules. Staging should be close to production here to catch missing egress rules before release.
Managing environment-specific operational settings
Scaling and autoscaling
Replica counts and autoscaling thresholds are classic environment differences. A practical approach:
- Dev: fixed low replicas; autoscaling disabled to reduce noise.
- Staging: autoscaling enabled with conservative thresholds to validate behavior.
- Prod: autoscaling enabled with tuned thresholds based on real traffic and SLOs.
When staging differs, ensure you still test the autoscaler logic somewhere before production. If staging traffic is too low, consider load tests or scheduled scaling simulations.
Scheduling constraints
Production often uses node pools (e.g., general, memory-optimized) and may require:
- Node affinity/anti-affinity for high availability.
- Topology spread constraints across zones.
- Taints/tolerations for dedicated nodes.
Staging should mimic these constraints enough to catch scheduling failures (for example, a pod that cannot schedule because it requests a node label that only exists in prod).
Observability parity
Staging should have the same metrics, logs, and traces instrumentation as production so you can validate dashboards and alert rules before they matter. Differences are usually in retention and sampling:
- Dev: shorter retention, higher sampling for debugging.
- Staging: moderate retention, similar sampling to prod for realism.
- Prod: tuned sampling, longer retention for incident analysis and compliance.
Ensure environment labels are attached to telemetry so you can filter and compare behavior across environments.
Step-by-step: preventing configuration drift with policy checks
Even with overlays, teams accidentally introduce drift by adding “just one more patch” in staging or production. Add automated checks that validate invariants.
Step 1: Define invariants as rules
Examples of invariants you can enforce:
- All workloads must set
resources.requestsandresources.limits. - All pods must run as non-root in staging and production.
- Images must come from approved registries.
- Production namespaces must have NetworkPolicies.
Step 2: Validate manifests in CI
Render your environment manifests (Kustomize build or Helm template) and run policy checks against the rendered YAML. This catches issues before they reach the cluster.
# Render dev manifestskustomize build apps/myapp/overlays/dev > /tmp/dev.yaml# Render prod manifestskustomize build apps/myapp/overlays/prod > /tmp/prod.yamlThen run your chosen policy tool (OPA Conftest, Kyverno CLI, or similar) against those files. The important part is the workflow: render, validate, and fail the build if rules are violated.
Step 3: Enforce in-cluster for staging/prod
CI checks are necessary but not sufficient. In staging and production, enforce policies at admission time so manual changes cannot bypass guardrails. Keep dev more permissive if needed, but avoid making dev so different that you never exercise the real constraints.
Handling environment-specific dependencies and shared services
Shared platform services
Some services are shared across environments (artifact registry, identity provider, centralized logging). Decide which are shared and which are isolated:
- Shared: container registry, CI runners, Git repositories.
- Often isolated: databases, message queues, caches, and any stateful dependency that could leak data or be impacted by dev load.
When sharing is unavoidable, use strict tenancy controls (separate accounts, separate topics/queues, separate database schemas) and ensure environment tags are present in logs and metrics.
DNS and routing differences
Even if ingress and TLS mechanics are handled elsewhere, environment management still needs a consistent naming scheme:
- Dev:
myapp.dev.internalor per-branch preview domains. - Staging:
myapp.staging.example.com - Prod:
myapp.example.com
Keep hostnames and routing rules in environment overlays so they are reviewed and promoted like any other change.
Ephemeral environments for pull requests
Beyond the classic three environments, many teams add ephemeral preview environments per pull request. The goal is to validate changes in a realistic Kubernetes deployment without polluting shared dev or staging.
Practical pattern
- Create a namespace per PR (e.g.,
myapp-pr-1842). - Deploy the same base manifests with a small overlay that sets unique names/hostnames.
- Auto-delete the namespace when the PR closes.
Key considerations:
- Cost control: enforce quotas so previews cannot scale indefinitely.
- Isolation: ensure previews cannot reach production dependencies.
- Discoverability: publish the preview URL and basic health status back to the PR.
Runbook: diagnosing “works in dev, fails in staging”
When a deployment behaves differently across environments, use a systematic approach to identify the delta.
1) Compare rendered manifests
Render both environments and diff them. You are looking for unintended differences: missing labels, different resource requests, different service accounts, different node selectors, or different policy attachments.
kustomize build apps/myapp/overlays/dev > /tmp/dev.yamlkustomize build apps/myapp/overlays/staging > /tmp/staging.yamldiff -u /tmp/dev.yaml /tmp/staging.yaml | head2) Compare runtime conditions
Even with identical manifests, clusters can differ. Check:
- Kubernetes version and enabled admission policies.
- Node pool labels/taints and available resources.
- DNS resolution and egress controls.
- Service mesh or sidecar injection differences (if used).
3) Validate dependency endpoints
Staging often points to different endpoints. Confirm that staging dependencies are reachable and behave similarly (timeouts, TLS requirements, authentication scopes).
4) Check observability signals with environment filters
Use consistent labels to filter dashboards and logs by env. Compare error rates, latency, and saturation. If staging has stricter policies, look for admission denials, network policy drops, or scheduling failures.
Common anti-patterns and how to avoid them
Forked manifests per environment
Copy-pasting manifests into three directories leads to silent divergence. Use a base + overlay approach and keep overlays minimal.
Staging that is “almost prod”
If staging differs in critical ways (different ingress controller, different policies, different node topology), it stops being a reliable gate. Decide which differences are acceptable (scale, data, retention) and keep the rest aligned.
Manual hotfixes in production without backporting
Emergency changes happen, but if you patch production manually and do not reflect it back into version control, you create drift that will bite the next release. Use a break-glass process that includes a mandatory follow-up PR to reconcile desired state.
Environment-specific code paths
When application behavior changes drastically by environment (beyond feature flags and safe toggles), you risk shipping untested production-only logic. Keep environment branching minimal and observable.