Mini-project overview and target architecture
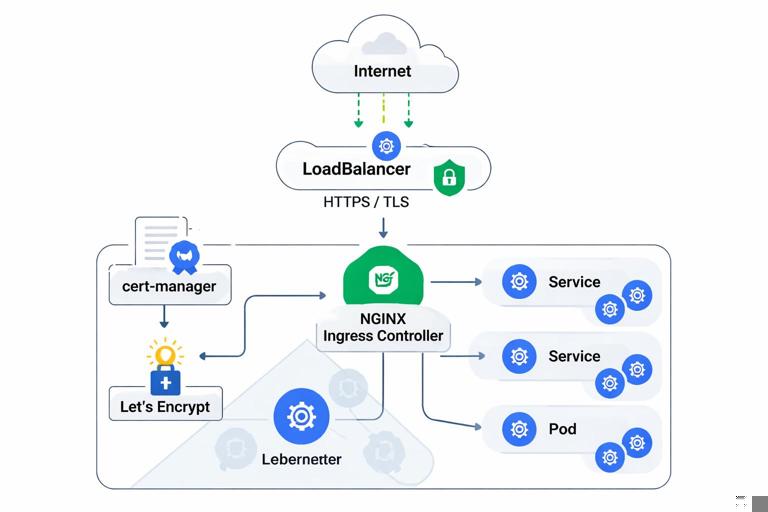
This mini-project hardens external access for an existing Kubernetes application by combining an Ingress controller, automated certificate issuance, and edge-focused security controls. You will implement a production-style setup where: (1) public traffic enters through a cloud LoadBalancer (or a NodePort in local labs), (2) an Ingress controller enforces HTTPS and routes to internal Services, (3) certificates are issued and renewed automatically, and (4) the edge is hardened with strict TLS settings, request limits, and safe defaults.
Assumptions: you already have a working app deployed in a namespace (for example app) with at least one HTTP Service (for example api) listening on port 80 inside the cluster. You also have a domain you control (for example api.example.com) and can create DNS records. The steps below focus on the “last mile” from the internet to your workloads and how to reduce exposure.
What you will build
- An Ingress controller (NGINX Ingress is used in examples) exposed via a public IP.
- cert-manager to request and renew certificates from Let’s Encrypt.
- A hardened Ingress configuration: HTTPS-only, modern TLS, HSTS, safe headers, request size limits, rate limiting, and restricted paths.
- Operational checks: certificate status, renewal simulation, and edge troubleshooting.
Prerequisites and variables
Set a few variables to keep commands consistent:
export NS_INGRESS=ingress-nginx export NS_CERT=cert-manager export APP_NS=app export DOMAIN=api.example.comVerify your app Service exists and is reachable inside the cluster:
kubectl -n ${APP_NS} get svc kubectl -n ${APP_NS} get endpointsIf your Service uses a different port (for example 8080), note it for the Ingress backend configuration.
- Listen to the audio with the screen off.
- Earn a certificate upon completion.
- Over 5000 courses for you to explore!

Download the app
Step 1: Install an Ingress controller with a dedicated public entrypoint
In production you typically run a dedicated Ingress controller per cluster (or per trust boundary) and expose it via a cloud LoadBalancer. The controller becomes the edge proxy responsible for TLS, routing, and many security controls.
Install ingress-nginx
Using Helm (recommended for repeatability):
helm repo add ingress-nginx https://kubernetes.github.io/ingress-nginx helm repo update kubectl create namespace ${NS_INGRESS} helm install ingress-nginx ingress-nginx/ingress-nginx -n ${NS_INGRESS} --set controller.replicaCount=2 --set controller.service.externalTrafficPolicy=LocalexternalTrafficPolicy=Local preserves client source IP for many environments, which is useful for rate limiting and logging. Ensure your cluster supports it; otherwise omit it.
Get the external IP and wire DNS
Wait for the controller Service to receive an external address:
kubectl -n ${NS_INGRESS} get svc ingress-nginx-controller -wCreate a DNS A/AAAA record for ${DOMAIN} pointing to that external IP (or CNAME to the cloud LB hostname). DNS propagation can take time; you can continue while it propagates.
Sanity check the controller
Confirm the controller pods are ready:
kubectl -n ${NS_INGRESS} get pods kubectl -n ${NS_INGRESS} logs deploy/ingress-nginx-controller --tail=50Step 2: Install cert-manager for automated certificate lifecycle
Hardening external access requires reliable certificate automation. cert-manager watches Kubernetes resources and requests certificates from an issuer (for example Let’s Encrypt). It stores the resulting keypair in a Secret and keeps it renewed.
Install cert-manager
helm repo add jetstack https://charts.jetstack.io helm repo update kubectl create namespace ${NS_CERT} helm install cert-manager jetstack/cert-manager -n ${NS_CERT} --set crds.enabled=trueVerify components:
kubectl -n ${NS_CERT} get podsCreate a ClusterIssuer (Let’s Encrypt)
Use HTTP-01 challenges via the Ingress controller. This requires that Let’s Encrypt can reach http://${DOMAIN}/.well-known/acme-challenge/... through your Ingress. Create a ClusterIssuer:
cat <<EOF | kubectl apply -f - apiVersion: cert-manager.io/v1 kind: ClusterIssuer metadata: name: letsencrypt-prod spec: acme: email: you@example.com server: https://acme-v02.api.letsencrypt.org/directory privateKeySecretRef: name: letsencrypt-prod-account-key solvers: - http01: ingress: class: nginx EOFCheck status:
kubectl get clusterissuer letsencrypt-prod -o yamlIf you want a safer dry run first, create a staging issuer using Let’s Encrypt staging endpoint and validate the flow before switching to production.
Step 3: Create a hardened Ingress with automated TLS
You will define an Ingress resource in your application namespace that: (1) routes traffic to your Service, (2) requests a certificate via cert-manager, and (3) enforces HTTPS and security headers.
Ingress manifest (HTTPS-only + cert-manager)
Create an Ingress that references the ClusterIssuer and stores the certificate in a Secret named api-tls:
cat <<EOF | kubectl apply -f - apiVersion: networking.k8s.io/v1 kind: Ingress metadata: name: api namespace: ${APP_NS} annotations: kubernetes.io/ingress.class: nginx cert-manager.io/cluster-issuer: letsencrypt-prod nginx.ingress.kubernetes.io/ssl-redirect: "true" nginx.ingress.kubernetes.io/force-ssl-redirect: "true" spec: tls: - hosts: - ${DOMAIN} secretName: api-tls rules: - host: ${DOMAIN} http: paths: - path: / pathType: Prefix backend: service: name: api port: number: 80 EOFWatch cert-manager create and fulfill the Certificate:
kubectl -n ${APP_NS} get certificate kubectl -n ${APP_NS} describe certificate api-tls kubectl -n ${APP_NS} get challenge,orderOnce issued, test HTTPS:
curl -I https://${DOMAIN}If DNS is still propagating, you may see challenge failures. Fix DNS first, then delete the failed Order/Challenge and let cert-manager retry, or simply reapply.
Step 4: Edge hardening controls (TLS policy, HSTS, headers, limits)
Now that traffic flows, harden the edge. Many controls can be applied at the Ingress layer to reduce attack surface and prevent accidental exposure. The goal is to enforce secure defaults without pushing complexity into every application.
Enforce modern TLS and disable weak protocols
Ingress-NGINX supports TLS settings via a ConfigMap for controller-wide defaults, and via annotations for per-Ingress overrides. Prefer controller-wide defaults for consistency.
Edit the controller ConfigMap (name may vary; commonly ingress-nginx-controller or ingress-nginx-controller ConfigMap in the ingress namespace). List ConfigMaps:
kubectl -n ${NS_INGRESS} get configmapPatch the controller ConfigMap to enforce TLSv1.2+ and strong ciphers:
kubectl -n ${NS_INGRESS} patch configmap ingress-nginx-controller --type merge -p '{"data":{"ssl-protocols":"TLSv1.2 TLSv1.3","ssl-prefer-server-ciphers":"true","ssl-ciphers":"ECDHE-ECDSA-AES128-GCM-SHA256:ECDHE-RSA-AES128-GCM-SHA256:ECDHE-ECDSA-AES256-GCM-SHA384:ECDHE-RSA-AES256-GCM-SHA384"}}'Reload happens automatically when the controller detects ConfigMap changes. Validate with:
kubectl -n ${NS_INGRESS} logs deploy/ingress-nginx-controller --tail=100Then verify from a client using openssl s_client and ensure older protocols fail.
Enable HSTS and safe security headers
HSTS tells browsers to always use HTTPS for your domain. Only enable it once you are confident HTTPS works reliably. Add annotations to your Ingress:
kubectl -n ${APP_NS} annotate ingress api --overwrite nginx.ingress.kubernetes.io/hsts="true" nginx.ingress.kubernetes.io/hsts-max-age="31536000" nginx.ingress.kubernetes.io/hsts-include-subdomains="true" nginx.ingress.kubernetes.io/hsts-preload="true"Add common response headers. With Ingress-NGINX you can inject headers via a snippet, but snippets can be risky if broadly allowed. A safer pattern is to use the built-in add-headers mechanism with a ConfigMap that contains headers, and reference it from the controller. If your environment allows snippets, keep them minimal and reviewed.
Create a headers ConfigMap in the ingress namespace:
cat <<EOF | kubectl apply -f - apiVersion: v1 kind: ConfigMap metadata: name: security-headers namespace: ${NS_INGRESS} data: X-Content-Type-Options: "nosniff" X-Frame-Options: "DENY" Referrer-Policy: "no-referrer" Permissions-Policy: "geolocation=(), microphone=(), camera=()" EOFConfigure the controller to add these headers:
kubectl -n ${NS_INGRESS} patch configmap ingress-nginx-controller --type merge -p '{"data":{"add-headers":"ingress-nginx/security-headers"}}'Validate headers:
curl -I https://${DOMAIN}Limit request body size and timeouts
Large bodies and long timeouts can be abused for resource exhaustion. Set reasonable defaults based on your API needs. For example, limit uploads to 1 MiB and tighten timeouts:
kubectl -n ${APP_NS} annotate ingress api --overwrite nginx.ingress.kubernetes.io/proxy-body-size="1m" nginx.ingress.kubernetes.io/proxy-read-timeout="30" nginx.ingress.kubernetes.io/proxy-send-timeout="30"If your API legitimately needs larger payloads (file uploads), create a separate host/path with a different Ingress and stricter auth, rather than raising limits globally.
Rate limiting and basic abuse controls
Rate limiting at the edge helps against brute force and accidental client loops. Ingress-NGINX supports simple limits via annotations. Start conservatively and tune based on real traffic patterns.
kubectl -n ${APP_NS} annotate ingress api --overwrite nginx.ingress.kubernetes.io/limit-rps="10" nginx.ingress.kubernetes.io/limit-burst-multiplier="3"Be aware that rate limiting depends on client IP detection. If you are behind a cloud load balancer, ensure the controller is configured to trust forwarded headers appropriately; otherwise all traffic may appear to come from the LB and limits will be ineffective or overly aggressive.
Restrict sensitive paths and methods
Many apps expose internal endpoints (for example /metrics, /debug, /admin) that should not be public. A practical approach is to create separate Ingress rules: one public Ingress for the API, and a second internal-only Ingress (or no Ingress at all) for sensitive endpoints.
Example: block access to /metrics at the edge using a server snippet (only if snippets are allowed and controlled):
kubectl -n ${APP_NS} annotate ingress api --overwrite nginx.ingress.kubernetes.io/server-snippet='location = /metrics { return 404; }'Alternative safer approach: do not route /metrics through this Ingress at all. Expose metrics via an internal Service and scrape it from inside the cluster.
Step 5: Separate public and private entrypoints (recommended hardening pattern)
A strong hardening pattern is to run two Ingress controllers: one public-facing and one private (internal load balancer or only reachable via VPN). This reduces the chance that an internal admin UI or metrics endpoint becomes internet-exposed due to a misconfigured Ingress.
Deploy a second controller for internal traffic
In cloud environments you can annotate the Service to create an internal load balancer. The exact annotation is provider-specific. The key idea is: internal controller has its own IngressClass (for example nginx-internal) and only internal Ingress resources use it.
Install a second controller with a distinct class:
helm install ingress-nginx-internal ingress-nginx/ingress-nginx -n ${NS_INGRESS} --set controller.ingressClassResource.name=nginx-internal --set controller.ingressClass=nginx-internal --set controller.replicaCount=2Then create internal-only Ingress resources using ingressClassName: nginx-internal (or the legacy annotation) and keep public endpoints on the public controller. This separation is one of the most effective ways to harden external access because it creates a clear boundary in configuration and review.

Step 6: Certificate operations: renewal, rotation, and failure modes
Automated certificates reduce operational burden, but you must know how to verify and troubleshoot them. Focus on three checks: (1) certificate is issued and not expired, (2) renewal is scheduled, and (3) the Ingress is actually serving the expected certificate.
Check Certificate and Secret
kubectl -n ${APP_NS} get certificate api-tls -o wide kubectl -n ${APP_NS} get secret api-tls -o yamlThe Secret should contain tls.crt and tls.key. To confirm expiry:
kubectl -n ${APP_NS} get secret api-tls -o jsonpath='{.data.tls\.crt}' | base64 -d | openssl x509 -noout -dates -issuer -subjectForce a renewal test (safe approach)
Instead of deleting Secrets in production, you can trigger renewal by adjusting the Certificate resource (for example adding an annotation) or by reducing renewBefore in a controlled environment. A common operational drill is to rotate the certificate Secret name and update the Ingress to reference the new Secret, letting cert-manager issue a fresh certificate.
Create a new Certificate explicitly (optional pattern):
cat <<EOF | kubectl apply -f - apiVersion: cert-manager.io/v1 kind: Certificate metadata: name: api-tls-rotated namespace: ${APP_NS} spec: secretName: api-tls-rotated issuerRef: name: letsencrypt-prod kind: ClusterIssuer dnsNames: - ${DOMAIN} EOFThen update the Ingress to use api-tls-rotated and verify the served certificate changes. This pattern is useful when you want explicit control over rotation events.
Common failure modes and what to check
HTTP-01 challenge fails: verify DNS points to the Ingress controller, port 80 is reachable, and the Ingress class matches the solver (
class: nginx).Wrong certificate served: ensure the Ingress
tls.hostsmatches the request host, and that only one Ingress claims that host on the same controller.Renewal not happening: check cert-manager controller logs and the Certificate status conditions.
kubectl -n ${NS_CERT} logs deploy/cert-manager --tail=200 kubectl -n ${APP_NS} describe certificate api-tlsStep 7: External access verification checklist (practical hardening validation)
After implementing hardening, validate behavior from outside the cluster. Treat this as a repeatable checklist you can run after changes.
HTTP redirects to HTTPS
curl -I http://${DOMAIN}Expect a 301/308 redirect to https://.
TLS protocol and certificate chain
openssl s_client -connect ${DOMAIN}:443 -servername ${DOMAIN} < /dev/null 2>/dev/null | openssl x509 -noout -issuer -subject -datesConfirm issuer is Let’s Encrypt and dates are valid.
Headers and limits
curl -I https://${DOMAIN} curl -s -o /dev/null -w "%{http_code}\n" -X POST https://${DOMAIN}/ -H "Content-Type: application/json" --data-binary @/dev/zeroThe second command should fail due to body size limits (you may need to craft a payload larger than your configured limit). Also verify HSTS and security headers appear.
Rate limiting behavior
Send a burst of requests and observe responses. You should see 429 when exceeding limits:
for i in $(seq 1 50); do curl -s -o /dev/null -w "%{http_code}\n" https://${DOMAIN}/health; done | sort | uniq -cStep 8: Hardening the Ingress controller itself
Hardening is not only about the Ingress resources; the controller is a privileged component that must be treated carefully.
Reduce feature surface: disable risky annotations if possible
Ingress-NGINX supports powerful snippet annotations that can inject arbitrary NGINX configuration. In high-control environments, disable snippet annotations to prevent accidental or malicious config injection. This is typically configured on the controller (for example allow-snippet-annotations in the controller ConfigMap). If you rely on snippets, restrict who can create/modify Ingresses in the public controller’s scope and enforce policy checks in CI.
kubectl -n ${NS_INGRESS} patch configmap ingress-nginx-controller --type merge -p '{"data":{"allow-snippet-annotations":"false"}}'If you disable snippets, remove any snippet-based annotations from your Ingresses and use safer alternatives (headers ConfigMap, separate Ingresses, or app-level controls).
Controller resource sizing and replicas
Edge components should be highly available. Ensure at least two replicas and set resource requests/limits so the controller is not starved under load. Example values (adjust to your environment):
helm upgrade ingress-nginx ingress-nginx/ingress-nginx -n ${NS_INGRESS} --set controller.replicaCount=2 --set controller.resources.requests.cpu=200m --set controller.resources.requests.memory=256Mi --set controller.resources.limits.cpu=1 --set controller.resources.limits.memory=512MiAccess logs and auditability
For incident response, you want consistent access logs at the edge. Enable and standardize log format at the controller level, and ensure logs are shipped to your logging backend. If you already have cluster logging, verify that ingress controller logs include client IP, host, path, status, and request time.
Step 9: Putting it together as a repeatable deliverable
To make this mini-project repeatable, store the manifests and Helm values in your repo as a small “edge” package. A practical structure is:
platform/ingress-nginx/values.yamlfor controller settings (replicas, TLS defaults, headers).platform/cert-manager/for cert-manager install values and issuers.apps/api/ingress.yamlfor the application Ingress, with annotations and TLS secret reference.
When you promote changes, apply them in this order: controller settings first, then issuer, then application Ingress. This reduces the chance of transient certificate failures caused by missing controllers or mismatched classes.