What “Deployment-Ready” Means for HTMX + Alpine Apps
In an HTMX + Alpine.js application, most user interactions translate into ordinary HTTP requests that return HTML fragments. That simplicity is a strength in production: you can observe, protect, and scale the system using the same mature techniques used for server-rendered apps and APIs. “Deployment-ready” means you can answer operational questions quickly (observability), prevent abuse and overload (rate limiting), survive transient failures (retries and backoff), and evolve the codebase safely (maintainable architecture). This chapter focuses on practical practices you can implement without turning your app into a heavy SPA or adding unnecessary client complexity.
Observability: Logs, Metrics, Traces, and Correlation IDs
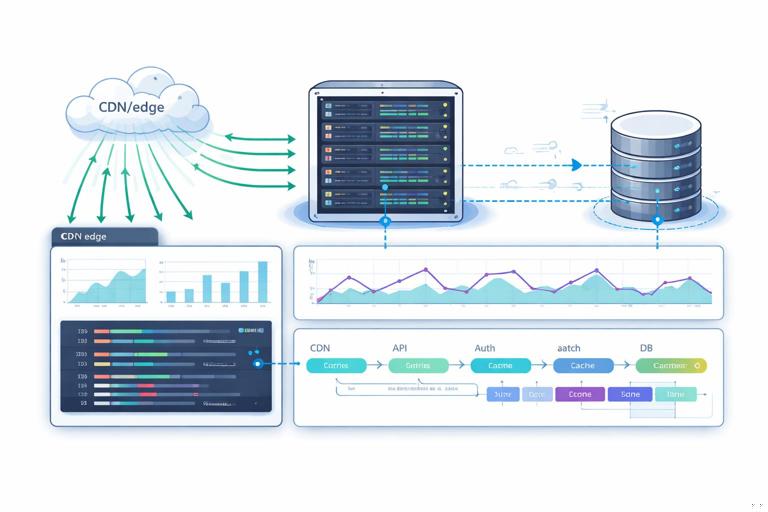
Observability is the ability to understand what the system is doing from the outside. For hypermedia apps, you want visibility into: which pages and fragments are requested, how long they take, what they return (status codes), and how those requests relate to a user action. The most useful baseline is structured logs + request metrics + a correlation ID that flows from the edge to the database and back.
Structured request logging with HTMX context
Because HTMX requests are still HTTP requests, your server can log them like any other. The extra step is to include HTMX-specific headers so you can distinguish full-page loads from fragment swaps and see which element initiated the request. HTMX sends headers such as HX-Request, HX-Target, HX-Trigger, and HX-Current-URL. Logging these fields makes debugging “why did this fragment update?” dramatically easier.
// Pseudocode middleware (Node/Express style) for structured logs and timing
app.use((req, res, next) => {
  const start = Date.now();
  const rid = req.headers['x-request-id'] || crypto.randomUUID();
  res.setHeader('X-Request-Id', rid);

  res.on('finish', () => {
    const ms = Date.now() - start;
    const log = {
      level: 'info',
      msg: 'http_request',
      rid,
      method: req.method,
      path: req.path,
      status: res.statusCode,
      duration_ms: ms,
      user_id: req.user?.id || null,
      htmx: {
        request: req.get('HX-Request') === 'true',
        target: req.get('HX-Target') || null,
        trigger: req.get('HX-Trigger') || null,
        current_url: req.get('HX-Current-URL') || null
      }
    };
    console.log(JSON.stringify(log));
  });

  next();
});
Step-by-step: (1) generate or accept X-Request-Id, (2) return it in the response, (3) log it with duration and HTMX headers, (4) ensure downstream calls (DB, HTTP clients) include the same ID in their logs. When a user reports “the Save button spun forever,” you can search logs by request ID and see the entire path.
Metrics that match real user interactions
Metrics should be cheap, aggregated, and aligned with user-perceived outcomes. For HTMX apps, track request counts and latency by route and by whether it was an HTMX request. Also track error rates (4xx, 5xx), and saturation signals (queue depth, DB pool usage). A useful pattern is to label metrics with route, method, status, and is_htmx to compare fragment endpoints vs full pages.
- Listen to the audio with the screen off.
- Earn a certificate upon completion.
- Over 5000 courses for you to explore!

Download the app
// Pseudocode metric increments (Prometheus-like)
http_requests_total{route="/tasks/:id", method="GET", status="200", is_htmx="true"} += 1
http_request_duration_ms_bucket{route="/tasks/:id", is_htmx="true", le="100"} += 1
Step-by-step: (1) define a small set of labels to avoid cardinality explosions, (2) instrument middleware to record duration and status, (3) create dashboards for p50/p95 latency and error rate, (4) alert on sustained p95 regressions and 5xx spikes.
Distributed tracing and span naming for fragments
If your app calls other services (email, payments, search, background jobs), distributed tracing helps you see where time is spent. The key is consistent span naming and propagating the correlation ID (or trace context) through HTTP clients and job queues. For fragment endpoints, name spans after the user action rather than internal function names, e.g., GET /tasks/:id (fragment) or POST /tasks/:id/complete. This makes traces readable to on-call engineers who are debugging user flows.
Operational Error Handling: Make Failures Visible and User-Safe
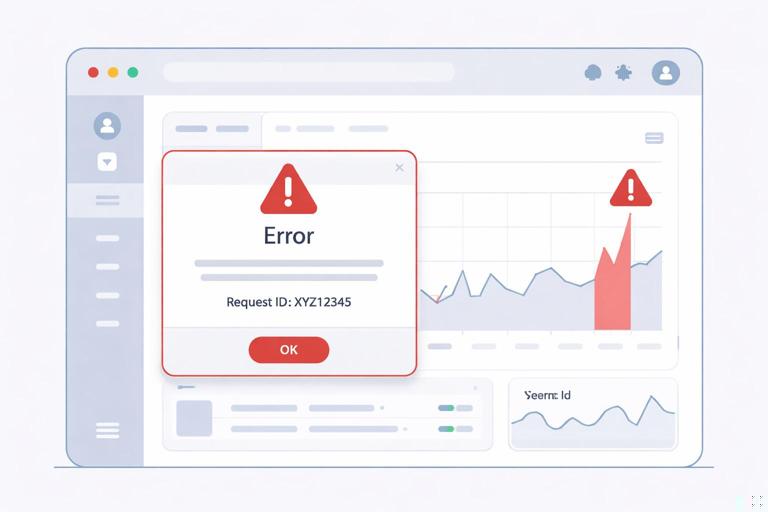
Production failures are inevitable: timeouts, deploy glitches, partial outages, and unexpected inputs. Your goal is to fail in a way that is observable to operators and understandable to users. For HTMX fragments, that usually means returning an HTML partial that can be swapped into a small area, plus a status code that your monitoring can alert on.
Consistent error envelopes for fragments
Define a small set of error partials that can be reused across endpoints: inline form error, toast/notification, and “retry” panel. Keep them visually consistent and include the request ID so support can correlate user screenshots with logs.
<!-- error-panel.html -->
<div class="error-panel">
  <p><strong>Something went wrong.</strong> Please try again.</p>
  <p class="muted">Request ID: {{request_id}}</p>
  <button class="btn" hx-get="{{retry_url}}" hx-target="{{target}}">Retry</button>
</div>
Step-by-step: (1) create a shared error partial, (2) ensure every handler can render it with request_id, (3) return 5xx for server faults and 4xx for user faults, (4) ensure your client UI has a stable target region for error swaps.
Rate Limiting: Protect the App Without Breaking UX
Rate limiting prevents abusive traffic and protects your infrastructure during spikes. In HTMX apps, it also prevents accidental overload from rapid triggers (e.g., repeated clicks, aggressive polling, or multiple tabs). A good strategy is layered: edge limits (CDN/reverse proxy), application limits (per user/session), and endpoint-specific limits (expensive operations).
Choose the right limiting key: IP, user, session, or route
IP-based limits are easy but can punish shared networks. User-based limits are fairer but require authentication. Session-based limits work for anonymous users if you have a stable session cookie. Route-based limits let you protect expensive endpoints more aggressively. In practice, combine them: a global IP limit to block obvious abuse, plus per-user limits for authenticated actions.
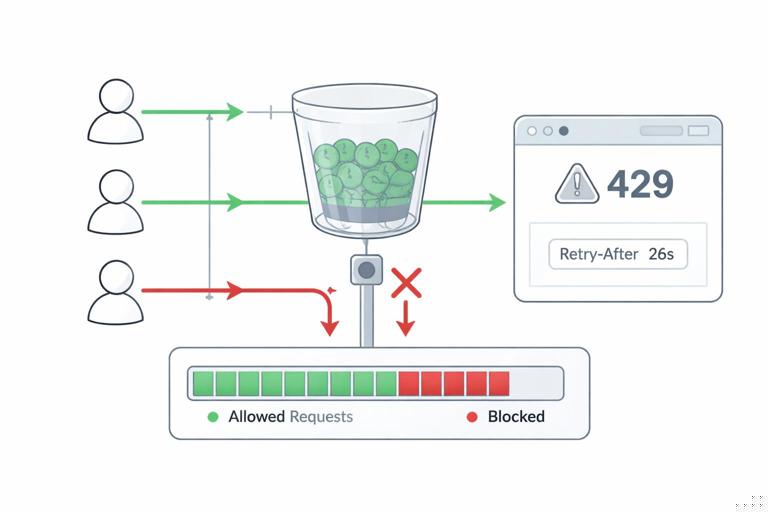
Token bucket or sliding window with clear responses
Implement a token bucket (or sliding window) limiter in a shared middleware. When a limit is exceeded, return 429 Too Many Requests and include Retry-After. For HTMX requests, return an HTML fragment that explains what happened and when to retry, rather than a JSON error.
// Pseudocode: rate limit middleware
function rateLimit({keyFn, limit, windowMs}) {
  return (req, res, next) => {
    const key = keyFn(req);
    const allowed = limiter.allow(key, limit, windowMs);
    if (!allowed.ok) {
      res.setHeader('Retry-After', String(Math.ceil(allowed.retryAfterMs / 1000)));
      if (req.get('HX-Request') === 'true') {
        return res.status(429).send(render('rate-limit-fragment.html', {
          retry_after_seconds: Math.ceil(allowed.retryAfterMs / 1000)
        }));
      }
      return res.status(429).send('Too Many Requests');
    }
    next();
  };
}
Step-by-step: (1) decide keys per endpoint (user ID for writes, session for anonymous, IP for global), (2) set conservative defaults and tune with metrics, (3) return 429 + Retry-After, (4) render a fragment for HTMX so the UI remains coherent, (5) log rate-limit events with the same request ID for investigation.
Preventing self-inflicted load from polling and rapid triggers
Even well-meaning features can overload your server. If you use periodic refreshes, keep intervals reasonable and add jitter. If you have buttons that can be clicked repeatedly, disable them while a request is in flight. Alpine can help manage “busy” state locally, while the server enforces hard limits.
<button
  x-data="{busy:false}"
  :disabled="busy"
  @click="busy=true"
  hx-post="/exports"
  hx-target="#export-status"
  hx-on::after-request="busy=false">
  Generate Export
</button>
This pattern reduces accidental bursts, but it does not replace server-side limits. Treat client-side throttling as UX improvement, not security.
Retries: When to Retry, How to Back Off, and How to Stay Idempotent
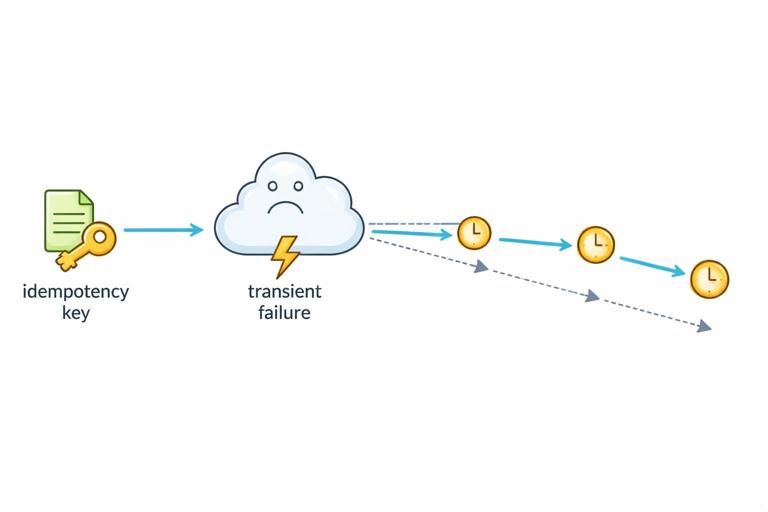
Retries are a tool for transient failures: network hiccups, temporary upstream unavailability, or brief overload. Retrying everything blindly can make outages worse, so you need rules: retry only safe operations, use exponential backoff with jitter, and ensure write operations are idempotent or guarded by idempotency keys.
Server-to-server retries (recommended) vs browser retries (careful)
The most controllable place to retry is inside the server when calling dependencies (databases, caches, external APIs). You can cap attempts, add backoff, and log each attempt. Browser-level retries for HTMX requests should be used sparingly, because the browser cannot always know whether a POST was applied. If you do client retries, prefer GETs or idempotent POSTs.
// Pseudocode: retry wrapper for an outbound HTTP call
async function withRetry(fn, {max=3, baseMs=100}) {
  for (let attempt = 1; attempt <= max; attempt++) {
    try {
      return await fn();
    } catch (err) {
      const transient = err.isTimeout || err.status === 503;
      if (!transient || attempt === max) throw err;
      const backoff = baseMs * Math.pow(2, attempt - 1);
      const jitter = Math.floor(Math.random() * baseMs);
      await sleep(backoff + jitter);
    }
  }
}
Step-by-step: (1) classify errors as transient vs permanent, (2) retry only transient ones, (3) use exponential backoff + jitter, (4) cap attempts and total time, (5) emit metrics for retries and final failures.
Idempotency keys for safe retries on writes
For operations like “create invoice” or “submit order,” retries can duplicate work. An idempotency key lets the server recognize repeated submissions and return the original result. In an HTMX app, you can generate an idempotency token per form render and submit it with the form. The server stores the key with the resulting record (or response) and replays it on duplicates.
<form hx-post="/payments" hx-target="#payment-result">
  <input type="hidden" name="idempotency_key" value="{{idempotency_key}}">
  <!-- other fields -->
  <button type="submit">Pay</button>
</form>
Step-by-step: (1) generate a unique key when rendering the form, (2) persist key + user + action + result, (3) on POST, check if key already exists; if yes, return the stored result, (4) expire keys after a reasonable window, (5) log “replayed” responses to detect flaky clients or network issues.
Timeouts and circuit breakers
Retries without timeouts can hang workers and exhaust resources. Always set timeouts on outbound calls and consider a circuit breaker for unstable dependencies. A circuit breaker stops sending requests temporarily after repeated failures, allowing the system to recover and keeping your app responsive. For HTMX fragments, a fast failure that returns a helpful partial is better than a slow spinner that never resolves.
Maintainable Architecture: Boundaries, Templates, and Operational Concerns
Maintainability is what keeps your app deployable over time: clear boundaries, consistent patterns, and a place for cross-cutting concerns like logging, rate limiting, and retries. With HTMX + Alpine, the architecture should emphasize server-side composition and small, reusable templates, while keeping client-side state minimal and localized.
Organize by feature with shared infrastructure layers
A practical structure is “feature folders” (tasks, billing, admin) plus “platform” modules (http, templates, auth, observability). Each feature owns its routes, handlers, templates, and domain logic. Platform modules provide middleware and utilities for request IDs, metrics, rate limiting, and retry wrappers.
- features/tasks/: routes, handlers, templates, domain service
- features/billing/: routes, handlers, templates, integrations
- platform/http/: middleware (request id, logging, rate limit)
- platform/observability/: metrics, tracing, log helpers
- platform/templates/: layout helpers, partial registry
This avoids a “routes folder” that becomes a dumping ground and makes it easier to reason about ownership during incidents.
Define a fragment contract per endpoint
Fragment endpoints should have an explicit contract: what HTML they return, what target they expect, and what error partials they may return. Document this contract close to the handler (comments or tests). The goal is to prevent accidental breaking changes where a fragment stops matching the DOM structure expected by the page.
// Example contract comment
// GET /tasks/:id/row
// Returns: <tr id="task-:id">...</tr>
// Errors: 404 row-not-found fragment, 500 error-panel fragment
// Intended target: #task-:id (outerHTML swap)
Step-by-step: (1) decide the “root element” of each fragment and keep it stable, (2) ensure IDs and data attributes are consistent, (3) standardize error fragments, (4) add a small integration test that asserts the fragment root element exists.
Centralize cross-cutting middleware and keep handlers thin
Handlers should focus on input validation, calling domain services, and rendering templates. Cross-cutting concerns belong in middleware: request IDs, auth, rate limiting, and response timing. This makes it easier to apply policies consistently and reduces the chance that a new endpoint ships without protection or logging.
// Pseudocode: composing middleware for an expensive endpoint
app.post(
  '/reports/monthly',
  requireAuth,
  requestId,
  requestLogging,
  rateLimit({ keyFn: req => `user:${req.user.id}:reports`, limit: 5, windowMs: 60_000 }),
  async (req, res) => {
    const report = await reportService.generate(req.user.id, req.body.month);
    res.send(render('reports/monthly-result.html', { report }));
  }
);
Step-by-step: (1) create reusable middleware modules, (2) define standard stacks for “read endpoints” vs “write endpoints” vs “expensive endpoints,” (3) enforce via code review or lint rules, (4) keep business logic in services that can be tested without HTTP.
Background jobs for long-running work with status fragments
Some operations should not run in the request/response cycle: exports, large imports, complex reports. Move them to background jobs and return an immediate response that renders a status component. The status component can be refreshed periodically (or updated via server events) while the job runs. Operationally, this reduces timeouts and makes retries safer because the job can be deduplicated by an idempotency key.
<div id="export-status"
     hx-get="/exports/{{job_id}}/status"
     hx-trigger="every 2s"
     hx-swap="outerHTML">
  <p>Export started…</p>
</div>
Step-by-step: (1) enqueue a job and return a job ID, (2) render a status fragment that polls a lightweight status endpoint, (3) store job state and progress, (4) rate limit the status endpoint to prevent excessive polling, (5) ensure job creation is idempotent for safe retries.
Release and Runtime Practices That Fit Hypermedia Apps
Deployment readiness is also about how you ship changes and how the app behaves during deploys. Because HTMX apps rely on server-rendered HTML, you must consider partial compatibility: a user might have an old page open while the server is updated. Favor backward-compatible fragment changes and avoid deploys that require the client to “refresh everything” to work.
Backward-compatible fragment evolution
When changing fragment markup, keep stable IDs and root elements, and add new elements rather than renaming existing ones. If you must change structure, consider supporting both versions temporarily by detecting the target or including versioned templates. This reduces incidents where a fragment swap fails because the expected DOM node no longer exists.
Health checks and graceful degradation
Implement a lightweight health endpoint for load balancers and a deeper readiness check that verifies critical dependencies (DB connectivity, cache). When dependencies are down, degrade gracefully: serve cached pages if available, return error fragments quickly, and avoid cascading failures by using timeouts and circuit breakers.
// Pseudocode: health endpoints
app.get('/healthz', (req, res) => res.status(200).send('ok'));
app.get('/readyz', async (req, res) => {
  const dbOk = await db.ping({timeoutMs: 200});
  if (!dbOk) return res.status(503).send('db unavailable');
  res.status(200).send('ready');
});
Step-by-step: (1) add /healthz for basic liveness, (2) add /readyz for dependency checks with strict timeouts, (3) configure the load balancer to remove unhealthy instances, (4) ensure readiness failures are visible in dashboards and alerts.
Putting It Together: A Deployment-Ready Checklist for Each New Endpoint
To keep quality consistent as the app grows, use a per-endpoint checklist. For each new route (page or fragment), verify: it emits request IDs and structured logs, it records metrics, it has appropriate rate limits, it uses timeouts and retries for outbound calls, it returns consistent error fragments for HTMX requests, and it follows the feature-folder architecture with thin handlers and testable services. This checklist turns “deployment-ready” from a vague goal into a repeatable engineering practice.
- Observability: request ID returned, structured logs include HTMX headers, metrics recorded
- Protection: rate limit policy defined (key, limit, window), 429 response includes Retry-After
- Resilience: outbound timeouts set, retries only for transient failures, idempotency for writes
- Maintainability: handler thin, domain logic in service, fragment contract documented
- Operations: health/readiness unaffected, backward-compatible markup changes considered