What CPR Does (and What It Does Not Do)
CPR (cardiopulmonary resuscitation) is a set of actions used when a baby or child is unresponsive and not breathing normally. It combines chest compressions (to move blood to the brain and heart) with rescue breaths (to add oxygen). In infants and children, cardiac arrest is often triggered by breathing problems (for example, drowning, severe asthma, infection, or airway swelling). That is why high-quality breaths matter in pediatric CPR.
CPR does not “restart” the heart in most pediatric cases by itself. Instead, it buys time by keeping oxygenated blood moving until the child starts breathing again or until advanced care and defibrillation (if needed) can be provided. Because the brain is very sensitive to lack of oxygen, the quality and speed of your actions are more important than perfection.
When to Start CPR in Infants and Children
Start CPR when the infant or child is unresponsive and not breathing normally. “Not breathing normally” includes gasping, irregular snorting breaths, or occasional agonal breaths that do not look like normal breathing. If you are unsure whether breathing is normal, treat it as abnormal and begin CPR.
CPR is not for a child who is responsive, crying, or breathing normally. If the child is breathing but unresponsive, place them in a recovery position appropriate for their size and keep monitoring breathing while waiting for help.
Key Differences: Infant vs Child CPR
CPR principles are the same, but hand placement, compression depth, and breath technique differ by size.
- Listen to the audio with the screen off.
- Earn a certificate upon completion.
- Over 5000 courses for you to explore!

Download the app
- Infant: under 1 year old (excluding newborn resuscitation in delivery settings). Compressions are done with two fingers (single rescuer) or two thumbs encircling the chest (two rescuers). Breaths are given mouth-to-mouth-and-nose.
- Child: about 1 year to puberty. Compressions are typically with one hand (small child) or two hands (larger child). Breaths are given mouth-to-mouth (pinch nose closed).
Compression depth targets are similar in proportion: about one-third the depth of the chest.
- Infant depth: about 4 cm (1.5 inches).
- Child depth: about 5 cm (2 inches).
Compression rate is the same: 100–120 compressions per minute.
High-Quality Compressions: The Foundation
Positioning and surface
Place the child on a firm, flat surface. A soft mattress reduces compression effectiveness. If the child is on a bed, move them to the floor if you can do so quickly and safely.
Hand placement
- Infant (single rescuer): place two fingers in the center of the chest just below the nipple line on the breastbone.
- Infant (two rescuers): use the two-thumb encircling technique—thumbs on the center of the chest, fingers wrapped around the back for support.
- Child: heel of one hand on the center of the chest (lower half of the breastbone). Use two hands if needed to reach proper depth without excessive strain.
Technique cues
- Push hard and fast: 100–120/min.
- Allow full chest recoil after each compression (do not lean).
- Keep interruptions as short as possible; pauses reduce blood flow.
- Count out loud to maintain rhythm and reduce hesitation.
Practical rhythm tip: Many people compress too slowly when stressed. Aim for a steady cadence. If you have an AED, its prompts can also help you maintain pace.
Rescue Breaths: How to Give Effective Ventilations
In pediatric CPR, breaths are important because many arrests begin with oxygen deprivation. The goal is to make the chest rise with each breath—no more, no less. Over-ventilating can force air into the stomach, increasing vomiting risk and reducing lung inflation.
Open the airway
Use a head-tilt/chin-lift. For infants, use a neutral head position (avoid over-tilting). For children, a gentle tilt is usually appropriate. If you suspect a neck injury, you still need to open the airway; use the least movement that allows breathing support, but do not delay CPR.
Breath technique
- Infant: seal your mouth over the infant’s mouth and nose. Give a gentle breath for about 1 second, watching for chest rise.
- Child: pinch the nose, seal your mouth over the child’s mouth, and give a breath for about 1 second with visible chest rise.
If the chest does not rise
- Reposition the head and chin and try again.
- Check your seal (especially with infants).
- Look quickly in the mouth for an obvious object only if you can see it; do not perform blind finger sweeps.
- Resume compressions promptly; do not spend long troubleshooting.
Example: You give a breath to a 3-year-old and the chest does not rise. You re-tilt the head slightly, lift the chin, pinch the nose more firmly, and try again. If still no rise, you return to compressions and follow the CPR cycle; the compressions may help move an obstruction.
Step-by-Step CPR for a Single Rescuer (Infant or Child)
This sequence assumes you have already determined the child is unresponsive and not breathing normally and that emergency response has been activated according to your local protocol. Focus here on the CPR mechanics.
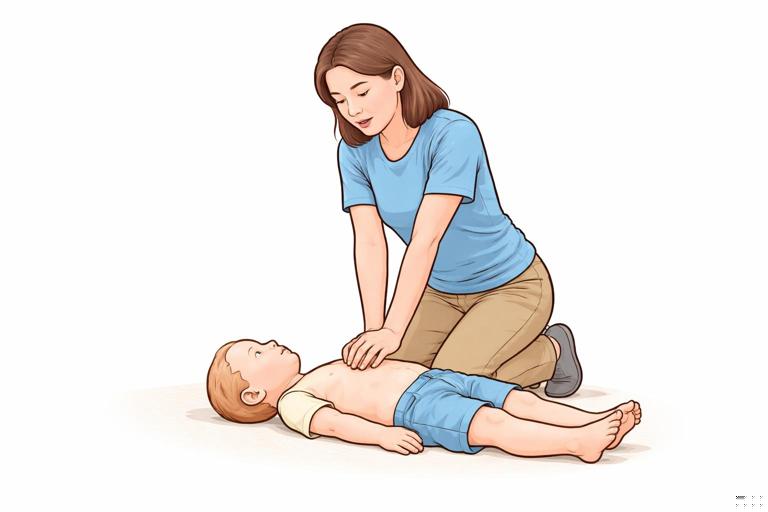
1) Start compressions
Begin chest compressions immediately.
- Rate: 100–120/min
- Depth: one-third of the chest
- Location: center of the chest on the breastbone
2) Give breaths in a 30:2 cycle
For a single rescuer, use 30 compressions followed by 2 breaths.
- Do 30 compressions.
- Open airway (head-tilt/chin-lift).
- Give 2 breaths, each about 1 second, with chest rise.
- Return immediately to compressions.
3) Continue cycles and minimize pauses
Continue 30:2 cycles until an AED is ready to use, the child shows signs of life (normal breathing, movement), or trained help takes over.
Practical pacing: Many rescuers pause too long between compressions and breaths. Aim for a brief breath phase (two quick effective breaths) and get back to compressions.
Two-Rescuer Pediatric CPR: More Efficient Teamwork
When two trained people are present, pediatric CPR becomes more effective because one rescuer can focus on compressions while the other manages breaths and AED setup.
Compression-to-breath ratio
For two rescuers in infants and children, use 15 compressions to 2 breaths (15:2). This increases the number of breaths delivered per minute while keeping compressions frequent.
Role assignment
- Rescuer A: compressions, counts out loud, maintains rate and depth.
- Rescuer B: airway and breaths, watches chest rise, prepares AED, and times role switches.
Switching to prevent fatigue
Switch compressors about every 2 minutes (or sooner if quality drops). The switch should be fast: one rescuer takes position while the other finishes a compression cycle, then swap with minimal interruption.
Example: In a school setting, a teacher begins compressions on an 8-year-old while a second staff member provides breaths and retrieves the AED. They use 15:2 and switch compressors after about 2 minutes when the first rescuer’s arms begin to tire.
CPR with a Barrier Device (Pocket Mask or Face Shield)
If you have a pocket mask, it can improve seal and reduce disease transmission concerns. Place the mask over the child’s mouth and nose (infant) or mouth (child) and use the head-tilt/chin-lift to maintain airway position. Squeeze the mask firmly to prevent leaks and deliver breaths that produce chest rise.
If you do not have a barrier device, you may still provide rescue breaths if you are willing and able. If you cannot provide breaths, perform compression-only CPR until help arrives; compressions are better than doing nothing.
Using an AED (Automated External Defibrillator) in Infants and Children
An AED analyzes the heart rhythm and, if appropriate, advises a shock to treat certain life-threatening rhythms. In children, shockable rhythms are less common than in adults, but they do occur—especially with sudden collapse, certain heart conditions, or electrocution. Because you cannot reliably tell which rhythm is present without equipment, using an AED as soon as available is recommended.
Safety and priorities
- CPR continues until the AED is powered on and pads are ready.
- Keep interruptions short: pause compressions only when the AED instructs you to stop for analysis or shock.
- Ensure no one is touching the child during rhythm analysis and shock delivery.
Choosing the right pads: pediatric vs adult
- Preferred: pediatric pads or a pediatric dose attenuator for children under about 8 years or under about 25 kg (55 lb), depending on device guidance.
- If pediatric pads are not available: use adult pads. Using adult pads is better than not using an AED.
Always follow the AED’s instructions and the pad diagrams. Different brands vary slightly.
Pad placement (and what to do if pads might touch)
Correct pad placement ensures the current passes through the heart.
- Standard anterolateral placement (common for children): one pad on the upper right chest (below the collarbone), the other on the left side of the chest (below the armpit).
- Anteroposterior placement (often for infants or small children): one pad in the center of the chest, the other on the center of the back between the shoulder blades.
If the child is small and the pads risk touching each other on the chest, use the anteroposterior placement. Pads that touch can reduce effectiveness and may cause arcing.
Step-by-step: AED use during pediatric CPR
1) Turn on the AED
Open the lid or press the power button. The device will begin voice prompts.
2) Expose and prepare the chest
- Remove clothing from the chest.
- Dry the chest if wet (for example after a pool incident). Water can interfere with pad adhesion.
- If there is heavy chest hair (more common in older children), pads may not stick well; if a razor is in the AED kit, shave quickly where the pads will go. If no razor is available, press pads firmly; if they won’t adhere, remove and apply a new set if available.
Medication patches: If you see a patch on the chest, remove it (use gloves if available) and wipe the area dry before placing a pad. Do not place a pad over a patch.
3) Attach pads to the child
Place pads as shown on the diagrams. Press firmly to ensure full contact.
4) Plug in the connector if required
Some AEDs have pads pre-connected; others require plugging in. Do this quickly.
5) Clear for analysis
When the AED says to analyze, stop compressions and make sure no one is touching the child. Say clearly, “Clear,” and visually confirm hands are off.
6) Deliver shock if advised
If the AED advises a shock, ensure everyone is clear and press the shock button if prompted (some devices deliver automatically). Immediately resume CPR after the shock—do not check for a pulse or pause to see what happens unless the child clearly wakes or breathes normally.
7) If no shock is advised
Resume CPR immediately. The AED will prompt you to continue CPR and will reanalyze at intervals.
Practical example: A 6-year-old collapses during sports. An AED arrives. You attach pads, clear for analysis, and the AED advises a shock. You deliver the shock and immediately restart compressions. After about 2 minutes, the AED reanalyzes. Even if no shock is advised, you continue CPR until the child shows normal breathing or advanced help takes over.
Special Situations Affecting CPR and AED Use
Drowning or water exposure
In drowning, oxygen deprivation is the primary problem. Provide effective breaths as part of CPR. If the child is wet, dry the chest quickly before applying AED pads. Move the child out of standing water; do not deliver a shock while the child is in water.
Vomiting during CPR
Vomiting can happen during resuscitation. If it occurs:
- Turn the child’s head and body to the side as a unit if possible, clear the mouth quickly, and return to CPR.
- Keep pauses short; prioritize compressions.
- After clearing, re-open the airway and resume breaths with chest rise.
Asthma or severe breathing illness leading to arrest
If a child with severe breathing difficulty becomes unresponsive and not breathing normally, treat it as cardiac arrest and begin CPR. In these cases, good ventilations are especially important. Ensure the airway is positioned well and that each breath produces chest rise.
Trauma and suspected neck injury
Even if trauma is suspected, if the child is unresponsive and not breathing normally, start CPR. Use the least head movement needed to open the airway. AED use is still appropriate if cardiac arrest is present.
Pacemakers or implanted devices (older children/teens)
You may see a small bulge under the skin near the collarbone. Do not place an AED pad directly over it; place the pad slightly to the side while keeping the general position.
Common CPR Mistakes and How to Fix Them Quickly
Compressing too shallow or too slow
Fix: Reposition your hands/fingers to the center of the chest, lock your elbows (for child compressions), and commit to one-third chest depth at 100–120/min. If you are tiring, switch with another rescuer.
Leaning on the chest
Fix: After each compression, release pressure fully while keeping contact. Full recoil helps the heart refill.
Long pauses for breaths or AED setup
Fix: Keep breaths to about 1 second each. During AED use, pause only when the device instructs analysis/shock. Assign tasks: one rescuer compresses while the other prepares pads.
Breaths that are too forceful
Fix: Give smaller, gentler breaths—just enough for visible chest rise. If the stomach inflates, adjust head position and reduce breath volume.
Incorrect pad placement or pads touching
Fix: Follow the diagrams. If pads might touch on a small chest, switch to front-and-back placement.
Skill-Building Drills You Can Practice (Without a Manikin)
You can improve readiness by rehearsing the sequence and your role in a team. These drills do not replace hands-on training, but they help reduce hesitation.
Verbal walkthrough drill
Say the steps out loud as if you are doing them: “Compressions in the center of the chest, 30, open airway, 2 breaths, back to compressions, AED on, pads on, clear, shock if advised, resume compressions.” Practicing the language helps you lead others during an emergency.
Timing drill
Use a timer for 2 minutes and practice counting compressions at a steady pace (without pressing on a person). The goal is to internalize 100–120/min so your pace does not slow under stress.
Team role drill
With another adult, assign roles: one person “compresses” (counts out loud), the other “breathes” and “runs the AED.” Practice switching roles quickly every 2 minutes with minimal interruption.
Quick reference (pediatric CPR mechanics) Single rescuer: 30 compressions : 2 breaths Two rescuers: 15 compressions : 2 breaths Rate: 100–120/min Depth: ~1/3 chest (infant ~4 cm, child ~5 cm) AED: use ASAP; pediatric pads preferred, adult pads acceptable if needed