What “runtime boundaries” mean in a Kubernetes world
Containerizing a service is not just “put the app in a container.” In Kubernetes, a container is a runtime unit with explicit boundaries: what it can see (filesystem, network), what it can use (CPU, memory), what it can assume (configuration, identity), and what it must not do (write to arbitrary paths, depend on host state, run privileged operations). Designing runtime boundaries means deciding, deliberately, which responsibilities live inside the image, which are injected at runtime, and which are delegated to the platform.
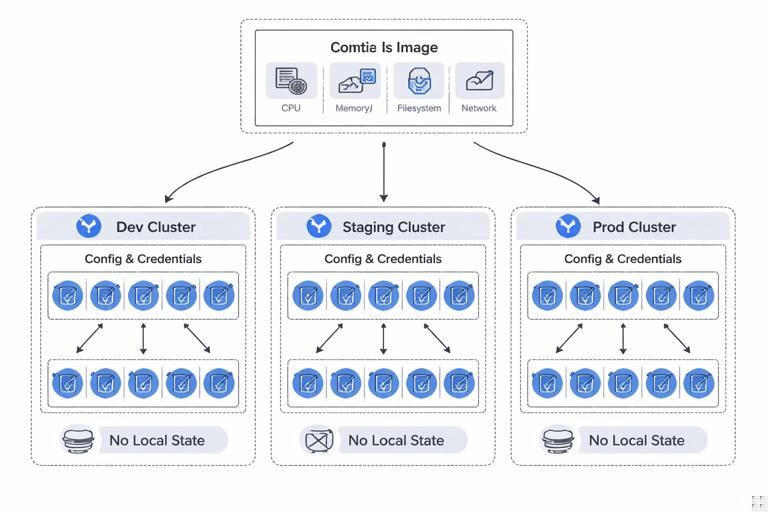
A good boundary makes the service portable and predictable: the same image can run in dev, staging, and prod with different configuration and credentials; it can be scaled horizontally without shared local state; it can be restarted at any time without data loss; and it can be constrained so failures are contained.
Key boundary decisions
- Process boundary: one main process per container; additional processes only when they are tightly coupled and managed intentionally.
- Filesystem boundary: immutable image layers; writable paths are explicit (temporary or mounted volumes).
- Configuration boundary: config is injected (env vars, mounted files) and not baked into the image.
- Secret boundary: secrets are never built into the image; they are provided at runtime and rotated without rebuilds.
- Network boundary: inbound/outbound ports and dependencies are explicit; avoid hidden calls to “whatever is on localhost” unless it is a sidecar in the same Pod.
- Resource boundary: CPU/memory requests and limits reflect how the service behaves under load; the app is resilient to throttling and OOM restarts.
- Privilege boundary: run as non-root, drop Linux capabilities, read-only root filesystem when possible.
Choosing the right unit of containerization
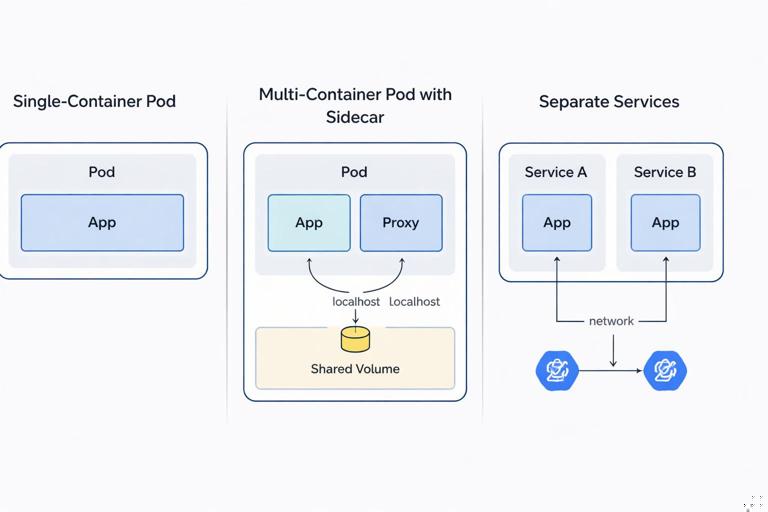
Before writing a Dockerfile, decide what “a service” means operationally. In Kubernetes, the smallest schedulable unit is a Pod, which can contain one or more containers that share network and volumes. Your design choice is usually between:
- One container per Pod (most common): simplest scaling and debugging; clear ownership.
- Multiple containers per Pod (sidecar pattern): used when two processes must share localhost networking and filesystem and must be co-scheduled (for example, a proxy, log shipper, or certificate reloader).
- Split into multiple services: when components scale differently, fail independently, or have different security/resource profiles.
Heuristics: if two components must always be deployed together and share the same lifecycle, a multi-container Pod can be appropriate. If they can be versioned and scaled independently, keep them as separate Deployments and communicate over the network.
Designing the container image boundary
A container image should contain only what is needed to run the service: the compiled artifact (or application code), runtime dependencies, and minimal OS libraries. Everything else is noise: shells, package managers, build tools, and debugging utilities increase attack surface and image size.
- Listen to the audio with the screen off.
- Earn a certificate upon completion.
- Over 5000 courses for you to explore!

Download the app
Multi-stage builds: keep build tools out of runtime
Multi-stage builds let you compile in one stage and copy only the output into a minimal runtime stage. This is one of the most effective ways to enforce a clean boundary between “build-time” and “run-time.”
# Example: Go service (multi-stage) Dockerfile FROM golang:1.22 AS build WORKDIR /src COPY go.mod go.sum ./ RUN go mod download COPY . . RUN CGO_ENABLED=0 GOOS=linux GOARCH=amd64 go build -o /out/service ./cmd/service FROM gcr.io/distroless/static-debian12:nonroot WORKDIR /app COPY --from=build /out/service /app/service USER nonroot:nonroot EXPOSE 8080 ENTRYPOINT ["/app/service"]Notes on the boundary:
- The final image has no compiler, no package manager, and typically no shell.
- Running as a non-root user is part of the runtime contract.
- Only the binary is copied; everything else is discarded.
Example: Node.js service with production dependencies only
# Example: Node.js Dockerfile (multi-stage) FROM node:20-bookworm AS build WORKDIR /app COPY package*.json ./ RUN npm ci COPY . . RUN npm run build FROM node:20-bookworm-slim WORKDIR /app ENV NODE_ENV=production COPY package*.json ./ RUN npm ci --omit=dev COPY --from=build /app/dist ./dist USER node EXPOSE 3000 CMD ["node", "dist/server.js"]Boundary choices here:
- Build output is separated from runtime dependencies.
- Dev dependencies are excluded from the runtime stage.
- The container runs as the unprivileged
nodeuser.
Pinning and reproducibility
To make runtime behavior predictable, pin versions where possible:
- Use specific base image tags (and ideally digests) to avoid surprise upgrades.
- Use lockfiles (
package-lock.json,poetry.lock,go.sum) and deterministic build steps. - Keep the build context small with a
.dockerignoreto avoid leaking credentials or bloating layers.
# .dockerignore example .git node_modules dist *.log .env *.pemRuntime configuration boundary: what goes in the image vs what is injected
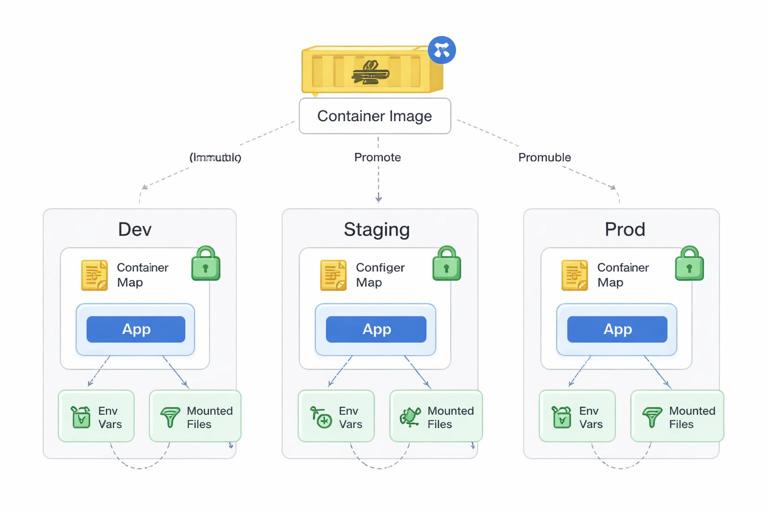
A common anti-pattern is baking environment-specific values into the image (database hostnames, API endpoints, feature flags). This breaks portability and forces rebuilds for every environment. Instead, treat the image as immutable and inject configuration at runtime.
Practical mapping: build-time vs run-time
- Build-time: compiled code, static assets, default config templates, migrations tooling (if needed), CA certificates.
- Run-time: environment variables, config files, secrets, service endpoints, credentials, per-environment tuning.
Design your app to read configuration from environment variables and/or a mounted config file. Prefer a single “source of truth” to avoid ambiguity (for example, env vars override config file, or vice versa, but document it).
Step-by-step: make configuration injectable
1) Identify all environment-specific values currently hardcoded (DB URL, Redis host, external API base URL, log level, feature flags).
2) Replace hardcoded values with configuration keys (for example, DATABASE_URL, REDIS_ADDR, LOG_LEVEL).
3) Provide safe defaults for local development, but fail fast in production if required settings are missing.
4) Ensure configuration is printed safely: log which non-sensitive settings are active, but never log secrets.
5) In Kubernetes, inject config via environment variables or mounted files (ConfigMap/Secret). Keep the container image unchanged across environments.
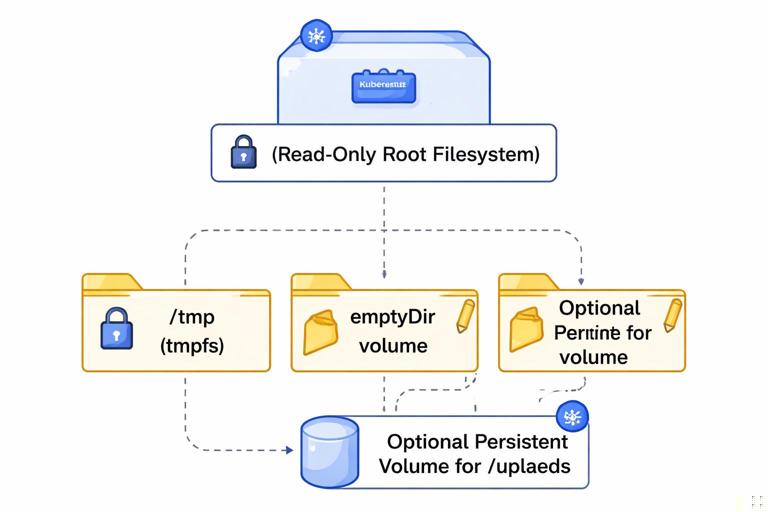
Filesystem boundary: immutable root, explicit writable paths
Containers should assume their root filesystem is immutable. If the app needs to write, it should write only to explicit locations. This reduces accidental statefulness and improves security.
Common writable needs
- Temporary files: use
/tmp(and consider mounting anemptyDirif you want to control size/medium). - Cache: either disable, keep in-memory, or mount a dedicated volume.
- Uploads: avoid local disk for durable data; use object storage or a persistent volume with clear lifecycle.
Step-by-step: enforce a read-only root filesystem
1) Update the app to write only to /tmp or a configurable directory.
2) Ensure the image does not require writing to its own directories at startup (for example, don’t generate files under /app).
3) In Kubernetes, set readOnlyRootFilesystem: true and mount writable volumes where needed.
# Pod security context snippet (conceptual) securityContext: readOnlyRootFilesystem: true runAsNonRoot: trueWhen you enable a read-only root filesystem, you quickly discover hidden assumptions (libraries trying to write caches under the home directory, frameworks writing PID files, etc.). Fixing these assumptions is part of designing a clean runtime boundary.
Process boundary: one main process, and when to use sidecars
Inside a container, you typically want a single main process. This keeps signals, exit codes, and health behavior clear. If you run multiple processes in one container, you need a supervisor, and failures become harder to reason about.
When a sidecar is appropriate
- Local proxy: a reverse proxy or mTLS sidecar that must share localhost with the app.
- Log/metrics agent: when you must tail files or expose a local endpoint (though many setups use node-level agents instead).
- Certificate reloader: watches mounted certs and triggers reloads.
Rule of thumb: if the helper process is a reusable operational concern and must share the Pod’s network namespace, use a sidecar container. If it is a one-time setup action, use an init container instead.
Init containers as a boundary tool
Init containers run to completion before the app starts. They are useful for tasks like waiting for a dependency, rendering config from templates, or running lightweight checks. Avoid putting long-running “setup” logic into init containers; keep them deterministic and fast.
Network boundary: explicit ports, explicit dependencies
A container should expose a clear interface: which port it listens on, which protocols it speaks, and which downstream services it needs. Hidden dependencies create fragile deployments.
Practical guidelines
- Bind to 0.0.0.0: inside containers, binding to
127.0.0.1makes the service unreachable from outside the container. - Make the listen port configurable: use
PORTenv var, defaulting to a sane value. - Time out outbound calls: set connect/read timeouts and retries; Kubernetes will restart pods, but it won’t fix hung threads.
- Graceful shutdown: handle SIGTERM and stop accepting new requests while finishing in-flight work.
Resource boundary: designing for requests/limits and failure modes
Kubernetes enforces resource boundaries via CPU and memory requests/limits. Your service should behave predictably when constrained: CPU throttling increases latency; memory limits can cause OOM kills. Containerizing without considering these realities often leads to unstable rollouts.
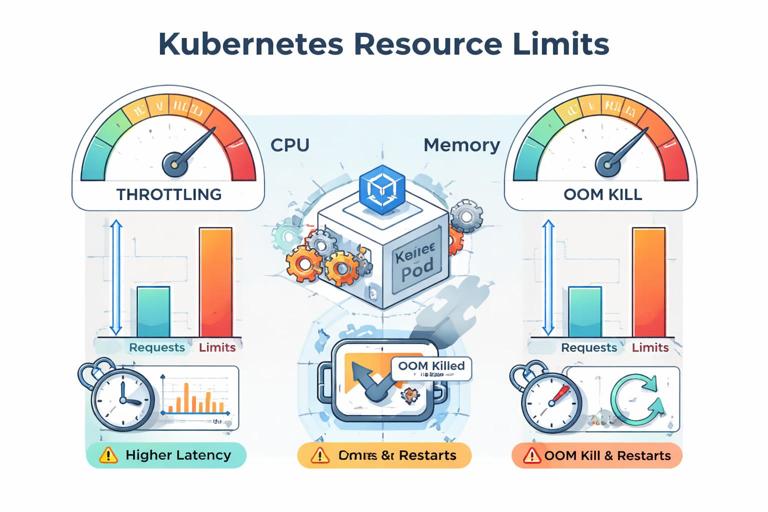
Practical steps to make resource usage predictable
1) Measure baseline memory usage at idle and under typical load.
2) Identify memory spikes (large responses, caching, batch jobs) and cap them (stream responses, limit concurrency, bound caches).
3) For runtimes with GC (Java, Go, Node), configure memory behavior so the process respects container limits. For example, set JVM container-aware flags or configure heap percentages; for Node, consider --max-old-space-size when needed.
4) Ensure the app can be restarted at any time: no in-memory-only durable state, idempotent startup, and safe retry logic.
Security boundary: least privilege by default
Runtime boundaries are also security boundaries. A container should have the minimum privileges required to do its job. This reduces blast radius if the service is compromised.
Concrete hardening measures
- Run as non-root: set a non-root user in the image and enforce it at runtime.
- Drop Linux capabilities: most apps need none beyond the default set; explicitly drop all and add back only if required.
- No privilege escalation: prevent setuid binaries from elevating privileges.
- Read-only root filesystem: discussed earlier; combine with explicit writable mounts.
- Avoid hostPath mounts: they pierce the boundary to the node filesystem; use only when absolutely necessary.
Also consider supply chain boundaries: only copy the minimal artifacts into the runtime image, and avoid downloading dependencies during container startup.
Step-by-step: containerize a typical HTTP service with clean boundaries
This walkthrough focuses on the decisions and checks that enforce runtime boundaries. Adapt the language/runtime specifics to your stack.
Step 1: define the runtime contract
Write down (in your repo) a short contract for the service:
- Listens on
PORT(default 8080) on0.0.0.0. - Reads configuration from env vars; secrets come from runtime injection.
- Writes only to
/tmp. - Gracefully shuts down on SIGTERM within N seconds.
- Runs as non-root and does not require extra Linux capabilities.
Step 2: create a minimal Dockerfile
Use a multi-stage build. Ensure the final stage contains only runtime necessities. Add:
USERset to non-root.WORKDIRset to a non-root-owned directory.ENTRYPOINT/CMDthat runs the main process directly (no shell wrapper unless necessary).
Step 3: verify the container does not depend on build context
Build and run locally with only runtime inputs:
# Build docker build -t myservice:local . # Run with explicit config docker run --rm -p 8080:8080 -e PORT=8080 -e LOG_LEVEL=info myservice:localIf the service fails because it expects files that weren’t copied into the image, decide whether those files belong in the image (static assets) or should be mounted/injected (config, secrets).
Step 4: enforce non-root and read-only assumptions
Run the container with a read-only filesystem to catch hidden writes:
docker run --rm -p 8080:8080 --read-only --tmpfs /tmp:rw,size=64m myservice:localIf it fails, fix the app or adjust writable paths. The goal is to make writable needs explicit.
Step 5: make startup and shutdown deterministic
Ensure:
- Startup fails fast if required config is missing.
- Long initialization is visible (logs/metrics) and bounded (timeouts).
- SIGTERM triggers graceful shutdown: stop accepting new requests, finish in-flight work, close connections.
This is critical because Kubernetes will terminate Pods during rollouts, scaling, and node maintenance.
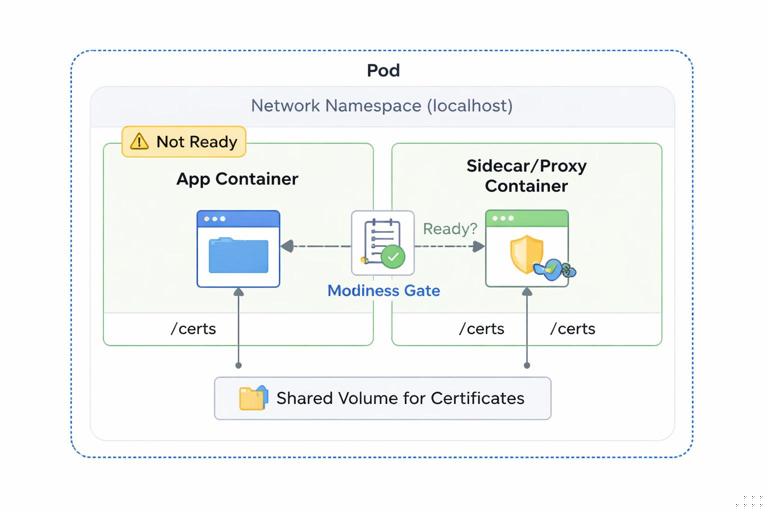
Designing boundaries inside a Pod: sharing localhost and volumes intentionally
When you decide to run multiple containers in one Pod, treat the Pod as the boundary and define what is shared:
- Shared network namespace: containers can talk over
localhost. Use this for tightly coupled helpers (proxy, local agent). - Shared volumes: use volumes to share files (for example, a sidecar writes refreshed certs to a shared volume; the app reads them).
Avoid accidental coupling: if the app depends on a sidecar being present, make that dependency explicit in your deployment manifests and readiness behavior (for example, the app should not report ready until it can reach the local proxy if the proxy is required).
Common anti-patterns and how to fix them
Anti-pattern: baking environment config into the image
Symptoms: separate images per environment; frequent rebuilds; secrets accidentally committed into layers.
Fix: move config and secrets to runtime injection; keep one image promoted across environments.
Anti-pattern: writing durable data to the container filesystem
Symptoms: data loss on restart; inconsistent behavior across replicas; “works on my machine” statefulness.
Fix: use external storage (object store, database) or a persistent volume with a clear lifecycle; keep containers stateless by default.
Anti-pattern: running as root “because it’s easier”
Symptoms: security scanners flag the image; platform policies block deployment; higher blast radius.
Fix: adjust file ownership at build time, use high ports, and run as non-root; only add privileges when you can justify them.
Anti-pattern: one container image for multiple roles without clear entrypoints
Symptoms: same image used for API, worker, cron tasks with ad-hoc commands; hard to reason about resources and health.
Fix: either create separate images per role or keep one image but define explicit commands and configuration per workload, with role-specific resource settings and health behavior.
Practical checklist for reviewing a containerized service
- Image is minimal; build tools are not in the runtime layer.
- Runs as non-root; no privilege escalation; capabilities are minimized.
- Root filesystem can be read-only; writable paths are explicit.
- Configuration is injected at runtime; secrets are not in the image.
- Service binds to
0.0.0.0; port is configurable. - Graceful shutdown is implemented; startup is deterministic and fails fast.
- Resource usage is measured; app behaves under CPU throttling and memory limits.
- Dependencies are explicit; no hidden reliance on node-local services.
- If using sidecars/init containers, shared resources and lifecycle coupling are intentional and documented.