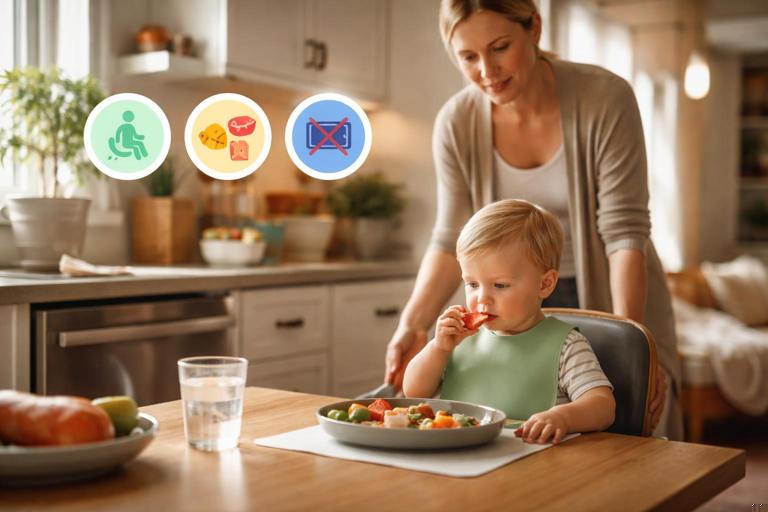
Why choking prevention matters and what “safe feeding” really means
Choking prevention is the set of choices and habits that reduce the chance that food, liquid, or small objects block a child’s airway. “Safe feeding” means matching food size, texture, and supervision to a child’s developmental abilities (not just their age), and creating an environment where eating is the main activity. Choking is different from gagging: gagging is a protective reflex that helps move food forward or out; choking is when airflow is blocked and the child cannot breathe effectively. Prevention focuses on controlling three variables: the child’s skills (chewing, swallowing, posture), the food/object hazards (shape, size, texture), and the setting (supervision, distractions, storage).
Developmental stage matters because the ability to sit upright, coordinate chewing and swallowing, manage mixed textures, and resist impulsive behaviors changes rapidly from infancy through early school years. A food that is safe for a 6-year-old (whole grapes) can be a high-risk hazard for a 2-year-old because of airway size and chewing patterns. Likewise, a child with developmental delays, low muscle tone, sensory sensitivities, or orthodontic appliances may need “younger-stage” precautions even if they are older.
Core principles that apply at every stage
- Upright posture: Feed children seated upright with good trunk support. Avoid eating while lying down, reclined in a stroller, or running around.
- One job at a time: Reduce distractions. Eating while laughing, crying hard, talking with a full mouth, or playing increases risk.
- Slow pace and small portions: Offer manageable bites and pause between bites. Overstuffing is a common pathway to choking.
- Texture progression: Advance textures gradually. Mixed textures (like soup with chunks) are often harder than single textures.
- Supervision means close and active: An adult should be within arm’s reach for infants and close enough to observe chewing and swallowing for toddlers and preschoolers.
- Modify high-risk foods: Round, firm, sticky, or compressible foods are common culprits. Change shape and texture to reduce airway-blocking potential.
- Safe storage: Keep small objects (coins, batteries, beads, magnets) out of reach; choking prevention is not only about food.
Developmental stage 1: Newborn to about 6 months (milk feeding stage)
At this stage, feeding is primarily breastmilk or formula. The main choking-related risks come from improper positioning, fast flow, bottle propping, and unsafe sleep-related feeding practices. Babies have limited head and trunk control, and their coordination is still developing.
Safe milk feeding: step-by-step
Position: Hold the baby semi-upright (head higher than stomach) with the head and neck supported in a neutral position (not sharply flexed forward or extended back).
Latch and seal: For bottle feeding, ensure the nipple is centered and the baby has a good seal to reduce air gulping and coughing.
Continue in our app.- Listen to the audio with the screen off.
- Earn a certificate upon completion.
- Over 5000 courses for you to explore!

Download the app
Control flow: Choose an age-appropriate nipple flow. If milk streams out when the bottle is inverted, the flow may be too fast. Signs of too-fast flow include coughing, sputtering, wide eyes, pulling off repeatedly, or milk leaking from the corners of the mouth.
Paced feeding: Keep the bottle more horizontal so the baby controls the flow, and pause every few minutes to allow swallowing and breathing.
No bottle propping: Do not prop a bottle with blankets or leave the baby unattended with a bottle. This increases choking and aspiration risk.
Burp breaks: Offer brief burp breaks to reduce spit-up and coughing episodes.
Common hazards and prevention
- Feeding when overly sleepy: A very drowsy baby may not coordinate swallowing well. Feed when the baby is alert enough to suck and swallow rhythmically.
- Thickening feeds: Only thicken feeds if specifically directed by a clinician; incorrect thickening can create new risks.
- Small objects near baby: Older siblings’ toys are a frequent hazard. Create a “baby-safe zone” on the floor with strict rules about tiny items.
Developmental stage 2: About 6 to 9 months (starting solids, early sitting and mouthing)
Many babies begin solids around this period when they can sit with minimal support, bring food to the mouth, and show readiness cues. Babies explore with their mouths and may push too much food in. Gagging is common as they learn textures; prevention focuses on safe shapes and soft textures, and on avoiding small hard pieces.
Introducing solids safely: step-by-step
Check readiness cues: Baby can sit with support, has good head control, brings objects to mouth, and shows interest in food. If these are not present, delay solids and focus on milk feeding.
Seat securely: Use a high chair with a stable base, foot support if possible, and a snug harness. Feet supported can improve stability and chewing coordination.
Start with soft, single-texture foods: Examples include smooth purees, mashed avocado, yogurt (if appropriate), or well-cooked, mashed vegetables.
Offer small amounts: Start with a small spoon tip or a few soft pieces. Let the baby set the pace.
Choose safe finger foods if doing baby-led feeding: Offer soft foods that can be squished between fingers (e.g., ripe banana spears, well-cooked sweet potato sticks). Pieces should be large enough to grasp, not small hard chunks.
Stay close and watch swallowing: Look for rhythmic chewing/gumming and swallowing. If the baby is coughing repeatedly, pause and reassess texture and size.
Foods and items to avoid at this stage
- Hard round foods: nuts, popcorn, hard candy.
- Small hard pieces: raw apple chunks, raw carrot coins, hard crackers that break into sharp pieces.
- Round “plug” shapes: whole grapes, cherry tomatoes, blueberries (unless smashed), mini mozzarella balls.
- Sticky clumps: spoonfuls of nut butter, marshmallows, gummy candies.
Practical example: making fruit safer
Instead of offering whole blueberries, press each berry flat between your fingers or a spoon to reduce the round airway-plug shape. For grapes, do not offer whole; save grapes for later stages and always cut lengthwise into quarters when appropriate.

Developmental stage 3: About 9 to 12 months (more texture, pincer grasp, faster eating)
Babies often develop a pincer grasp and can pick up small pieces, which can be helpful for self-feeding but also increases the chance of grabbing unsafe items. They may eat quickly and experiment with stuffing the mouth. They are also more mobile, making it tempting for caregivers to allow “eating on the go,” which increases risk.
Safe self-feeding: step-by-step
Prepare the environment: Sit the baby in a high chair; remove small objects from the floor and tray before meals.
Serve bite-sized soft pieces: Offer pea-sized to bean-sized soft pieces that dissolve easily or can be mashed with gums (e.g., well-cooked pasta pieces, soft scrambled egg pieces, tender shredded chicken).
Limit “stuffing”: Place a few pieces on the tray at a time rather than a full handful. Refill as they eat.
Model slow eating: Eat with the baby when possible and demonstrate taking small bites and pausing.
Keep drinks appropriate: If introducing cups, use small sips. Large gulps can trigger coughing, especially when learning straw or open cups.
Texture traps: mixed textures
Mixed textures can surprise a baby who expects a smooth puree. Examples include soup with chunks, cereal in milk, or fruit pieces in yogurt. Introduce mixed textures gradually by starting with very small soft lumps and increasing as skills improve.
Developmental stage 4: 12 to 24 months (toddlers: impulsive, mobile, learning to chew)
Toddlers are at high risk because they are active, easily distracted, and still developing molars and mature chewing patterns. They may run, climb, laugh, or cry while eating. They also imitate older children and may demand foods they cannot safely manage.
Toddler mealtime safety routine: step-by-step
Set a consistent eating location: Use a high chair or booster with a secure strap at a table. Make “we only eat sitting down” a firm rule.
Serve appropriate bite sizes: Cut foods into small pieces. For round foods, change the shape (see below).
Supervise actively: Stay in the room and watch. Avoid stepping away to answer the door or do chores during high-risk foods.
Teach “chew then talk”: Use simple phrases: “Chew, chew, swallow, then talk.” Keep it calm and consistent.
Limit distractions: Avoid screens during meals. Screens can cause trance-like eating and overstuffing.
Offer water with meals: Small sips can help clear the mouth, but avoid encouraging large gulps.
High-risk foods for toddlers and how to modify them
- Grapes/cherry tomatoes: Cut lengthwise into quarters. Cutting into rounds (coins) keeps the plug shape and is less safe than lengthwise cuts.
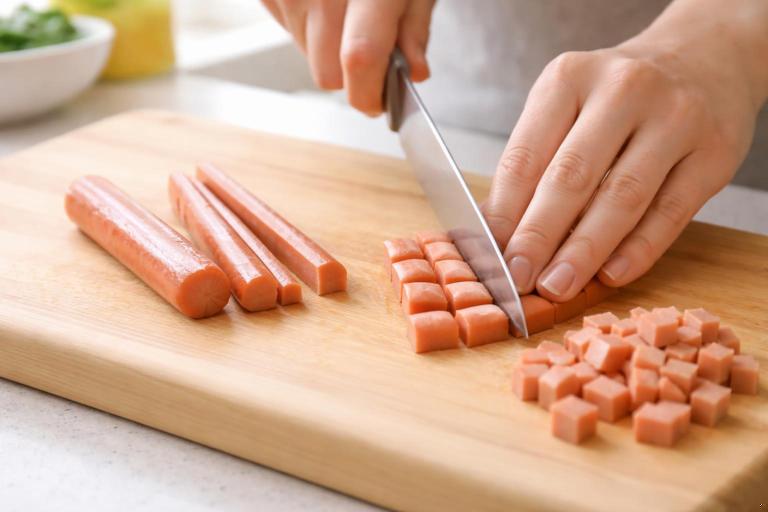
- Hot dogs/sausages: Cut lengthwise first, then into small pieces. Round slices are a classic choking hazard.
- Raw carrots/apples: Cook until soft, grate finely, or slice very thin. Avoid hard chunks.
- Nut butter: Spread thinly on toast or mix into yogurt/oatmeal; avoid spoonfuls or thick globs.
- Cheese: Cut into thin strips or small pieces; avoid large cubes that can lodge.
- Popcorn, nuts, hard candies, gum: Avoid entirely in this age group.
Practical example: safer sandwich
A thick peanut butter sandwich can form a sticky mass. Make it safer by spreading a thin layer of nut butter, adding a moist layer (banana mash or jam), and cutting into small strips. Offer water sips and supervise closely.
Developmental stage 5: 2 to 4 years (preschoolers: improving skills, still high-risk behaviors)
Preschoolers chew better and can follow simple safety rules, but they are still prone to distraction, talking with food in their mouths, and sudden laughter. They also encounter more group eating situations (playdates, preschool snacks) where supervision may be divided.
Teaching choking-prevention skills
- Rule-based habits: “Sit to eat,” “Take small bites,” “Chew until it’s mushy,” “No stuffing.” Practice during calm meals, not only when correcting.
- Food checks: Teach them to show you a new food before eating it at a party or school event.
- Spit-it-out practice: In a playful, non-shaming way, teach that it is okay to spit food into a napkin if it feels too big or hard.
Group settings: practical steps
Scan the menu: At parties, look for high-risk items (whole grapes, hot dog rounds, popcorn, hard candy bowls).
Pre-modify: Bring a small food-safe knife or ask the host to cut grapes and hot dogs lengthwise.
Assign supervision: In playgroups, explicitly designate an adult to watch eating rather than assuming “someone is watching.”
Separate play and food: Create a snack table where kids sit, then return to play after swallowing.
Developmental stage 6: 5 to 8 years (early school age: more independence, new environments)
Children in this stage usually have mature chewing skills, but choking risk persists due to speed eating, peer distraction, and eating in places like school cafeterias, buses, sports fields, or while walking. They may also experiment with challenges (stuffing food, eating contests) or chew non-food items.
School and activities: prevention strategies
- Lunchbox design: Pack foods that are easy to chew and not overly dry or sticky. Include a drink to help with dry foods (but avoid encouraging gulping).
- Time pressure: If lunch periods are short, children may rush. Practice “two bites, sip, breathe” pacing at home.
- Sports snacks: Require sitting or standing still to eat; no eating while running drills. Cut fruit appropriately (grapes quartered lengthwise if served).
- Teach “help-seeking” language: Children should know to alert an adult immediately if a friend is choking or if they feel food stuck.
Practical example: safer after-school snack
Instead of offering a handful of mixed nuts or popcorn, choose yogurt with soft fruit, cheese sticks cut into thin strips, or hummus with soft pita triangles. If offering apples, slice thinly rather than giving whole apple chunks.
Developmental stage 7: 9 to early teens (greater autonomy, higher-risk choices)
Older children and early teens generally have low choking risk from typical foods, but risk can increase with certain behaviors: eating quickly between classes, talking and laughing with a mouth full, trying extremely spicy or dry foods as dares, chewing gum during sports, or eating while lying down with devices. Orthodontic appliances can also affect chewing efficiency and increase the chance of swallowing larger pieces.
Coaching strategies that work for this age
- Explain the “why”: Discuss how airway size and distraction interact, and how certain foods (large chunks of meat, sticky candies) can obstruct.
- Set situational rules: No gum during sports, no eating in the car when unsupervised, no “challenges” involving food stuffing.
- Encourage self-modification: Teach them to cut foods, take smaller bites, and drink water with dry foods.
Non-food choking hazards by developmental stage
Choking prevention must include objects. Children often choke on non-food items, especially during play. The risk peaks in infants and toddlers but remains relevant whenever small items are accessible.

Infants (0–12 months)
- Common hazards: coins, buttons, beads, small toy parts, latex balloons, small batteries.
- Prevention: Floor checks before tummy time; keep older siblings’ toys in a separate bin; use age-appropriate toys with secure parts.
Toddlers and preschoolers (1–4 years)
- Common hazards: small building pieces, marbles, pen caps, small hair accessories, balloons.
- Prevention: Teach “toys stay out of mouths,” store small items in locked or high containers, supervise craft activities.
School age and teens
- Common hazards: gum, hard candies, small objects during experiments or dares.
- Prevention: Clear rules about not holding objects in the mouth; avoid gum during active play.
How to identify and reduce high-risk food characteristics
Rather than memorizing a long list, it helps to recognize patterns. Foods are higher risk when they can form a tight seal in the airway or when they are difficult to break down.
High-risk characteristics
- Round and firm: grapes, cherry tomatoes, blueberries, hot dog coins.
- Hard and small: nuts, seeds, popcorn kernels, hard candy.
- Sticky or thick: nut butter globs, marshmallows, chewy candies.
- Dry and crumbly: crackers, chips, dry bread that can scatter into the airway when inhaled during laughter.
- Compressible: hot dogs and some meats can compress into a plug shape.
Modification toolkit
- Change shape: Cut lengthwise, quarter, shred, grate, slice thin.
- Change texture: cook until soft, steam, mash, moisten with sauce or yogurt.
- Control portion: serve small amounts at a time, especially for self-feeders.
Special situations: children with higher choking risk
Some children need extra precautions regardless of age: those with developmental delays, neuromuscular conditions, cleft palate history, swallowing disorders, significant reflux, or sensory-based feeding difficulties. Children who fatigue easily may chew less effectively near the end of a meal.
Practical adjustments
- Longer meals with breaks: Short rest pauses can improve coordination.
- Consistent textures: Avoid mixed textures if they trigger coughing or pocketing food in the cheeks.
- Professional guidance: If a child frequently coughs, chokes, or has wet/gurgly voice after eating, request a feeding/swallowing evaluation from a qualified clinician.
Mealtime setup checklist (home and school)
- Seating: stable chair, upright posture, feet supported when possible.
- Food prep: high-risk foods modified (lengthwise cuts, softening, shredding).
- Supervision: adult present and attentive; siblings not tasked as primary supervisors for infants/toddlers.
- Environment: no small objects on the floor or table; no balloons or small toy parts near eating areas.
- Behavior rules: sit to eat, no running with food, chew and swallow before talking.
Practical food-prep examples by stage
Example 1: preparing grapes safely
Toddler/preschool: Wash grapes, then cut each grape lengthwise into quarters. Serve a few pieces at a time. Avoid offering whole grapes or round slices.
Example 2: preparing hot dogs safely
Toddler/preschool: Cook thoroughly. Slice the hot dog lengthwise into quarters, then cut those strips into small pieces. Avoid coin-shaped slices.
Example 3: preparing carrots safely
Infant/toddler: Steam carrots until very soft. For finger foods, offer large soft sticks that mash easily; for toddlers, cut soft pieces small. Avoid raw carrot coins.
Example 4: managing nut butter
Infant/toddler: Use thin smears on toast strips or mix a small amount into yogurt or oatmeal. Avoid spoonfuls or thick layers that can stick to the palate.
What to do in the moment when a child gags during feeding (prevention-focused response)
Gagging can look alarming, but it is often part of learning textures. A calm response helps the child recover and reduces panic-related inhalation.
Pause feeding: Do not add more food.
Keep the child upright: Maintain seated posture.
Stay calm and allow time: Many children will push the food forward and swallow or spit it out.
Offer a small sip if appropriate: For older infants/toddlers who can manage sips, a small sip of water can help clear the mouth.
Adjust next bites: Reduce piece size, soften texture, or return to a simpler texture before trying again.
If gagging is frequent, severe, or accompanied by repeated coughing with feeds, reassess textures and consider professional feeding guidance.