Why an “Activity List” Must Look Like the Jobsite
An activity list is the set of schedule tasks you will sequence, resource, and track. In construction, the activity list succeeds only when it mirrors how work actually happens in the field: crews mobilize, areas are released, inspections gate progress, materials arrive, and multiple trades share space. If the activity list is written like a paperwork outline instead of a jobsite plan, the schedule may look neat but it will not be controllable. A jobsite-reflective activity list lets you answer practical questions: What crew is doing what, where, with what prerequisites, and how will we know it is done?
In this chapter, the focus is not on defining scope or building a deliverable hierarchy. The focus is translating the real production plan into schedulable, measurable activities that superintendents, foremen, and project engineers can use to run the work day to day.
What “Reflecting Real Jobsite Work” Means
Activities represent production, not paperwork
Many schedules become a list of documents: “Submit shop drawings,” “Approve submittals,” “Order materials,” “Install,” “Test,” “Closeout.” Those items matter, but the schedule’s backbone should be production activities that consume time on site and are constrained by access, crews, and inspections. Paperwork and procurement should be included where they truly drive the critical path or create release gates, but they should not replace the field plan.
Activities are written at the right level of control
Jobsite-reflective activities are neither too big nor too tiny. If an activity is too large, you cannot see where you are slipping until it is too late (for example, “Rough-in MEP for entire floor”). If it is too small, the schedule becomes unmanageable (for example, “Install 12 hangers in Room 204”). The right level is the smallest chunk you can reliably plan, assign, and measure with a clear start/finish and a clear handoff to another trade.
Activities match how crews move through space
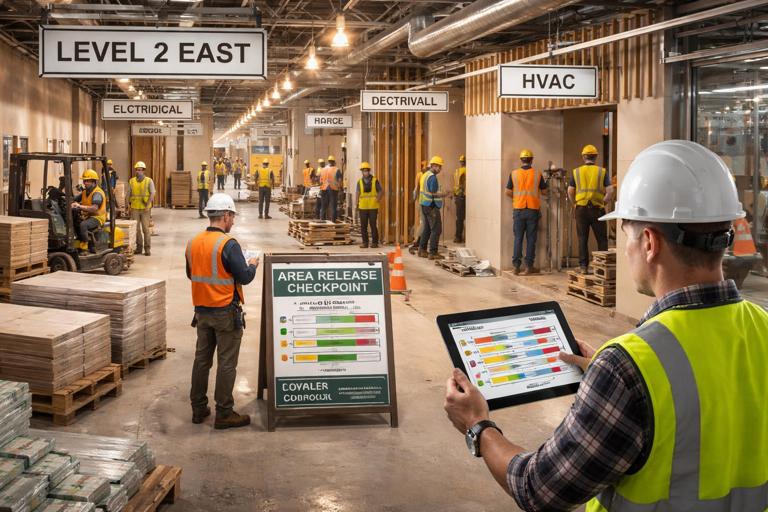
Construction is spatial. Crews work by zones, floors, lines, rooms, elevations, or grid bays. A schedule that ignores spatial flow will create impossible overlaps (five trades “starting” on the same day in the same corridor) or will hide the real constraint (Area A is not released, so Area B cannot start). A jobsite-reflective activity list uses the same breakdown the superintendent uses: “Level 2 East Wing,” “Pod A,” “Gridline 1–5,” “Roof Area North,” “Unit stack 01–04,” etc.
- Listen to the audio with the screen off.
- Earn a certificate upon completion.
- Over 5000 courses for you to explore!

Download the app
Activities include the real gates: inspections, cure times, and releases
Field progress is often gated by events that are not “work” but still consume calendar time: concrete cure, waterproofing flood test, firestopping inspection, above-ceiling inspection, energization, turnover of areas, owner access restrictions, and safety permits. If these gates are missing, the schedule will show unrealistic concurrency and will fail during execution.
Characteristics of a High-Quality Jobsite Activity
1) Clear action + object + location
Write activities so anyone can visualize the work without additional explanation. A strong naming pattern is: Verb + Work Item + Location/Zone. Examples: “Install in-wall plumbing rough-in – Level 3 East,” “Frame corridor walls – Level 2 North,” “Set RTUs – Roof Area A,” “Pull branch wiring – Level 1 West.”
2) Single responsible party (or clearly defined lead)
Each activity should have one accountable trade or team. If multiple trades must work together, split into separate activities with a clear handoff (for example, “Install duct mains,” then “Install duct drops,” then “Insulate duct,” then “Ceiling close”). If you truly need a combined activity (rare), define a lead and define what “done” means for all parties.
3) Measurable completion criteria
“Done” must be observable. Completion criteria can be quantity-based (100% of rooms in zone), inspection-based (passed above-ceiling inspection), or handoff-based (area released to drywall). Avoid ambiguous criteria like “in progress,” “as required,” or “as needed.”
4) Duration that can be estimated from production
Durations should be tied to crew production rates and quantities. Even if you do not show the math in the schedule, the activity should be sized so a foreman can say, “That’s a 5-day task with one crew,” not “Could be 2 days or 3 weeks.”
5) Logical boundaries that support tracking
Activities should align with how you will collect progress: daily reports, quantity installed, inspection sign-offs, or area turnover. If you cannot track it without guesswork, it is not sized correctly.
Common Mistakes That Break Field Alignment
Using administrative placeholders instead of field work
Examples: “MEP rough-in,” “Interior finishes,” “Sitework,” “Commissioning.” These are categories, not activities. They hide sequencing and prevent meaningful updates.
Ignoring access and temporary conditions
Real work depends on scaffolding, hoists, laydown areas, temporary power, temporary heat, and weather protection. If those are critical constraints, they need explicit activities such as “Install construction hoist,” “Provide temporary heat – Level 2–4,” or “Dry-in building – Area B.”
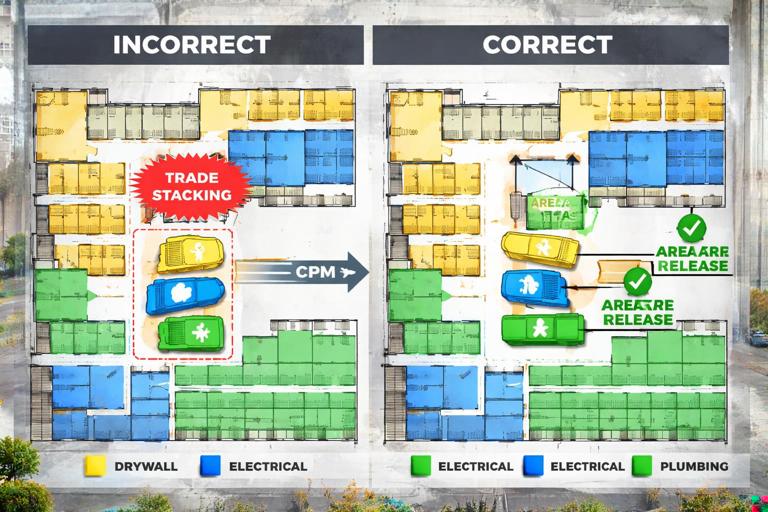
Overlapping trades in the same space without a plan
A schedule may show drywall, painting, flooring, and casework all “starting” the same week in the same zone. On the jobsite, that creates stacking, rework, and safety issues. The activity list should reflect the intended trade flow and the planned zone release sequence.
Missing inspection and test activities
If you do not schedule “Above-ceiling inspection – Level 2 East,” you will eventually discover it when the ceiling is ready to close and the inspector is not available. The activity list should include the inspection events that control handoffs.
Step-by-Step: Building an Activity List That Mirrors the Field
Step 1: Start from the field execution plan (not from templates)
Gather the superintendent’s intended sequence, the major zone releases, and the trade flow. Use inputs such as: logistics plan, phasing plan, crane/hoist plan, access restrictions, and the planned turnover strategy (partial turnovers, floor-by-floor, area-by-area). The goal is to capture “how we will build it,” not “how we would like it to look.”
Step 2: Define the controlling locations (zones) used by the field
Pick a location breakdown that matches how foremen talk: floors, wings, pods, grid bays, units, or exterior elevations. Keep it consistent across trades so handoffs are visible. Example zone set for a mid-rise interior: “Level 1 West,” “Level 1 East,” “Level 2 West,” “Level 2 East,” etc. Example for a hospital: “OR Suite,” “ICU Pod A,” “ICU Pod B,” “Imaging,” “Central Plant.”
Step 3: For each zone, list the trade sequence as it will be executed
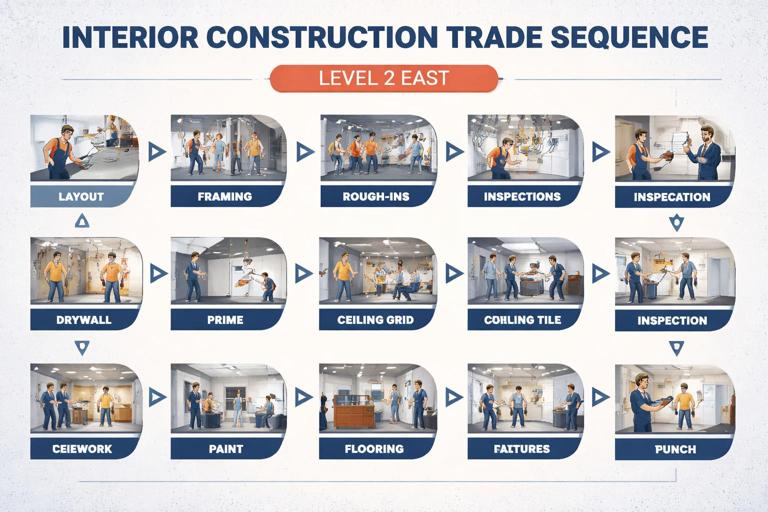
Write the major production steps in the order crews will perform them. Do not jump straight to finish trades; include prerequisites such as embeds, sleeves, in-wall rough-ins, inspections, and close-in. A simple interior sequence might look like: layout → framing → in-wall rough-in (plumbing, electrical, low voltage) → in-wall inspection → insulation → drywall hang → tape/finish → prime → ceiling grid → above-ceiling rough-in completion → above-ceiling inspection → ceiling tile → paint finish → flooring → casework → trim → final fixtures → testing → punch.
Step 4: Right-size activities using “handoff points”
Identify where one trade hands space to another. Those handoffs are natural activity boundaries. For example, drywall cannot start until framing and in-wall rough-ins are complete and inspected. Ceiling close cannot happen until above-ceiling work is complete and inspected. Use these handoffs to split activities so each has a clear predecessor/successor relationship.
Step 5: Add non-work time that controls progress
Include cure times, drying times, lead times that truly gate installation, and inspection windows. Examples: “Concrete cure – Slab on Grade Area A,” “Waterproofing flood test – Level 2 Restrooms,” “Fire alarm acceptance test,” “Utility energization,” “Elevator inspection.” If an event can be managed without affecting the field sequence, you may track it separately; if it can stop the next trade, it belongs in the activity list.
Step 6: Validate each activity with the “foreman test”
For each activity, ask: Can a foreman commit to a start date? Can they commit to a finish date? Can they explain what “100% complete” means? If the answer is no, rewrite or split the activity.
Step 7: Check for constructability in time and space
Review the activity list for unrealistic stacking. If three trades are scheduled to work in the same small zone simultaneously, decide whether you truly intend that (and how it will be managed) or whether the activities should be resequenced or rezoned. This is where the activity list becomes a coordination tool, not just a CPM input.
Step 8: Add “area release” and “turnover” activities where needed
Area release is a real jobsite event: “Release Level 2 East to drywall,” “Release corridor to ceiling close,” “Turn over Level 1 West for owner occupancy.” These activities clarify responsibilities and prevent the schedule from implying that downstream work can start without a formal handoff.
Practical Examples of Jobsite-Reflective Activity Lists
Example 1: Interior buildout (office floor) by zones
Instead of one activity called “MEP rough-in – Level 3,” use zone-based, trade-based activities that match the flow:
- Layout walls – Level 3 East
- Frame walls – Level 3 East
- In-wall plumbing rough-in – Level 3 East
- In-wall electrical rough-in – Level 3 East
- In-wall low voltage rough-in – Level 3 East
- In-wall inspections – Level 3 East
- Insulate walls – Level 3 East
- Hang drywall – Level 3 East
- Tape/finish drywall – Level 3 East
- Prime/paint first coat – Level 3 East
- Ceiling grid install – Level 3 East
- Above-ceiling MEP completion – Level 3 East
- Above-ceiling inspection – Level 3 East
- Ceiling tile install – Level 3 East
- Flooring install – Level 3 East
- Casework install – Level 3 East
- Final electrical devices – Level 3 East
- Final plumbing trim – Level 3 East
- Test and balance support (diffusers set) – Level 3 East
- Punchlist and corrections – Level 3 East
This list reflects how the superintendent will release Level 3 East through a predictable flow. If the project is large, repeat for Level 3 West, then Level 4, etc., or use rolling wave planning for future zones.
Example 2: Concrete structure with real constraints
A structure schedule often fails when it ignores formwork cycles, rebar inspections, and cure/strip times. A jobsite-reflective activity list might include:
- Set deck forms – Level 5
- Install rebar/PT – Level 5
- MEP embeds and sleeves – Level 5
- Pre-pour inspection – Level 5
- Place concrete – Level 5
- Initial cure/protection – Level 5
- Strip forms/reshore – Level 5
- Layout for next level – Level 6
Notice how inspections and cure/protection are explicit. If your project has a defined cycle (for example, 7-day deck cycle), these activities can be sized to match that cycle and updated reliably.
Example 3: Exterior envelope with access and testing gates
Envelope work is spatial and access-driven. A realistic activity list might be elevation-based and include testing:
- Install swing stage anchors – South Elevation
- Install air/vapor barrier – South Elevation (Levels 2–4)
- Install windows – South Elevation (Levels 2–4)
- Sealant and perimeter flashing – South Elevation (Levels 2–4)
- Install cladding panels – South Elevation (Levels 2–4)
- Water test (ASTM field test) – South Elevation sample area
- Punch and repairs – South Elevation (Levels 2–4)
Without access activities and testing gates, the schedule may assume continuous installation, but the jobsite reality is that access setup and verification often control the pace.
How to Decide the Right Activity Size (Practical Rules)
Rule A: Aim for activities that are 3–15 working days (most of the time)
Many teams can track 1–2 week activities effectively in weekly updates. Shorter activities are appropriate for critical handoffs (inspections, pours, energization) or when the work is highly repetitive and fast. Longer activities can be acceptable for long-lead offsite processes, but for field production they often hide problems.
Rule B: One crew, one location, one primary scope
If an activity requires two different crews or spans multiple zones, it is usually too large. Split by zone or by crew type. Example: “Install ductwork – Level 2” might need to be split into “Install duct mains – Level 2 West” and “Install duct branches – Level 2 West” if different crews perform them and they hand off to different successors.
Rule C: Split at inspection points and close-in points
Close-in points (drywall close, ceiling close, backfill, paving) are irreversible or expensive to reopen. Inspections and tests that must occur before close-in should be separate activities so they can be scheduled, coordinated, and tracked.
Rule D: Use quantities to justify splits
If a zone contains 60 rooms and the trade will complete 15 rooms per week, consider splitting into four room-batches (or two wings) so progress is visible and downstream trades can start earlier. The activity list should enable planned partial releases, not force all-or-nothing behavior.
Making Activities Update-Friendly (So Progress Matches Reality)
Use completion rules that match field reporting
Field teams often report progress by rooms complete, linear feet installed, fixtures set, or inspections passed. Align activity boundaries with those reporting units. For example, “Install doors – Level 2 East” can be tracked by door count; “Pull wire – Level 2 East” can be tracked by circuits or rooms; “Paint finish – Level 2 East” can be tracked by room completion.
Avoid “percent complete” traps
Percent complete is useful only when it is tied to a measurable quantity. If the activity is vague, percent complete becomes opinion and creates false confidence. A better approach is to define the activity so that it is either complete by area (rooms 1–10) or complete by milestone (inspection passed).
Include coordination activities that the superintendent actually manages
Some coordination work is real and time-consuming: “Above-ceiling coordination walk – Level 2 East,” “Mockup approval,” “Room readiness verification,” “Owner/IT walkdown.” If these events routinely affect starts and finishes, include them as activities so they are visible and planned.
Field-Driven Activity Naming and Coding (Practical Patterns)
Naming pattern examples
- FRM Frame walls – L2 East
- PLB In-wall plumbing rough-in – L2 East
- ELE In-wall electrical rough-in – L2 East
- INS In-wall inspection – L2 East
- DRY Hang drywall – L2 East
- ACT Above-ceiling inspection – L2 East
- FLR Install flooring – L2 East
Consistent prefixes help sorting and filtering during coordination meetings. Keep names short but specific. Always include the location identifier.
Location tags that match drawings and signage
Use the same zone names found on plans, room signage, or BIM views. If the field calls it “Pod A,” do not label it “Zone 3.” Misaligned naming creates confusion and slows updates.
Checklist: Does Your Activity List Reflect Real Jobsite Work?
- Each activity describes a physical action in a specific location.
- Each activity has one accountable trade/crew.
- Activities are sized so progress can be observed weekly (or faster on critical handoffs).
- Inspection/test gates that control handoffs are explicitly listed.
- Area releases and turnovers are represented where they control downstream starts.
- Temporary works and access constraints are included when they drive sequence.
- Trade stacking is intentional and manageable, not accidental.
- Completion criteria are measurable (quantity, area, or pass/fail event).
Mini-Workshop: Convert a Vague Schedule Line into Jobsite Activities
Starting point (too vague)
“MEP Rough-In – Level 2”
Convert it using location + trade + handoffs
Assume Level 2 is split into East and West, and the close-in gate is drywall. A jobsite-reflective set could be:
- Install in-wall plumbing rough-in – L2 East
- Install in-wall electrical rough-in – L2 East
- Install in-wall low voltage rough-in – L2 East
- In-wall inspections – L2 East
- Release L2 East to drywall
- Install in-wall plumbing rough-in – L2 West
- Install in-wall electrical rough-in – L2 West
- Install in-wall low voltage rough-in – L2 West
- In-wall inspections – L2 West
- Release L2 West to drywall
Why this works better in the field
It matches how foremen plan crews, it creates clear prerequisites for drywall, it enables partial release (East can start drywall while West finishes rough-in), and it creates natural points for coordination and inspection scheduling.