What “Risk and Dependency Stabilization” Means in a Rescue Context
When a project is already in trouble, risk management stops being a periodic register update and becomes an operational control system. Risk and dependency stabilization is the focused effort to (1) prevent known threats from turning into schedule and cost shocks, (2) reduce uncertainty around external inputs, and (3) protect the critical path from avoidable disruption. In practice, this chapter is about two levers you can pull quickly: vendor management (because external parties often control key deliverables and lead times) and critical path protection (because not every task matters equally when time is scarce).
Stabilization differs from general project risk management in three ways. First, it is time-boxed and biased toward immediate containment: you prioritize risks and dependencies that can impact the next 2–6 weeks of delivery. Second, it is evidence-driven: you validate vendor status and dependency readiness with artifacts (builds, test results, shipment confirmations, signed change orders), not verbal assurances. Third, it is integrated with scheduling: every major risk and dependency is mapped to a specific milestone, handoff, or critical path activity, with explicit triggers and fallback actions.
Build a Dependency Map That Matches How Work Actually Flows
Troubled projects often have a “plan view” of dependencies (what the schedule says) and a “reality view” (what teams are waiting on). Stabilization starts by creating a dependency map that reflects real handoffs and constraints. This is not a re-baselining exercise; it is a control tool to prevent surprises.
Step-by-step: Create a dependency map in 60–90 minutes
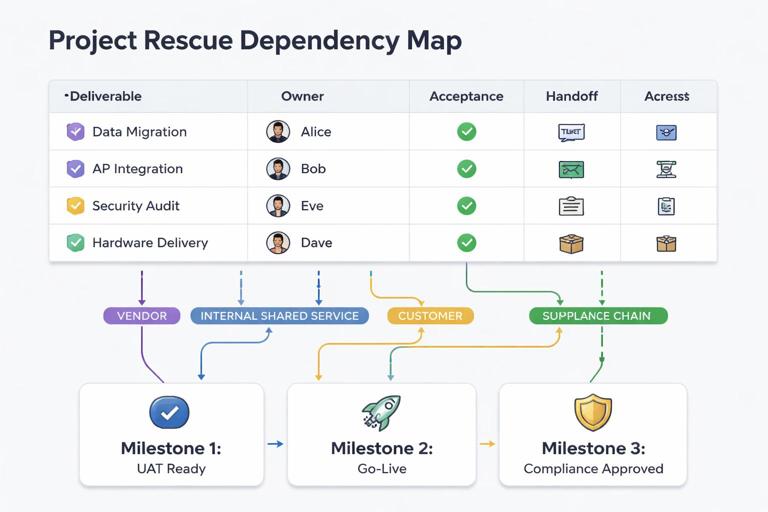
- List the top deliverables for the next 4–8 weeks (features, releases, integrations, compliance artifacts, environments).
- For each deliverable, identify inbound dependencies: vendor components, APIs, data feeds, security approvals, hardware, legal review, procurement, shared platform teams.
- Classify each dependency as: external vendor, internal shared service, customer-provided, regulatory/third-party, or physical supply chain.
- Define the dependency “acceptance criteria”: what “ready” means in testable terms (e.g., “API v2 endpoint available in staging with OAuth scopes X/Y, 99th percentile latency < 300ms, contract tests passing”).
- Capture the handoff mechanism: ticket, contract deliverable, artifact repository, shipment, environment access, signed document.
- Assign a single dependency owner on your side (not the vendor) who is accountable for chasing status, validating readiness, and escalating.
Keep the map lightweight: a table or a simple diagram is enough. The key is that each dependency has a clear “definition of done” and an owner who will not accept vague progress statements.
Identify “Critical Dependencies” vs. “Important Dependencies”
Not all dependencies deserve the same intensity. Stabilization requires a triage lens: which dependencies can stop the critical path, and which can be worked around temporarily?
- Listen to the audio with the screen off.
- Earn a certificate upon completion.
- Over 5000 courses for you to explore!

Download the app
Practical classification
- Critical dependency: if late or defective, it blocks a critical path activity or a release gate, and there is no viable workaround within the rescue window.
- Important dependency: impacts quality, scope, or efficiency, but can be deferred, substituted, or isolated without stopping the next milestone.
- Nice-to-have dependency: beneficial but not required for the next committed outcomes.
For each critical dependency, you should have (1) a verified current status, (2) a next checkpoint date, (3) a trigger threshold for escalation, and (4) a fallback plan that is technically and contractually feasible.
Vendor Management as a Stabilization System (Not a Relationship Exercise)
In a rescue situation, vendor management must shift from “status updates” to “delivery control.” This does not mean being adversarial; it means being precise. Vendors respond best when expectations are measurable, decisions are fast, and escalation paths are clear.
Core principles
- Single-threaded communication: one accountable vendor manager on your side, one accountable delivery lead on theirs. Avoid parallel asks from multiple stakeholders.
- Artifact-based progress: progress is demonstrated through deliverables (builds, test reports, shipment confirmations, signed documents), not percent complete.
- Short feedback loops: weekly status is too slow for a rescue. Use 2–3 touchpoints per week for critical vendors.
- Contract awareness: stabilization requires knowing what you can enforce (SLAs, acceptance criteria, change control, penalties, termination rights) and what you cannot.
Step-by-Step: Stand Up a Vendor Stabilization Cadence
1) Establish a “Vendor Control Sheet”
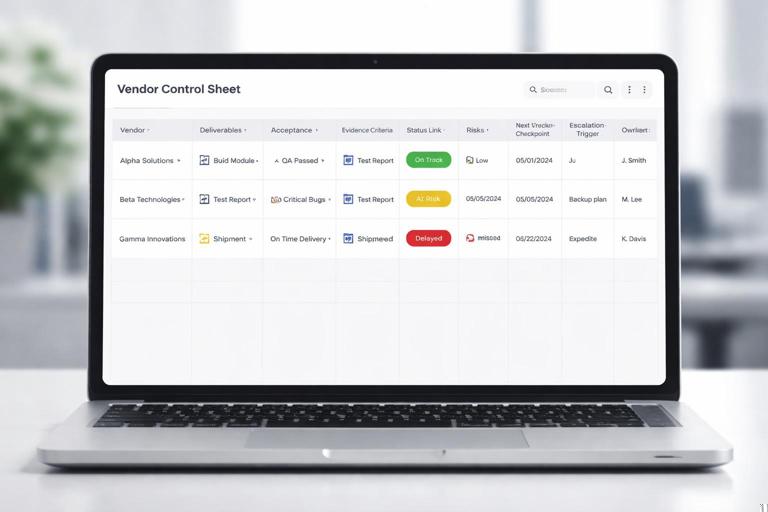
Create a single view that covers every vendor touching the critical path. Keep it simple and operational. Suggested columns:
- Vendor / product / workstream
- Critical deliverables due in next 4–8 weeks
- Acceptance criteria (testable)
- Current status (with evidence link)
- Risks/issues and impact
- Next checkpoint date
- Escalation trigger (e.g., “no build by Wednesday 12:00”)
- Fallback option (and decision deadline)
- Commercial notes (SOW, change order, SLA, invoice holdback)
- Owner (your side) and vendor owner
2) Convert vague deliverables into acceptance tests
Many vendor disputes come from ambiguous definitions. Convert “integration complete” into acceptance tests. Example:
- Ambiguous: “Vendor will deliver SSO integration.”
- Testable: “SSO works in staging and production with SAML 2.0, supports IdP-initiated and SP-initiated flows, passes security scan with no critical findings, and includes runbook + rollback steps.”
This reduces rework and gives you leverage: acceptance becomes objective.
3) Implement checkpoint-based commitments
Instead of waiting for a final delivery date, define intermediate checkpoints that prove the vendor is on track. For a software vendor, checkpoints might be: API contract published, sandbox access granted, first integration build delivered, defect burn-down trend acceptable, performance test results shared. For a hardware vendor: purchase order confirmed, manufacturing start, quality inspection, shipment, customs clearance, delivery, installation readiness.
4) Create an escalation ladder before you need it
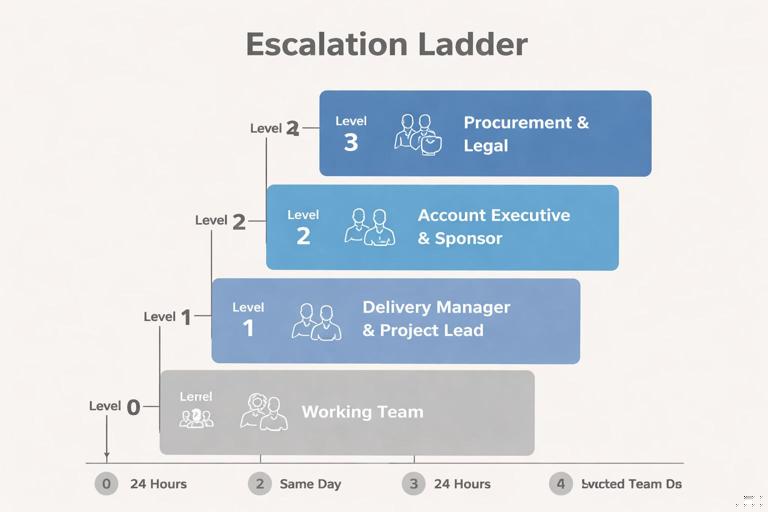
Escalation works only when it is pre-agreed and time-bound. Define levels such as:
- Level 0: working team resolves within 24 hours.
- Level 1: vendor delivery manager + your project lead, same day.
- Level 2: vendor account executive + your sponsor/procurement, within 48 hours.
- Level 3: contractual remedies (change order, invoice hold, SLA credits, partial termination), initiated by procurement/legal.
Attach triggers to each level (missed checkpoint, repeated defects, unresponsive communication, scope dispute). The goal is not punishment; it is restoring predictability.
5) Align commercial levers with delivery outcomes
In stabilization, commercial terms can reinforce delivery behavior. Examples include:
- Milestone-based payments tied to acceptance tests rather than calendar dates.
- Holdbacks until critical defects are resolved or documentation/runbooks are delivered.
- Change control discipline: no “free” scope creep; every change has an impact statement and a decision deadline.
Coordinate closely with procurement and legal to avoid making threats you cannot execute.
Protecting the Critical Path: Make It Visible and Defend It Daily
Critical path protection is the practice of identifying the sequence of work that determines the earliest possible finish date, then actively reducing the probability and impact of disruptions to that sequence. In troubled projects, the critical path often shifts because of rework, hidden dependencies, and late discovery of integration issues. Your job is to keep the critical path stable long enough to deliver the next committed milestone.
Critical path protection is not just “track the schedule”
Tracking tells you you’re late; protection prevents you from getting later. Protection includes:
- Dependency readiness checks before starting critical tasks.
- Buffer management (explicitly managing contingency time and capacity).
- Quality gates to avoid rework loops that consume critical path time.
- Fast decision-making when a critical path task is threatened.
Step-by-Step: Critical Path Protection Playbook
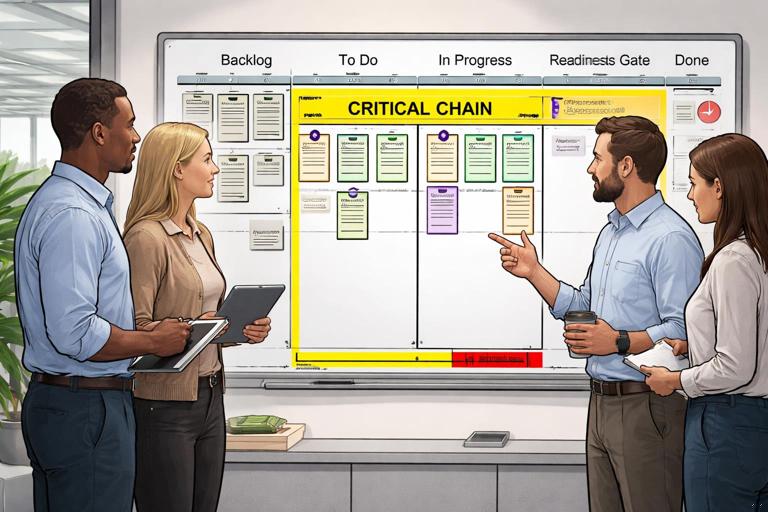
1) Identify the “critical chain” for the next milestone
Rather than analyzing the entire project end-to-end, focus on the next major milestone or release. Identify the tasks that must happen in sequence to reach that milestone. Include non-obvious gates such as security approvals, environment provisioning, and vendor acceptance.
Practical tip: if you cannot explain the critical chain in one paragraph, it is not operational yet. Example:
“To hit Release Candidate on May 15, we must: finalize API contract (by Apr 5) → vendor delivers SDK build (by Apr 12) → integration in staging (Apr 13–19) → performance test (Apr 20–24) → security review (Apr 25–May 3) → bug fix window (May 4–10) → release packaging and deployment rehearsal (May 11–14).”
2) Add “readiness gates” before each critical task
A common failure mode is starting critical work without prerequisites, then discovering blockers midstream. For each critical task, define a readiness gate: a short checklist that must be true before work begins. Example readiness gate for “integration in staging”:
- Staging environment available and stable (uptime target met for 48 hours)
- Vendor SDK build delivered and checksum verified
- API contract tests passing in vendor sandbox
- Access credentials issued and validated
- Logging/monitoring enabled for integration endpoints
If the gate is not met, you do not “start anyway.” You escalate or switch to a fallback task that does not consume critical path capacity.
3) Define explicit buffers and protect them
Buffers are not laziness; they are shock absorbers. In a rescue, you need buffers because uncertainty is high. The mistake is hiding buffers inside tasks where they get silently consumed. Instead:
- Create a visible integration buffer after vendor handoffs (because integration is where surprises surface).
- Create a visible defect-fix buffer before release gates.
- Protect buffers by requiring approval to spend them, just like budget.
Example rule: “Any use of the integration buffer requires a documented cause (dependency late, defect rate, environment instability) and a mitigation action.”
4) Install a “critical path daily check”
For the duration of stabilization, run a short daily check focused only on critical chain items and their dependencies. Keep it 10–15 minutes. Agenda:
- What changed since yesterday that affects critical chain tasks?
- Which readiness gates are at risk for the next 3–5 days?
- Which vendor checkpoints are due next?
- What decisions are needed today to avoid delay?
This is not a general standup. Attendance should be limited to owners of critical chain tasks, dependency owners, and the person empowered to escalate.
Risk Treatment Tactics That Work Fast (and When to Use Them)
In stabilization, you will repeatedly choose among a small set of risk responses. The difference is speed and specificity.
Avoid (remove the risk source)
Use when a dependency is too uncertain and alternatives exist. Example: a vendor’s feature is unstable and blocks release; you remove it from the release scope and ship without it, or you switch to a simpler integration method.
Mitigate (reduce probability or impact)
Use when you must keep the dependency but can reduce exposure. Examples:
- Run early integration spikes with vendor builds to surface incompatibilities.
- Add contract tests to detect breaking changes immediately.
- Increase monitoring and rollback readiness for vendor-provided services.
Transfer (shift impact contractually or operationally)
Use when the vendor can reasonably bear responsibility. Examples:
- Enforce SLA credits for downtime impacting your critical path testing window.
- Require vendor to provide on-call support during cutover.
Accept (with triggers and contingency)
Use when mitigation is too costly or slow. Acceptance must include a trigger and a contingency plan. Example: “If customs delay exceeds 5 days, we switch to cloud-based test rigs and defer on-prem performance validation.”
Practical Example: Stabilizing a Vendor API Dependency
Scenario: Your project depends on a payment provider’s API upgrade. The vendor promises delivery “next week,” but your integration team reports frequent breaking changes and incomplete documentation. The upgrade sits on the critical chain for your next release.
Stabilization actions
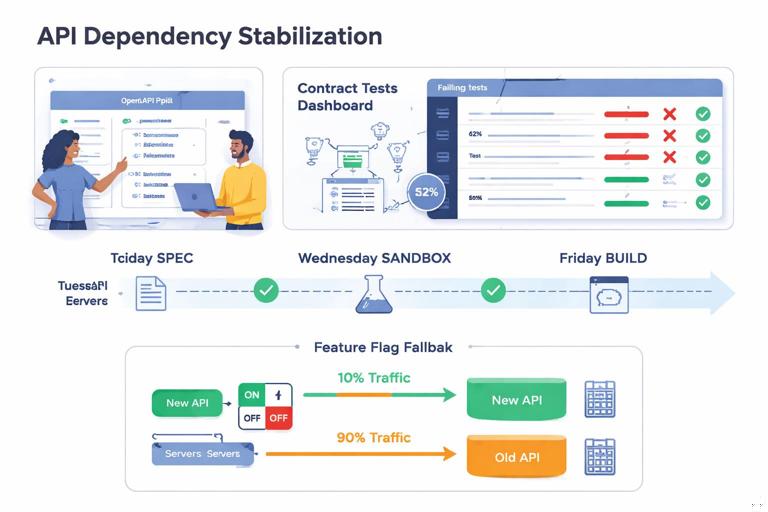
- Define acceptance criteria: published OpenAPI spec, stable versioning policy, sandbox credentials, contract tests passing, and a change log.
- Set checkpoints: spec by Tuesday, sandbox by Wednesday, first stable build by Friday, defect turnaround within 48 hours.
- Install readiness gate before integration: contract tests green for 24 hours; vendor confirms no breaking changes planned for 7 days.
- Create a fallback: implement a feature flag to route a subset of transactions through the old API; limit release scope to non-payment features if needed.
- Escalate with evidence: share failing contract tests and timestamps of breaking changes; request vendor engineering escalation and a freeze window.
The key is that you are no longer “waiting for the vendor.” You are controlling the interface with measurable gates and a fallback that protects the milestone.
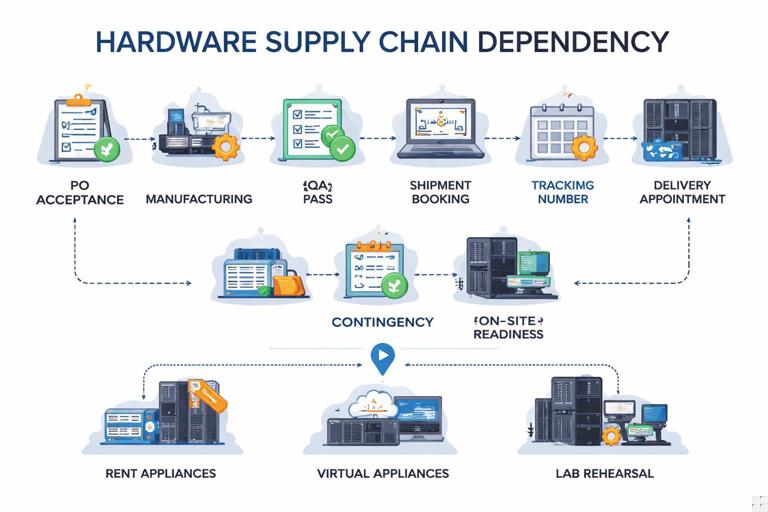
Practical Example: Stabilizing a Hardware/Supply Dependency on the Critical Path
Scenario: A data center migration requires new network appliances. Lead times are uncertain, and the vendor’s shipment date has slipped twice. Your cutover rehearsal depends on the hardware arriving and being configured.
Stabilization actions
- Break the dependency into verifiable stages: PO acceptance, manufacturing start, QA pass, shipment booking, tracking number, customs clearance, delivery appointment.
- Demand evidence: shipment booking confirmation and tracking, QA certificate, serial numbers.
- Protect the critical path: schedule configuration work only after a readiness gate (hardware on-site + power/network prerequisites ready).
- Create contingency: rent equivalent appliances, use virtual appliances temporarily, or run rehearsal in a lab environment while waiting for production hardware.
- Commercial lever: tie payment to delivery and acceptance; negotiate expedited shipping at vendor cost if delays are vendor-caused.
This approach prevents the team from burning critical path time on “pre-work” that cannot be completed without the physical dependency.
Common Failure Patterns and How to Counter Them
Failure pattern: “Green status” with no proof
Counter: require artifact-based reporting. Replace “on track” with links to builds, test results, shipment confirmations, or signed documents.
Failure pattern: Too many dependencies labeled critical
Counter: force a decision: “If this slips by 2 weeks, do we miss the milestone?” If not, it is not critical for stabilization purposes.
Failure pattern: Vendor scope disputes stall progress
Counter: separate delivery from dispute. Agree on a short-term path (e.g., deliver minimal viable capability) while procurement/legal resolves the commercial disagreement in parallel.
Failure pattern: Integration rework consumes the critical path
Counter: add readiness gates, contract tests, and a defect triage rule that prioritizes issues by critical chain impact rather than severity labels alone.
Tools You Can Implement Immediately
Dependency “Definition of Ready” template
Dependency: ____________________________  Owner: ______________________  Due: ____________  Critical? (Y/N): __
Acceptance criteria (testable):
- ______________________________________
- ______________________________________
Readiness gate before consuming dependency:
- Evidence link: _________________________
- Validation method: _____________________
Escalation trigger (date/time/condition): ______________________________
Fallback option and decision deadline: _________________________________
Vendor checkpoint email (short, enforceable)
Subject: Checkpoint confirmation for [Deliverable] – due [Date]

To stay aligned on the recovery timeline, please confirm by [time/date]:
1) Artifact to be delivered: [build/spec/shipment confirmation]
2) Acceptance criteria: [bullet list]
3) Evidence link/location: [URL/repo/tracking]
4) Risks to meeting this checkpoint: [list]

If we do not receive the artifact by [time/date], we will escalate to [Level 1/2] and execute fallback [X] by [decision deadline].
Critical path protection checklist (daily)
- Any critical chain task blocked today? If yes, by what dependency?
- Are the next 3 readiness gates on track? What evidence do we have?
- Which vendor checkpoint is next, and who validates it?
- Are buffers being consumed? If yes, what mitigation is in place?
- What decision must be made within 24 hours to avoid delay?