Why pacing and timing guides matter after the hook
Once you have earned the first second, retention becomes a timing problem: how quickly you deliver new information, how often you change the viewer’s expectation, and how reliably you reward attention. Pacing is the speed and density of story beats. Pattern interrupts are deliberate changes in rhythm, visuals, audio, or logic that reset attention. Retention timing guides are practical maps that tell you what kind of “attention reset” or “reward” should happen at specific seconds so the viewer keeps watching.
In vertical shorts, viewers are not “settling in.” They are continuously evaluating whether the next moment will be worth it. That means your pacing cannot be constant. A constant pace becomes predictable, and predictability invites swiping. Instead, you want controlled variation: moments of acceleration, micro-pauses for comprehension, and interrupts that feel motivated by the story rather than random.
Pacing: controlling speed, density, and comprehension
Three pacing levers
Think of pacing as three levers you can adjust independently:
Beat frequency: how often something changes (new shot, new line, new on-screen element, new action). Higher frequency feels faster.
Information density: how much new meaning you deliver per second (facts, steps, reveals, comparisons). Higher density feels more valuable but can overwhelm.
Continue in our app.- Listen to the audio with the screen off.
- Earn a certificate upon completion.
- Over 5000 courses for you to explore!

Download the app
Comprehension time: how much time you allow the viewer to process (visual clarity, pauses, repetition, recap). More comprehension time reduces confusion but can feel slow.
High retention pacing balances these levers. If you raise information density, you often need to increase comprehension support (cleaner visuals, simpler phrasing, brief recaps). If you increase beat frequency, you may need to lower density so the viewer can keep up.
Common pacing failures (and what to do instead)
Monotone pace: same shot length, same sentence length, same energy. Fix: alternate fast and slow segments (e.g., rapid setup, then a 0.3–0.6 second micro-pause on the key result).
Overstuffed middle: too many points without structure. Fix: convert the middle into a numbered progression (even if you don’t show numbers on screen) and give each step a distinct visual action.
Slow verification: you promise a result, then take too long to show proof. Fix: show proof earlier as a “flash-forward,” then explain how you got it.
Confusing speed: fast edits but unclear meaning. Fix: keep edits fast, but simplify each frame: one focal action per shot, one claim per sentence.
Pattern interrupts: attention resets that feel earned
A pattern interrupt is any intentional break in the viewer’s predicted rhythm. The goal is not chaos; the goal is to prevent autopilot. When a viewer can predict the next 2–3 seconds, they start deciding whether to leave. Interrupts create a tiny question: “Wait—what changed?” That question buys you time to deliver the next value beat.
Types of pattern interrupts you can use in vertical shorts
Visual interrupts: change angle, lighting, background, wardrobe layer, prop, or on-screen graphic style. Example: you’ve been talking to camera, then cut to an overhead shot of hands demonstrating the step.
Motion interrupts: sudden movement (step into frame, push-in, whip pan, quick object placement). Example: you slide a finished item into frame exactly on a beat.
Audio interrupts: drop the music for half a second, add a sound effect, switch to a different beat, or use a deliberate silence before a reveal.
Logic interrupts: contradict expectation (“Most people do X. That’s why it fails.”), introduce a constraint (“You can’t use Y”), or reveal a hidden rule.
Format interrupts: switch from talking head to screen recording, from real-time to time-lapse, from narration to on-screen text-only for one beat.
Effective interrupts are motivated: they happen at a moment where the story naturally turns (a new step, a reveal, a mistake, a comparison). Unmotivated interrupts feel like noise and can reduce trust.
Interrupt placement: where they work best
Interrupts are most useful at predictable drop-off zones: after the initial curiosity fades, after a step is completed, or right before a payoff. You can also use them to “seal” a key point: interrupt, then deliver the line you want remembered.
After a micro-resolution: you finish a small task; the viewer’s brain says “done.” Interrupt to open the next loop.
Before a reveal: a half-beat of silence or a hard cut can make the reveal feel bigger.
When switching modes: explanation → demonstration, problem → solution, before → after.
Retention timing guides: mapping attention resets and rewards
A retention timing guide is a plan for what must happen at specific time marks to keep attention. It is not a rigid formula; it is a checklist that prevents “dead air” and ensures the viewer receives frequent proof that staying is worth it.
Two principles make timing guides work:
Frequent micro-payoffs: small rewards every few seconds (a result, a tip, a visual proof, a surprise, a clarification).
Escalation: each segment should feel like it is moving toward something more specific, more useful, or more surprising than the last.
Timing guide for a 15-second short (high-density)
Use this when you have one clear outcome and can demonstrate quickly.
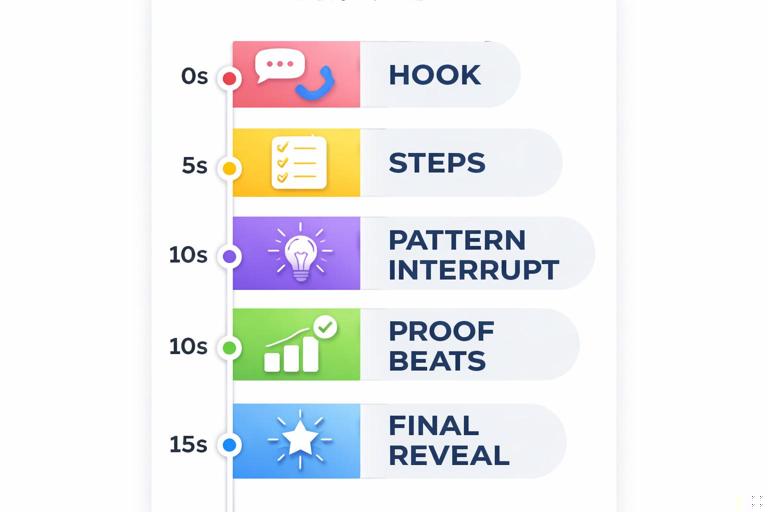
0–2s: (Hook already handled elsewhere) Immediately show a glimpse of the outcome or the “after” state as proof you can deliver.
2–5s: Step 1 in one sentence + one visible action. Keep it concrete.
5–7s: Pattern interrupt (angle change or audio drop) + Step 2. This is often the first retention dip zone.
7–10s: Proof beat: show the intermediate result or a quick comparison (wrong vs right).
10–13s: Step 3 or the “secret” constraint that makes it work. Add a logic interrupt (“If you skip this, it fails.”).
13–15s: Final reveal in a clean shot. Keep it visually readable; let the viewer register the payoff.
Timing guide for a 30-second short (balanced explanation + demo)
Use this when you need slightly more context or a multi-step process.
0–3s: Proof glimpse + define the target in plain language (what changes by the end).
3–7s: Step 1 (setup). Keep sentence length short. Avoid qualifiers.
7–10s: Interrupt + Step 2. Use a different visual mode (hands, screen, close-up).
10–14s: Micro-payoff: show a measurable improvement (faster, cleaner, cheaper, clearer).
14–18s: Step 3 (the “most people miss this” step). Logic interrupt works well here.
18–22s: Proof beat: demonstrate the difference if you do it wrong vs right in 2 quick cuts.
22–26s: Step 4 (final assembly / final setting). Increase pace slightly with faster cuts.
26–30s: Final reveal + one-sentence recap of the mechanism (why it worked). Keep recap simple, not a lecture.
Timing guide for a 45–60 second short (story + transformation)
Use this when the content needs a mini-journey: problem, attempts, correction, result. The risk here is a sagging middle, so you must schedule interrupts and proof beats.
0–4s: Proof glimpse + define the stakes (what’s annoying, expensive, or time-wasting).
4–10s: Attempt 1 (common approach) shown quickly. Then show it failing in one clear visual.
10–14s: Interrupt (hard cut + silence) + “Here’s the rule you’re missing.” This is a major retention reset.
14–22s: Correct method Step 1–2. Keep each step tied to a visible action.
22–28s: Micro-payoff: show improvement already happening (partial result). Viewers need reassurance mid-video.
28–36s: Correct method Step 3 + constraint (what not to do). Use a quick wrong/right comparison.
36–44s: Interrupt (format change: time-lapse, overlay diagram, or screen recording) + final step.
44–52s: Final reveal in the cleanest, most readable shot. Slow down slightly for comprehension.
52–60s: Recap in one breath + optional “if you only remember one thing” line. Avoid adding new steps here.
Step-by-step: building a pacing plan before you film
Step 1: Write beats, not paragraphs
Open a note and list beats as single lines. Each line must be filmable and must change something (new info, new action, new proof). Example for a cooking shortcut:
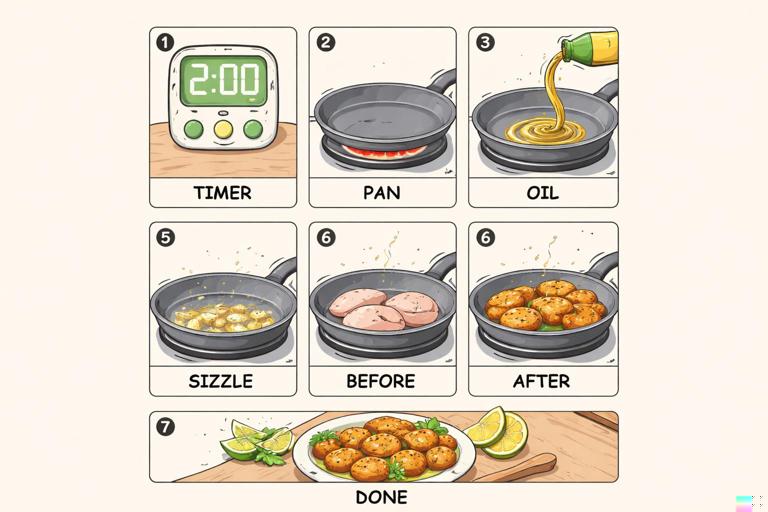
Beat 1: Show final crispy result (0.5s) Beat 2: “Stop using cold pan” + show cold pan (1s) Beat 3: Heat pan empty 20 seconds (show timer) (2s) Beat 4: Add oil, swirl (1s) Beat 5: Add food, sizzle sound (1s) Beat 6: Compare: left side pale vs right side crisp (2s) Beat 7: Final plate close-up (2s)If a beat cannot be shown, it will likely slow pacing because you’ll be forced into abstract explanation.
Step 2: Assign a time budget to each beat
Give each beat a target duration. For 30 seconds, you might have 8–12 beats. For 15 seconds, 5–8 beats. This forces you to compress language and avoid “bonus commentary.”
A practical rule: if a beat is purely explanatory (no proof), cap it at about 1 second unless it is the central rule. Proof beats can be longer because they are satisfying to watch.
Step 3: Schedule interrupts like punctuation
Mark where attention might dip: after setup, after a step completes, before the final reveal. Add interrupts there. Treat them like commas and periods:
Comma interrupt (small): angle change, quick zoom, hand enters frame, on-screen element appears.
Period interrupt (big): format switch, hard cut + silence, sudden time-lapse, dramatic comparison shot.
For a 30-second short, plan 2–4 comma interrupts and 1–2 period interrupts. For 60 seconds, plan 4–7 comma interrupts and 2–3 period interrupts.
Step 4: Add proof beats every 6–10 seconds
Proof beats are retention anchors: “Here is evidence this is working.” They can be:
Before/after split
Timer or measurable change
Close-up of texture/detail
Screen result (settings changed, output improved)
Reaction shot (only if it reads as genuine and immediate)
If you go longer than about 10 seconds without proof, you are relying on trust alone, which is fragile in swipe environments.
Step 5: Decide where to slow down on purpose
High retention is not maximum speed; it is controlled speed. Pick 1–2 moments to slow down for comprehension:
The key rule (the one sentence that makes the method work)
The final reveal (let the viewer register it)
A safety-critical step (if applicable)
Slowing down can be as small as holding a shot 0.4 seconds longer, removing background music for a beat, or using a cleaner frame with fewer competing elements.
Practical pattern interrupt recipes (copy-and-adapt)
Recipe 1: The “silence snap” before the key rule
When to use: right before the most important sentence in the video.
How:
Keep music or ambient sound running.
At the moment before the rule, cut audio to near-silence for 0.2–0.4 seconds.
Hard cut to a tighter shot or a different angle.
Deliver the rule in one clean line.
Example line: “The trick is: don’t change the setting—change the input.”
Recipe 2: The “wrong vs right” two-cut comparison
When to use: mid-video to prevent sag and to create proof.
How:
Show the wrong method for 0.7–1.2 seconds.
Cut immediately to the right method for 0.7–1.2 seconds.
Use a consistent framing so the difference is obvious.
Say one sentence that names the difference.
Example line: “Left is smeared because it’s too wet; right stays crisp because it’s dried first.”

Recipe 3: The “mode switch” (talking head → demo → talking head)
When to use: when explanation risks becoming abstract.
How:
Deliver one sentence of context to camera.
Cut to hands/screen for the step.
Return to camera for the implication or warning.
This creates a natural rhythm: claim → evidence → meaning.
Recipe 4: The “prop reveal” interrupt
When to use: when you need to re-energize without changing location.
How:
Keep the same framing.
Introduce a new object into frame quickly (slide, drop, place).
Let the object become the new focal point.
Use it to demonstrate the next step.
This works because the viewer’s visual system responds strongly to new objects entering the scene.
Editing for pacing: a checklist you can run in one pass
Cut-level pacing checks
Remove “pre-sentences”: cut everything before the first meaningful word of each line.
Trim exits: end shots as soon as the action is understood.
One idea per breath: if a sentence contains “and,” consider splitting it into two beats with a cut between.
Alternate shot sizes: even small changes (medium → close) can function as micro-interrupts.
Audio pacing checks
Use audio to mark segments: subtle beat change or sound cue at step transitions.
Strategic silence: remove music briefly before a reveal or rule.
Clarity over vibe: if music competes with consonants, lower it or choose a simpler track.
Information pacing checks
Proof appears early and repeats: show the outcome at least twice (glimpse early, full reveal later).
No long claims without evidence: if you say “this works,” show “this working” within a few seconds.
Replace adjectives with demonstrations: instead of “super fast,” show a timer.
Worked examples: pacing maps for three common short formats
Example A: Tutorial (30 seconds) — “Fix this common phone setting”
Goal: viewer completes a change and sees a result.
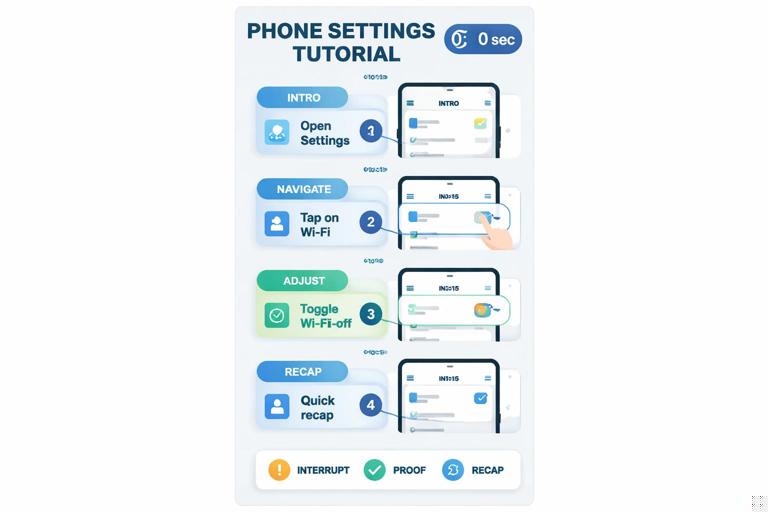
0–2s: Show before/after result (screen capture) 2–6s: Step 1: open settings (fast screen recording) 6–8s: Interrupt: hard cut + zoom to the exact toggle 8–12s: Step 2: change one option (name it once) 12–15s: Proof: show immediate difference (side-by-side) 15–19s: Step 3: one extra adjustment (optional but valuable) 19–22s: Interrupt: switch to talking head for one warning 22–27s: Proof: show final result in real use (camera shot) 27–30s: One-sentence recap of the rule (no new steps)Example B: Myth-bust (45 seconds) — “Stop doing X; do Y”
Goal: keep attention through a claim, a test, and a corrected method.
0–3s: Show surprising outcome (test result) 3–8s: Show the common method quickly 8–12s: Proof: it fails (clear visual) 12–14s: Interrupt: silence + “Here’s why” 14–22s: Explain the mechanism with one simple visual aid 22–28s: Show corrected method step 1–2 28–32s: Proof: improvement already visible 32–38s: Wrong/right comparison in two cuts 38–45s: Final proof + one-line takeawayExample C: Transformation (60 seconds) — “From messy to clean workflow”
Goal: sustain retention through multiple steps by scheduling resets.
0–4s: Show the clean final workflow (fast montage) 4–10s: Show the messy starting point (one clear pain) 10–14s: Interrupt: format switch to checklist overlay 14–22s: Step 1: remove one bottleneck (demo) 22–28s: Proof: time saved or fewer steps (measure) 28–36s: Step 2: standardize one action (demo) 36–40s: Interrupt: time-lapse of setup 40–48s: Step 3: automation/shortcut (demo) 48–54s: Proof: run-through at full speed 54–60s: Final reveal + one-sentence ruleAdvanced timing tactics: micro-loops and delayed clarity
Micro-loops: opening and closing tiny questions
Beyond the main narrative, you can create micro-loops that keep the viewer leaning forward. A micro-loop is a small question you open and close within 3–8 seconds. Examples:
“Watch what happens when I do it the normal way.” (close loop by showing failure)
“There’s one setting that changes everything.” (close loop by showing the toggle)
“This looks wrong at first.” (close loop by showing why it’s necessary)
Micro-loops help pacing because they create natural segment boundaries where you can place interrupts.
Delayed clarity: letting the viewer catch up without slowing down
Sometimes you want speed, but you also want comprehension. Delayed clarity is when you show the action first, then label it a moment later. This keeps momentum while still teaching.
Example: you quickly perform a step (0.8 seconds), then immediately cut to a tighter shot and name it: “That was the pre-heat—without it, it sticks.” The viewer feels the pace, then receives the explanation as reinforcement.
Quick templates you can paste into your script doc
Template: 30-second pacing skeleton
Proof glimpse (2s) Step 1 (4s) Interrupt + Step 2 (4s) Proof beat (4s) Key rule (4s) Wrong/right (4s) Final step (4s) Final reveal + recap (4s)Template: interrupt planner
Interrupt #1 at: first step transition (visual mode change) Interrupt #2 at: first proof beat (audio shift) Interrupt #3 at: key rule (silence snap) Interrupt #4 at: final reveal (hard cut + hold)