What “Lighting Zones” Mean in a Smart Home
A lighting zone is a group of one or more luminaires that are intended to behave as a single controllable unit for the occupant. In traditional wiring, a zone often maps to “whatever is on this switch leg.” In a smart home, a zone is defined by the experience you want: what turns on together, what dims together, and what responds together to sensors and schedules. The electrical work still matters (you must know which loads are fed from which circuits), but the zone definition is primarily functional.
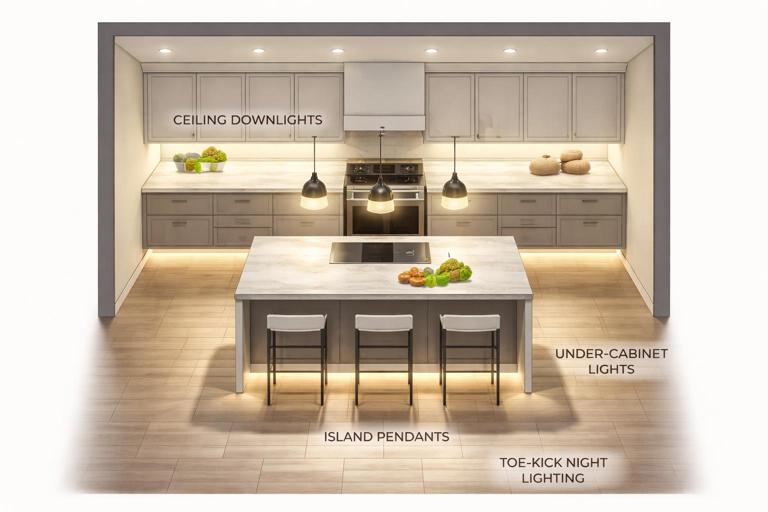
Zones can be physical (all downlights in a kitchen ceiling) or task-based (only the under-cabinet lights). They can also be layered: a room may have multiple zones that overlap in use but not in wiring. For example, a “Kitchen” may include: (1) general downlights, (2) island pendants, (3) under-cabinet task lights, (4) toe-kick night lighting. Each zone can have its own default level, sensor behavior, and time-of-day rules.
Why zoning matters for electricians
- Predictable behavior: Occupants expect consistent results from a button press or motion event. Poor zoning creates “why did that light turn on?” complaints.
- Reduced nuisance triggers: Proper zones allow occupancy sensors to control only what should respond to motion, and leave accent or media lighting alone.
- Energy and comfort: Zoning enables partial lighting (task lighting only) and lower levels at night.
- Commissioning efficiency: Clear zone naming and grouping reduces programming time and service calls.
Common Zone Types and How to Apply Them
1) Room-based zones (baseline)
This is the most intuitive approach: each room has one or more zones that are controlled together. Start with a “general” zone for safe navigation and add additional zones only when there is a clear purpose.
- Example: Bedroom general (ceiling fixture or downlights) as Zone 1; bedside lamps as Zone 2; closet light as Zone 3.
2) Task zones (work surfaces and activities)
Task zones should be bright, targeted, and often independent of the general zone. They are frequently triggered by occupancy but may also be tied to time-of-day or manual scenes.
- Example: Kitchen under-cabinet lights as a task zone that turns on with kitchen occupancy during daytime, but stays off during “Movie” scene.
3) Accent zones (aesthetic layers)
Accent lighting (cove, wall wash, art lights) is usually scene-driven and should not always follow occupancy. Many nuisance complaints come from accent zones being tied to motion when the homeowner wanted them only for entertaining.
- Listen to the audio with the screen off.
- Earn a certificate upon completion.
- Over 5000 courses for you to explore!

Download the app
- Example: Living room cove lighting is part of “Entertain” and “Relax” scenes, not occupancy.
4) Pathway / night zones (low-level navigation)
Night zones are designed to provide safe movement without glare. They are commonly driven by occupancy sensors with strict time-of-day constraints and low dim levels.
- Example: Hallway toe-kick lights at 10% from 11 PM to 6 AM on motion, with a short timeout.
5) Whole-area zones (open plans)
Open-plan spaces often need both local control and coordinated control. You may define sub-zones (kitchen, dining, living) but also provide a “Great Room” scene that sets all three together. The key is to avoid a single occupancy sensor turning on the entire open plan unless that is explicitly desired.
Occupancy Sensors: Types, Strengths, and Typical Failure Modes
Occupancy sensors are inputs that infer presence and drive lighting behavior. In smart homes, they can be hardwired sensors feeding a control system, line-voltage sensors switching a load, or low-voltage sensors integrated into a hub ecosystem. Regardless of platform, the electrician’s job is to place and configure them so they detect the right motion, ignore the wrong motion, and coordinate with manual controls.
Sensor technologies in residential lighting
- PIR (Passive Infrared): Detects changes in infrared energy (body heat movement). Strong for typical walking motion, weaker for minor motion (typing at a desk) and can miss motion if line-of-sight is blocked.
- Ultrasonic: Emits sound waves and detects changes in reflections. Better at minor motion and around partitions, but can false-trigger from HVAC airflow, fans, or vibration if sensitivity is too high.
- Dual-technology: Combines PIR and ultrasonic to reduce false-offs while limiting false-ons. Often best for bathrooms, offices, and rooms with intermittent small motion.
- mmWave presence sensors (where used): Detect micro-movements and can provide “presence” rather than just “occupancy.” Excellent for preventing lights from turning off while someone is still, but requires careful placement to avoid detecting through doorways or thin walls.
Occupancy vs vacancy behavior
Many codes and energy standards distinguish between occupancy (auto-on allowed) and vacancy (manual-on required, auto-off allowed). Even when not mandated, vacancy behavior is often preferred in bedrooms and media rooms to prevent nuisance auto-on. In smart homes, you can implement hybrid behavior: auto-on only during certain hours, or auto-on only to a low level at night.
Common failure modes you will troubleshoot
- False-on: Sensor sees motion in a hallway through an open doorway, detects pets, or ultrasonic sensitivity is too high.
- False-off: PIR cannot see small motion (shower curtain blocks view; person at desk is too still), timeout too short, or sensor aimed incorrectly.
- Flicker or rapid cycling: Poor coordination between sensor logic and manual dimming/scenes; multiple sensors fighting each other; or sensor controlling a load that is also being controlled by another device.
- “Lights won’t turn off” complaints: mmWave detecting through glass/doorway, ultrasonic detecting HVAC movement, or a second sensor in an adjacent zone holding the lights on via a shared scene.
Step-by-Step: Designing Lighting Zones for Sensor Control
The goal is to create zones that match how people move and use the space, then assign sensor responsibilities so that motion triggers the correct lights at the correct level for the correct duration.
Step 1: Identify circulation paths and dwell areas
Walk the plan and mark where people pass through (circulation) versus where they stay (dwell). Circulation areas (hallways, entries, pantry pass-through) benefit from quick response and short timeouts. Dwell areas (kitchen prep, desk, vanity) need fewer false-offs and often longer timeouts or presence detection.
- Practical tip: If a space is both circulation and dwell (kitchen), split it into at least two zones: a general zone for circulation and a task zone for dwell.
Step 2: Define the minimum safe lighting per area
Decide what must turn on to prevent trips and falls. This is often a subset of the available lighting. For example, in a living room, the minimum safe lighting might be a couple of downlights or a floor lamp zone, not every accent light.
Step 3: Decide which zones are sensor-driven vs scene-driven
As a rule of thumb:
- Sensor-driven: entries, hallways, closets, laundry, pantry, garage, bathrooms (often), stairways, night pathway lighting.
- Scene-driven/manual: living rooms, dining rooms, media rooms, accent layers, entertaining spaces.
Hybrid spaces (kitchens, home offices) often use sensors to turn on a baseline level and allow manual/scene control for higher levels.
Step 4: Assign sensor coverage and avoid “zone bleed”
Zone bleed occurs when a sensor intended for one zone triggers another zone. Prevent it by aiming sensors away from doorways, using lens masks where available, reducing sensitivity, and choosing mounting locations that see the intended area but not adjacent traffic.
- Example: A hallway sensor should not see into a bedroom. If it does, the bedroom lights may turn on whenever someone walks past the door.
Step 5: Set timeouts by activity
Timeout is not one-size-fits-all. Use shorter timeouts for pass-through spaces and longer timeouts for dwell spaces. Also consider a two-stage strategy: after a period of inactivity, dim to a low level before turning fully off.
- Typical starting points: hallways 1–3 minutes; closets 2–5 minutes; bathrooms 5–15 minutes; kitchen 10–20 minutes (or presence-based); garage 5–15 minutes.
Step 6: Choose default levels and night behavior
Default level should match the time of day and the zone type. Night pathway zones should come on low. Bathrooms at night may come on to 10–30% to avoid glare. This is a coordinated control strategy problem: the same motion event can produce different outputs depending on time, ambient light, and current scene.
Coordinated Control Strategies (How to Make Devices Work Together)
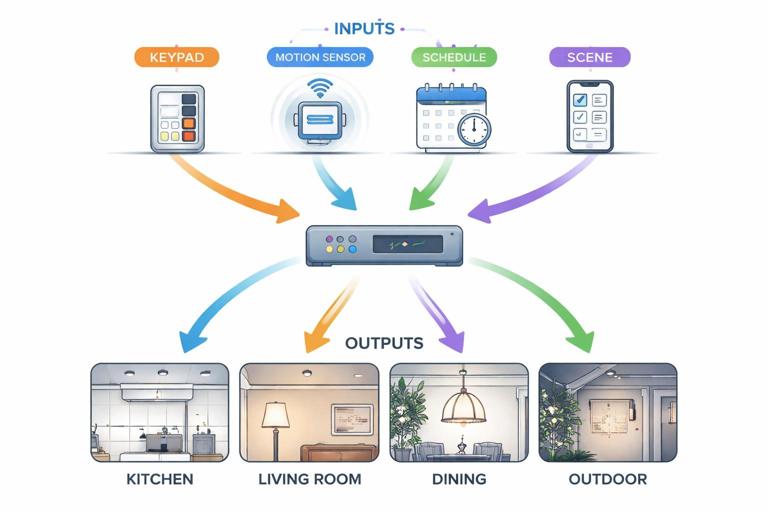
Coordinated control means multiple inputs (switches, sensors, schedules, scenes) can affect multiple outputs (zones) without conflicts. The most common conflicts happen when a sensor turns lights off while someone manually turned them on, or when multiple sensors keep retriggering a scene and overriding a dim level.
Strategy A: Layered control with priorities
Define a priority order for control sources. A practical hierarchy is:
- Life safety / egress: always wins (e.g., emergency pathway lighting).
- Manual local control: should override automation temporarily.
- Scenes: coordinated settings for multiple zones.
- Occupancy automation: baseline convenience behavior.
- Schedules / circadian defaults: background adjustments.
Implementation depends on the system, but the concept is consistent: if a user manually sets a light, the automation should not immediately undo it.
Strategy B: Manual-on, auto-off (vacancy) in “sensitive” rooms
Bedrooms and media rooms are common places where auto-on is annoying. Use vacancy logic: the sensor only turns lights off after inactivity, but does not turn them on. If you still want night navigation, use a separate pathway zone that is allowed to auto-on at low level.
Strategy C: Baseline-on with “raise” scenes
In kitchens and open plans, occupancy can bring on a baseline level (e.g., 30–50% general lighting). Then keypad buttons or app scenes can raise levels and add accent zones. This avoids the “everything blasts on” effect while still providing convenience.
Strategy D: Two-stage off (dim-then-off)
Instead of turning off abruptly, dim to a low level first. This reduces complaints and provides a visual warning. It also helps in bathrooms and stairways where sudden darkness can be unsafe.
// Example logic (conceptual) for a bathroom zone with two-stage off: if motion detected: set vanity zone to time-based level (day=80%, night=20%) start timer T1 = 10 min if no motion for T1: dim vanity zone to 10% start timer T2 = 2 min if no motion for T2: turn vanity zone offStrategy E: Door + motion logic for closets and pantries
For small spaces, a door contact combined with motion can be more reliable than motion alone. Door open can turn on immediately; door closed can start a short off timer. This prevents the “standing still” false-off problem in tight closets.
Strategy F: Ambient light (lux) gating
If the system supports it, use ambient light thresholds so occupancy does not turn on lights when daylight is sufficient. This is especially effective in rooms with large windows and in transitional spaces like foyers.
- Commissioning note: Lux sensors must be placed where they measure representative light, not directly under a luminaire or in direct sun patches.
Step-by-Step: Commissioning Occupancy Sensors for Reliable Results
Step 1: Verify the zone mapping and naming
Before tuning sensors, confirm each controlled load is correctly assigned to the intended zone and labeled clearly (e.g., “Kitchen General,” “Kitchen Task,” “Hall Night Path”). Clear naming prevents programming errors and speeds future service.
Step 2: Set an initial behavior profile
Pick a starting profile per room type:
- Hallway: occupancy auto-on, short timeout, night dim level.
- Bathroom: occupancy or vacancy depending on preference; longer timeout; two-stage off.
- Bedroom: vacancy for main lights; occupancy allowed only for night pathway zone.
- Living room: usually no occupancy control for main/accent; optional vacancy auto-off for a single “cleanup” zone.
Step 3: Adjust sensitivity and coverage deliberately
Start with moderate sensitivity. Walk-test the space: approach from typical entry points, move as an occupant would, and then sit/stand in likely dwell positions. For PIR, ensure line-of-sight to the dwell area. For ultrasonic, reduce sensitivity if you see false-ons from adjacent movement or airflow.
- Practical test: Stand at the vanity mirror, then remain mostly still for several minutes. If lights turn off, you need longer timeout, better sensor placement, or a different sensor technology.
Step 4: Tune timeouts based on real use
Use the initial timeouts, then adjust after observing behavior. A common mistake is setting timeouts too short to “save energy,” which increases nuisance and causes occupants to disable automation. In smart homes, user acceptance is part of system reliability.
Step 5: Configure manual override behavior
Decide what happens when someone manually turns a zone on or changes dim level:
- Option 1: Manual override holds until the next vacancy event (room becomes unoccupied).
- Option 2: Manual override holds for a fixed time (e.g., 2 hours), then automation resumes.
- Option 3: Manual override cancels only the “auto-off” (useful in workshops where lights must stay on).
Whichever you choose, document it for the homeowner and label keypads accordingly if applicable.
Step 6: Validate interactions between multiple sensors
In larger spaces, multiple sensors may cover one zone, or one sensor may influence multiple zones. Confirm that retriggers extend the timer as expected and that sensors do not fight each other. If two sensors control different zones in the same room, ensure their behaviors are consistent (e.g., both use the same night mode rules).
Practical Coordinated Scenarios (Examples You Can Implement)
Bathroom: comfort at night, no false-offs in shower
- Zones: Vanity, Shower, Exhaust fan (if integrated), Night pathway (optional).
- Sensor placement: Ensure detection of shower area; avoid aiming PIR only at the doorway.
- Rules: Motion turns on Vanity to 80% daytime, 20% nighttime. Shower zone may be manual or tied to presence if reliable. Two-stage off for Vanity. Fan logic can be separate (humidity) but avoid tying fan strictly to occupancy if it causes short cycling.
Kitchen: baseline automation without overriding scenes
- Zones: General downlights, Under-cabinet task, Island pendants, Accent/cove.
- Rules: Occupancy turns on General to 40% and Under-cabinet to 60% during daytime if lux is low; at night, only a low pathway subset (e.g., toe-kick) turns on. “Cook” scene raises General and Task; “Entertain” scene adds pendants and accent. Manual scene selection suspends occupancy changes until vacancy.
Hallway + adjacent rooms: prevent zone bleed
- Zones: Hall general, Hall night pathway, Bedroom general (vacancy), Bedroom pathway.
- Rules: Hall sensor controls hall zones only. Bedroom sensor (if used) controls only bedroom pathway at night and auto-off. Use lens masking/aiming so hall sensor cannot see into bedroom doorway.
Garage: reliable auto-off with task exception
- Zones: Garage general, Workbench/task.
- Rules: Occupancy turns on Garage general; auto-off after 10 minutes. Workbench is manual-on and not affected by occupancy off (or has a much longer timeout). This prevents the “I’m working quietly and the lights go out” complaint.
Troubleshooting Coordinated Control Problems
Problem: Lights turn on unexpectedly
- Check sensor field of view: Doorways, mirrors, stair landings, and open-plan sightlines are common culprits.
- Check technology mismatch: Ultrasonic may be reacting to airflow; mmWave may be detecting through openings.
- Check automation scope: A scene or “area occupied” variable may be too broad, turning on multiple zones when any sensor trips.
Problem: Lights turn off while room is occupied
- Check placement: PIR needs line-of-sight; shower curtains and tall cabinets block detection.
- Increase timeout or add two-stage off: Especially in bathrooms and offices.
- Consider presence sensing: If the platform supports it, presence reduces false-offs in dwell areas.
Problem: Manual dimming gets overridden
- Identify the “writer”: Determine whether a sensor, schedule, or scene is sending repeated level commands.
- Implement manual override: Hold manual levels until vacancy or for a timed period.
- Reduce automation frequency: Avoid rules that continuously “enforce” a dim level every minute.
Problem: Multiple zones behave inconsistently in the same room
- Normalize profiles: Ensure all zones in a room share the same time-of-day mode logic unless intentionally different.
- Align fade rates: Different fade times can look like lag or malfunction; coordinate ramp/fade so the room feels cohesive.
- Confirm scene membership: A zone accidentally included in a scene can appear to “have a mind of its own.”
Documentation and Handover (What to Record for Future Service)
Coordinated lighting systems are serviceable when the intent is documented. Record the zone list, sensor locations, and key rules so future changes don’t break the logic.
- Zone schedule: Zone name, controlled fixtures, default levels, fade times.
- Sensor schedule: Sensor type, mounting location, coverage notes, sensitivity setting, timeout, lux threshold (if used).
- Control strategy notes: Which rooms are occupancy vs vacancy; what manual override does; which scenes include which zones.
- Known constraints: Areas prone to false triggers (pets, HVAC vents, reflective surfaces) and how you mitigated them.