Why Communication Protocols Matter to Installers
In smart home work, communication is the “control wiring” you cannot see. A perfectly terminated line-voltage device can still fail at the job if it cannot reliably join the network, stay connected, and respond with acceptable latency. Installers are often called back for issues that look like electrical faults but are actually RF coverage, interference, pairing sequence, or hub placement problems. This chapter focuses on installer-facing fundamentals for Wi‑Fi, Zigbee, Z‑Wave, and Bluetooth, with practical steps for commissioning and troubleshooting.
Key installer outcomes
- Choose the right protocol for the device role (high bandwidth vs low power vs long range).
- Plan hub/router placement and RF environment before mounting devices permanently.
- Commission devices consistently (pairing, naming, grouping, updates) to reduce callbacks.
- Troubleshoot using observable symptoms: RSSI/LQI, routing, channel overlap, and power constraints.
Protocol Snapshot: What Each One Is Best At
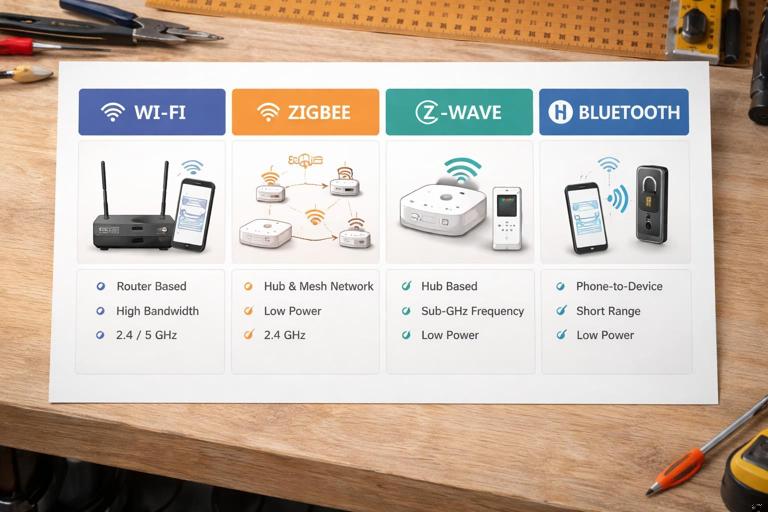
Wi‑Fi (2.4 GHz and 5 GHz)
What it is: IP-based wireless networking used by phones, routers, and many smart devices. Most smart home Wi‑Fi devices use 2.4 GHz for range and wall penetration; some use 5 GHz for higher throughput but shorter range.
- Strengths: Direct-to-router connectivity, high bandwidth (cameras, audio), easy phone setup, no dedicated hub required for many products.
- Limitations: Higher power draw (less ideal for battery sensors), congestion in 2.4 GHz, dependence on router quality and configuration.
- Installer mindset: Treat the router/AP as a “panelboard” for communications: placement, capacity, and configuration determine system reliability.
Zigbee (2.4 GHz mesh)
What it is: A low-power mesh protocol where many mains-powered devices act as repeaters (routers) and battery devices are typically end devices. Zigbee requires a coordinator (hub) to form the network.
- Strengths: Mesh extends coverage, low power for sensors, good for lighting and sensors, many devices can coexist.
- Limitations: Shares 2.4 GHz with Wi‑Fi and Bluetooth, so channel planning matters; interoperability depends on profiles and hub support.
- Installer mindset: Build the mesh intentionally: enough powered routers, correct hub placement, and stable channel selection.
Z‑Wave (sub‑GHz mesh, region-specific)
What it is: A sub‑GHz mesh protocol (e.g., ~908 MHz in North America) designed for home automation. Like Zigbee, it uses a controller (hub) and benefits from mains-powered repeaters.
- Strengths: Less interference from Wi‑Fi (different band), strong wall penetration, predictable device certification ecosystem, excellent for switches, locks, and sensors.
- Limitations: Region/frequency specific (devices must match region), lower bandwidth than Wi‑Fi, network healing and inclusion practices matter.
- Installer mindset: Think “coverage through walls” and “repeaters at intervals.” Pay attention to secure inclusion for locks and access devices.
Bluetooth (Classic and BLE)
What it is: Short-range wireless. In smart homes, Bluetooth Low Energy (BLE) is common for commissioning, proximity features, and some sensors. Some ecosystems use Bluetooth mesh, but many products use BLE to connect to a phone or to a gateway/bridge.
- Listen to the audio with the screen off.
- Earn a certificate upon completion.
- Over 5000 courses for you to explore!

Download the app
- Strengths: Simple onboarding, low power, good for close-range control and setup, often used for locks and initial provisioning.
- Limitations: Shorter range, may require a gateway for remote control, performance depends heavily on placement and building materials.
- Installer mindset: Use Bluetooth as a “local service tool” and ensure any required gateway is placed within reliable range.
Installer Decision Guide: Matching Protocol to Application
Bandwidth and latency needs
- Cameras, video doorbells, streaming audio: typically Wi‑Fi (or wired Ethernet where available). Zigbee/Z‑Wave are not designed for video.
- Lighting control, sensors, automation triggers: Zigbee or Z‑Wave are often more reliable than Wi‑Fi at scale because they form purpose-built meshes and reduce load on the router.
- Locks and access control: commonly Z‑Wave or BLE (sometimes Wi‑Fi). Prioritize secure inclusion and stable routing.
Power source and battery life
- Battery sensors: Zigbee, Z‑Wave, or BLE are typical. Wi‑Fi battery devices exist but often trade battery life for convenience.
- Mains-powered devices: Any protocol can work; Zigbee/Z‑Wave mains devices can strengthen the mesh as repeaters.
Site constraints
- Dense Wi‑Fi environments (apartments, condos): Z‑Wave can avoid 2.4 GHz congestion; Zigbee can still work with careful channel planning and a strong mesh.
- Thick walls, masonry, metal lath, foil-backed insulation: Sub‑GHz Z‑Wave may penetrate better; Wi‑Fi 2.4 GHz may outperform 5 GHz; Zigbee/BLE may need more repeaters/gateways.
- Large homes: Mesh (Zigbee/Z‑Wave) or multiple Wi‑Fi access points with proper roaming support. Avoid relying on a single consumer router at one end of the building.
Wi‑Fi for Installers: Setup and Reliability Basics
Concepts you must know on site
- SSID and bands: Many devices only support 2.4 GHz. If the router uses a combined SSID for 2.4/5 GHz, onboarding can fail if the phone is on 5 GHz while the device expects 2.4 GHz.
- Signal strength: RSSI (received signal strength indicator) is commonly shown in apps or router dashboards. Very weak RSSI often causes intermittent disconnects and delayed commands.
- Channel congestion: 2.4 GHz has only three non-overlapping channels (1, 6, 11). Neighbor networks and interference can cause packet loss.
- Client capacity: Consumer routers can struggle with many IoT clients. Symptoms include random offline devices and slow reconnection after power outages.
Step-by-step: Commissioning a Wi‑Fi smart device (installer workflow)
Verify network readiness: Confirm internet service is active, router firmware is current, and the customer has credentials. If possible, create a dedicated IoT SSID on 2.4 GHz with WPA2/WPA3 as supported by devices.
Check band compatibility: Confirm the device supports 2.4 GHz only or dual-band. If onboarding issues occur, temporarily disable 5 GHz or separate SSIDs so the phone and device are on the same band.
Place the device for onboarding: For initial setup, keep the device within strong range of the router/AP. After it is registered and updated, move it to its final location and verify performance.
Complete pairing in the manufacturer app: Follow prompts for AP mode or BLE-assisted provisioning. Ensure the device is assigned to the correct room and given a clear name that matches the physical location.
Run firmware updates immediately: Many Wi‑Fi devices ship with old firmware. Update before final mounting to avoid later downtime.
Validate control and recovery: Test on/off response multiple times, then power-cycle the device (if accessible) and confirm it reconnects without manual intervention.
Troubleshooting Wi‑Fi symptoms
- Device pairs but goes offline later: Check RSSI at the installed location, router client limits, DHCP lease time, and whether the router is rebooting or changing channels frequently.
- Delayed response: Look for 2.4 GHz congestion, weak signal, or router CPU overload. Consider adding an access point closer to the device rather than a generic “Wi‑Fi extender” that halves throughput.
- Device will not pair: Confirm 2.4 GHz support, security mode compatibility (some older devices fail on WPA3-only), and that the phone is not on a VPN that blocks local discovery.
Zigbee for Installers: Building a Healthy Mesh
Core concepts
- Coordinator: The hub forms the Zigbee network and selects a channel. Its placement is critical.
- Routers (repeaters): Typically mains-powered devices that relay messages. More routers in strategic locations improves reliability.
- End devices: Often battery-powered sensors that “sleep” and check in periodically. They rely on nearby routers/coordinator.
- Channel overlap with Wi‑Fi: Zigbee uses 2.4 GHz channels that can overlap with Wi‑Fi. Poor channel choices can cause intermittent issues that look like “random dropouts.”
Step-by-step: Commissioning Zigbee devices in an installer-friendly order

Place the hub/coordinator centrally: Avoid putting it inside metal enclosures, behind AV racks, or next to a Wi‑Fi router. Use a short USB extension if the hub is a USB stick to move it away from interference sources.
Set or confirm Zigbee channel: If the hub allows channel selection, choose a Zigbee channel that minimizes overlap with the site’s strongest Wi‑Fi channel. Document the chosen channel for future service.
Add mains-powered Zigbee routers first: Pair powered devices (repeaters) throughout the home before adding battery sensors. This creates stable routing options from the start.
Add end devices near their final locations: Pair sensors where they will live so they select appropriate parent routers. Avoid pairing all sensors next to the hub and then relocating them far away.
Allow time for mesh stabilization: Zigbee routing can improve over time. After adding many devices, wait and then retest responsiveness in distant areas.
Group and scene testing: If the system uses groups (e.g., multiple lights responding together), test group commands from different control points to verify consistent delivery.
Common Zigbee pitfalls and fixes
- Hub plugged into a router/TV area and devices drop: Move the hub away from dense RF/noise sources; use an extension cable; elevate it.
- Battery sensors unreliable: Ensure nearby powered routers exist; replace weak batteries; confirm sensors are not mounted on metal surfaces that detune antennas.
- Interference with Wi‑Fi: Adjust Wi‑Fi channel (1/6/11) or Zigbee channel to reduce overlap. In some cases, moving the Wi‑Fi AP a few feet can materially change interference patterns.
Z‑Wave for Installers: Inclusion, Security, and Network Health
Core concepts
- Controller: The hub manages the Z‑Wave network.
- Mesh routing: Mains-powered Z‑Wave devices repeat; battery devices generally do not.
- Secure inclusion: Many devices (especially locks) require secure pairing. Security levels (commonly S2) affect reliability and must be done correctly.
- Region frequency: Z‑Wave devices must match the hub’s region. A mismatch can look like a dead device even when powered correctly.
Step-by-step: Reliable Z‑Wave inclusion process
Confirm region compatibility: Verify the hub and devices are intended for the same region/frequency before you start.
Start inclusion near the hub when required: Some devices include best near the controller, especially for secure inclusion. If the device is fixed in place (e.g., a lock), consider using the hub’s “network-wide inclusion” feature if supported, or temporarily bring the hub closer.
Include repeaters strategically: Add mains-powered devices in a path outward from the hub, creating stepping stones for the mesh.
Include security devices carefully: For locks, follow the manufacturer’s secure inclusion steps exactly. Confirm the hub reports the expected security level (e.g., S2) and test lock/unlock multiple times.
Run a network heal (if applicable): After adding or relocating devices, run the hub’s Z‑Wave repair/heal procedure to optimize routes. Schedule this when the customer can tolerate a short period of reduced responsiveness.
Verify routes and neighbors: Many hubs show neighbor tables or route quality. Use these tools to confirm that distant devices have at least one strong repeater path.
Common Z‑Wave pitfalls and fixes
- Device won’t include: Exclude it first (even if it’s “new”), then include again. Many Z‑Wave devices need exclusion to clear prior network data.
- Lock is inconsistent: Ensure secure inclusion succeeded, add a nearby Z‑Wave repeater (beaming-capable if required by the lock), and avoid placing the hub in a low-signal basement corner.
- After power outage, some devices slow: Run a repair/heal, confirm repeaters are powered, and check for a missing repeater that previously carried traffic.
Bluetooth for Installers: Commissioning Tool and Short-Range Control
Core concepts
- BLE provisioning: Many devices use BLE for initial setup, then switch to Wi‑Fi or join a hub network.
- Local range expectations: Bluetooth is often reliable within a room or two, but building materials can reduce range sharply.
- Gateway requirement: If the customer expects remote control, confirm whether a Bluetooth-to-IP gateway/bridge is required and where it must be placed.
Step-by-step: Bluetooth-based onboarding best practices
Prepare the phone/tablet: Enable Bluetooth and location permissions if required by the app. Disable VPN if discovery fails.
Stand close to the device: Perform pairing within a few feet. If the device is in a metal box or behind a metal plate, temporarily remove obstructions during commissioning if safe and allowed by the manufacturer.
Complete provisioning and update firmware: BLE devices often need firmware updates early. Do this before finalizing physical installation if access will be limited.
Validate gateway connectivity (if used): If a bridge is required, confirm the device shows “remote available” or similar status and test control from outside Bluetooth range (e.g., by turning off Bluetooth on the phone and using cellular data).
Interference, Placement, and Materials: Practical RF Rules on Job Sites
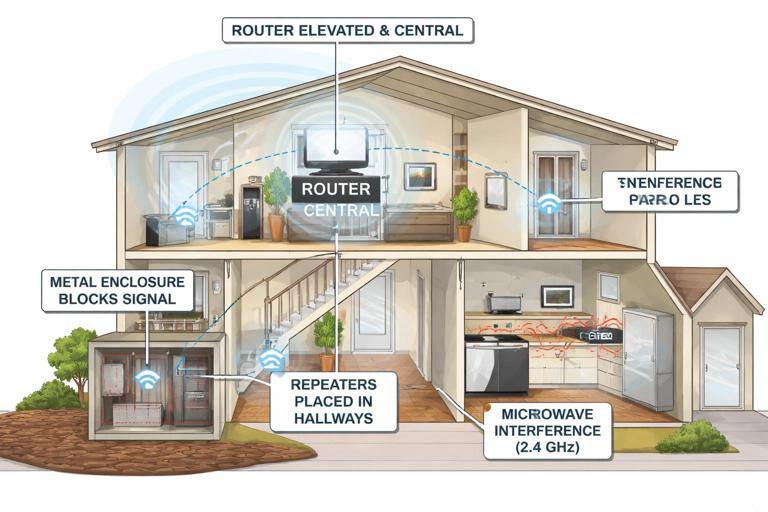
Placement rules that prevent callbacks
- Keep hubs away from noise sources: Avoid placing hubs directly next to Wi‑Fi routers, large power supplies, AV receivers, USB 3.0 devices, and dense cable bundles. A small separation can improve RF performance.
- Avoid metal enclosures: Metal panels, structured wiring cans, and some mirrored/foil-backed surfaces can block RF. If equipment must be near such areas, place antennas or hubs outside the enclosure.
- Height helps: Placing hubs/APs higher and more central often improves coverage compared to floor-level placement in a cabinet.
- Repeaters as “signal junction boxes”: For Zigbee/Z‑Wave, add powered devices in hallways or central rooms to bridge distant areas.
Recognizing interference patterns
- Works in the morning, fails at night: Often neighbor Wi‑Fi congestion increases in the evening. Consider channel changes or adding an AP/mesh node.
- Fails when microwave runs: 2.4 GHz interference can affect Wi‑Fi/Zigbee/BLE. Improve distance and signal strength, or move critical devices away from the kitchen path.
- One room always problematic: Look for metal-backed insulation, tile with metal lath, radiant barriers, or large appliances. Plan for a closer repeater/AP.
Commissioning Checklist: A Repeatable Installer Process
Before pairing any device
- Confirm which protocols are in use and which hubs/bridges are required.
- Verify customer network credentials and router location; identify where hubs will live permanently.
- Decide naming conventions (e.g., “Kitchen_Cans_North” vs “Light 1”) and room structure in the app.
- Check for firmware updates for hubs/controllers first.
During pairing
- Pair infrastructure devices first (hubs, bridges, repeaters, powered nodes), then battery devices.
- Pair devices near their final location when mesh parenting matters (especially Zigbee sensors).
- Document any special steps (secure inclusion, beaming repeater requirements, channel selections).
After pairing
- Test control from multiple points (app, voice assistant if used, wall control if applicable).
- Simulate common failure modes: router reboot, hub reboot, brief power interruption (when safe and permitted) and verify recovery.
- Record network details for service: Wi‑Fi SSID used, hub location, Zigbee channel, Z‑Wave repair date, and any repeaters installed for coverage.
Practical Troubleshooting Scenarios
Scenario 1: “Devices are installed correctly but randomly show offline”
Likely causes: weak signal, interference, overloaded router, hub placed poorly, or mesh missing repeaters.
- Wi‑Fi: Check RSSI at device, confirm 2.4 GHz congestion, review router client list and uptime, consider adding an access point.
- Zigbee: Confirm hub is central and not next to Wi‑Fi router; add a powered Zigbee router between hub and problem area; allow time for routing to settle.
- Z‑Wave: Run repair/heal; verify repeaters are powered; exclude/include the worst device if it has a bad route.
Scenario 2: “Everything works near the hub but not at the far end of the house”
Likely causes: insufficient mesh density or poor AP placement.
- Wi‑Fi: Add a properly placed access point or mesh node with wired backhaul if possible; avoid single-node extenders if they reduce throughput.
- Zigbee/Z‑Wave: Add powered repeaters in intermediate locations; avoid placing repeaters inside metal boxes or behind large appliances.
Scenario 3: “A lock pairs but is slow or misses commands”
Likely causes: insecure/failed secure inclusion, weak mesh route, or missing nearby repeater.
- Confirm the hub reports the correct security level for the lock.
- Add a nearby compatible repeater (and verify it is powered and included).
- Re-run Z‑Wave repair/heal after adding the repeater.
- If still inconsistent, exclude and re-include the lock using the manufacturer’s secure inclusion procedure.
Scenario 4: “Bluetooth setup works on site, but customer can’t control it remotely”
Likely causes: device is Bluetooth-only without a gateway, or the gateway is out of range/offline.
- Confirm whether the product requires a bridge for remote access.
- Verify the bridge is online and placed within reliable Bluetooth range of the device.
- Test remote control by disabling Bluetooth on the phone and using cellular data.
Field Notes: Documentation That Saves Service Time
Smart home communication issues are often repeat problems unless you document the “network as installed.” Include these items in your job notes:
- Hub/controller make/model, physical location, and power source.
- Wi‑Fi SSID used for IoT devices, band (2.4/5), and router/AP locations.
- Zigbee channel (if selectable) and any known interference sources nearby.
- Z‑Wave repair/heal date and any repeaters installed specifically to support distant devices or locks.
- Device naming scheme and room/group mapping so future replacements can be commissioned consistently.