Why Export Settings Matter for Retention (Not Just “Quality”)
Export is where your edit becomes a deliverable that must survive compression, autoplay, variable network speeds, and different device screens. A short can look sharp in your editor and still fail on-platform because of mismatched frame rate, over-sharpening, crushed blacks, clipped highlights, or text that becomes unreadable after recompression.
Think of export settings as a contract between your master file and the platform’s transcoder. Your goal is to hand the platform a clean, robust file that compresses predictably: stable motion, controlled detail, consistent color, and audio that remains intelligible after loudness normalization.
Two guiding principles
- Give the platform “easy-to-encode” video: avoid unnecessary noise, extreme grain, and chaotic micro-detail that turns into blocky artifacts.
- Export a high-quality mezzanine (delivery master): not uncompressed, but high enough bitrate and correct settings so the platform’s compression is the only major loss.
Vertical Delivery Standards: Specs That Travel Well
Platforms change exact recommendations, but vertical delivery standards are stable. Use these as your default unless a platform explicitly requires something else.

Core video specs (recommended default)
- Aspect ratio: 9:16
- Resolution: 1080×1920 (Full HD vertical). If you finish in 4K vertical (2160×3840), only upload if your workflow and platform benefit from it; otherwise 1080×1920 is the most reliable.
- Frame rate: match your timeline and source (commonly 30 fps or 60 fps). Avoid exporting 30 from a 60 timeline or vice versa unless you intentionally converted.
- Codec: H.264 (most universal). HEVC/H.265 can look better at lower bitrates but may introduce compatibility issues in some pipelines; use only if you know the platform and your upload method handle it well.
- Container: .mp4
- Chroma subsampling: 4:2:0 (standard for delivery)
- Bit depth: 8-bit for H.264 delivery is typical; if you grade heavily, do your work in higher precision internally, then export a clean 8-bit deliverable without banding.
Bitrate targets (practical ranges)
Bitrate is not “more is always better.” Too low creates macroblocking; too high can be wasted because the platform will re-encode anyway. Use a range that preserves detail while staying reasonable.
- 1080×1920 at 30 fps: 12–20 Mbps (H.264)
- 1080×1920 at 60 fps: 20–35 Mbps (H.264)
- 2160×3840 at 30 fps: 35–60 Mbps (H.264) if you choose to upload 4K
If your content has lots of motion (sports, handheld movement, fast cuts), lean toward the higher end. If it’s mostly talking head with simple backgrounds, mid-range is fine.
- Listen to the audio with the screen off.
- Earn a certificate upon completion.
- Over 5000 courses for you to explore!

Download the app
Keyframe interval (GOP)
Many platforms prefer a keyframe every ~2 seconds. This helps seeking and can improve transcode stability.
- 30 fps: keyframe interval 60 frames
- 60 fps: keyframe interval 120 frames
Audio specs (recommended default)
- Codec: AAC
- Sample rate: 48 kHz
- Bitrate: 256–320 kbps stereo
Even if your platform will recompress audio, starting with clean AAC at 48 kHz reduces the chance of brittle highs, pumping, or smeared consonants after transcoding.
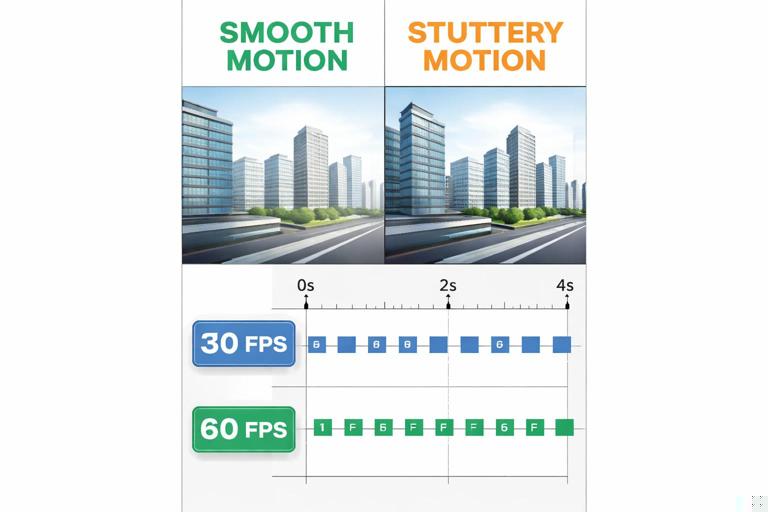
Frame Rate, Motion, and the “Looks Jittery” Problem
Vertical shorts often include fast camera moves, quick zooms, and kinetic overlays. These can break down quickly if frame rate handling is sloppy.
Rules to avoid jitter and ghosting
- Do not mix frame rates casually: if you shot 60 fps and deliver 30 fps, decide whether you are using 60 for slow motion or converting to 30. Randomly dropping frames creates stutter.
- Use proper motion interpolation only when necessary: optical flow can help but can also create warping artifacts around hands, faces, and text.
- Match shutter to frame rate at capture: if you shot with an extremely fast shutter, motion can look choppy even at 60 fps. Export can’t fix that; it can only preserve it.
Practical step-by-step: choosing 30 vs 60 for delivery
Check your dominant source frame rate. If most clips are 30, deliver 30. If most are 60 and you rely on smooth motion, deliver 60.
Check platform behavior. If your target platform reliably supports 60 fps playback in your region and account type, 60 can help motion clarity. If not, 30 is safer.
Do a 10-second test upload. Export a short segment with fast motion and text. Upload privately/unlisted and watch on a phone over cellular and Wi‑Fi. Choose the version that survives recompression best.
Color Management for Vertical Delivery (Avoiding Washed-Out or Over-Saturated Uploads)
A common failure mode is “it looked perfect in the editor, but on my phone it’s washed out,” or “skin tones went orange.” This is usually a color space / gamma interpretation mismatch between your editing environment, export tags, and the platform’s transcode.
Practical guidance that prevents most issues
- Deliver in Rec.709. For most shorts, Rec.709 is the safest delivery color space.
- Avoid extreme contrast curves. Heavy crushed shadows and clipped highlights amplify compression artifacts and can make faces look harsh after transcoding.
- Watch for banding in gradients. Vertical videos often include blurred backgrounds and sky gradients. If you see banding, reduce aggressive noise reduction, add subtle texture, or adjust gradients to be less smooth.
Practical step-by-step: a “phone reality check” for color
Export a 15–20 second test clip with skin tones, a bright highlight (window, lamp), and a dark area (hair, jacket).
Watch on at least two displays: your editing monitor and a phone at 50–70% brightness.
Look for three red flags: clipped highlights (no detail), crushed blacks (no separation), and oversaturated reds (skin looks sunburned).
Adjust before final export: slightly lower contrast, pull back saturation, and recover highlights if needed. Re-test.
Compression-Friendly Finishing: Detail, Noise, Sharpening, and Text Edges
Vertical shorts are often watched on small screens, which tempts creators to over-sharpen and over-contrast. That can backfire because platform compression exaggerates halos and turns fine detail into shimmering blocks.
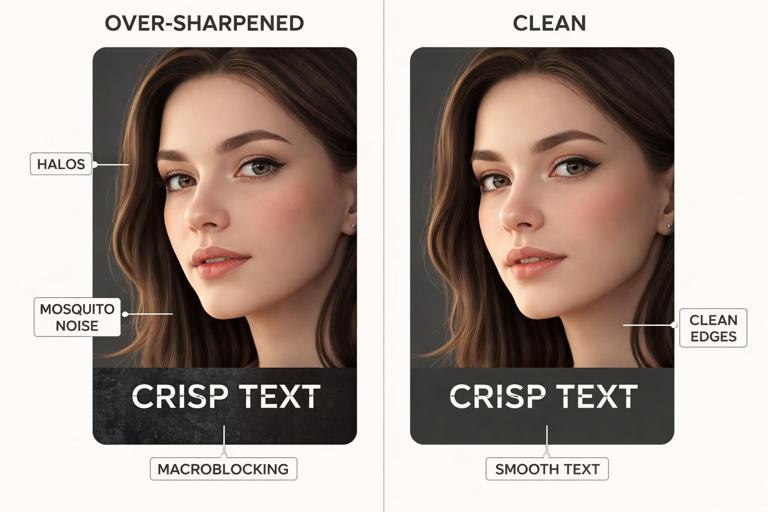
What to avoid
- Over-sharpening: creates halos around faces and text; halos become “mosquito noise” after compression.
- Heavy film grain/noise overlays: noise is random detail that demands bitrate. If you add grain, keep it subtle and consistent.
- High-frequency patterns: tight stripes, tiny checker patterns, and detailed fabrics can moiré and flicker.
What to do instead
- Use moderate sharpening only if needed: prioritize clarity in eyes and facial features, not edges everywhere.
- Prefer clean backgrounds: if you use blur, keep it stable (avoid animated blur that changes every frame).
- Keep text edges clean: avoid ultra-thin fonts and hairline strokes; compression will break them.
Audio Quality Control: Loudness, Peaks, and Translation to Phones
Platforms often normalize loudness. If your mix is too hot, it can be turned down; if it’s too dynamic, quiet words disappear on small speakers. Your export should be controlled and consistent.
Practical loudness targets (workable defaults)
- Dialogue-centric shorts: aim for integrated loudness around -14 to -16 LUFS (as a practical range), with true peaks kept below -1 dBTP.
- Keep headroom: avoid hitting 0 dBFS; clipping is irreversible and becomes more obvious after transcoding.
These are practical targets, not a legal broadcast spec. The point is consistency: clear speech, no sudden jumps, and no clipping.
Practical step-by-step: a fast audio QC pass
Listen at low volume on your phone. If you can’t understand every word, your mix is too dynamic or masked.
Check peaks on the master bus. Ensure nothing clips; keep true peak under -1 dBTP if your tools support it.
Scan for harshness. “S” sounds and brittle highs can become painful on small speakers. If needed, reduce sibilance slightly and tame 3–6 kHz.
Confirm mono compatibility. Some phone playback effectively collapses stereo. Make sure important elements don’t disappear when summed to mono.
Quality Control Checklist Before You Export
QC is not a single “watch it once.” It’s a structured pass that catches the issues most likely to hurt retention: unreadable visuals, distracting artifacts, and audio that doesn’t translate.
Visual QC checklist
- Safe areas: verify that essential visuals are not too close to edges where UI overlays may cover them.
- Text legibility: check smallest text on a phone-sized preview. If you must squint, it will fail after compression.
- Flicker: watch for LED lighting flicker, screen refresh banding, or strobing patterns in fine textures.
- Stabilization artifacts: look for warping at frame edges, especially around hands and faces.
- Banding: inspect gradients (walls, skies, blurred backgrounds).
- Macroblocking: look in dark areas and fast motion; if you see blocks in your export, increase bitrate or reduce noise/detail.
Audio QC checklist
- Dialogue clarity: every word understandable on phone speakers.
- Consistent level: no sudden jumps between clips.
- No clipping: peaks controlled; no distortion on loud syllables.
- Music balance: music supports, never masks speech.
Export Workflow: A Repeatable Step-by-Step
Use this workflow to produce consistent, platform-ready vertical exports without guessing each time.
Step 1: Confirm timeline settings
- Resolution set to 1080×1920 (or your chosen vertical master).
- Frame rate matches your intended delivery (30 or 60).
- Preview render set to high quality if your editor uses proxies.
Step 2: Do a final “real-time watch”
- Watch the full short once without stopping.
- Then scrub quickly for text, transitions, and any moment with heavy motion or gradients.
Step 3: Export a high-quality master
Recommended baseline settings (H.264):
- Format: MP4
- Codec: H.264
- Resolution: 1080×1920
- Frame rate: 30 or 60 (match timeline)
- Bitrate: VBR 2-pass if available; otherwise high-quality VBR/CBR in the ranges above
- Keyframes: every 2 seconds
- Audio: AAC, 48 kHz, 320 kbps
Step 4: Verify the exported file (don’t assume)
Play the exported file locally on your computer to ensure no missing frames, glitches, or audio dropouts.
AirDrop/transfer to a phone and watch in the phone’s native player. This isolates issues caused by your export (before platform compression).
Check file metadata (resolution, frame rate, audio sample rate). Many “mystery issues” come from accidental 720×1280 exports or 44.1 kHz audio.
Platform Recompression: Designing Your Export to Survive It
Every major short-form platform transcodes uploads into multiple renditions for different devices and network conditions. Your upload is not what viewers see. The goal is to minimize the damage introduced by that second compression pass.
How to make recompression less destructive
- Keep motion clean: avoid excessive motion blur plus heavy sharpening; it creates unstable edges.
- Reduce noise in shadows: noisy dark areas turn into blocky patches after transcode.
- Avoid tiny, high-contrast details: thin lines and micro-textures shimmer.
- Use consistent lighting and exposure: sudden exposure shifts are hard to encode smoothly.
Practical example: fixing a “blocky dark background” export
If your talking-head short has a dark wall behind you and it turns blocky after upload:
- Lift shadows slightly so the background isn’t near-black.
- Reduce noise (or avoid adding grain) specifically in the background.
- Increase export bitrate modestly (e.g., from 12 Mbps to 18 Mbps at 1080×1920/30).
- Consider adding a subtle, stable blur to the background to reduce detail the encoder struggles with.
Vertical Delivery Standards Beyond the File: Naming, Versions, and Archiving
Delivery is also operational. When you publish frequently, the biggest quality failures come from uploading the wrong version, mismatched audio, or an outdated cut.
Versioning system (simple and scalable)
- File naming: Project_ShortTopic_Platform_Aspect_FPS_v## (e.g., Brand_Tip01_9x16_30_v03.mp4)
- Keep a “final exports” folder separate from drafts.
- Store a high-quality master and a platform upload file if you generate separate versions.
Practical step-by-step: preventing wrong-version uploads
Lock picture before export: once you decide it’s final, duplicate the timeline/sequence and label it “LOCKED.”
Export only from the locked sequence. This prevents accidental changes.
Open the exported file and confirm the first 3 seconds and last 3 seconds. Most wrong-version mistakes show up immediately (missing captions, wrong music, old ending).
Troubleshooting Common Export Failures (Fast Diagnosis)
Problem: Text looks soft or jagged after upload
- Cause: thin fonts, too-small size, over-sharpening, or platform downscaling.
- Fix: increase font weight/size, add subtle shadow/outline, avoid hairline strokes, export at 1080×1920 (not lower), and keep edges clean (no excessive sharpening).
Problem: Video looks “washed out” on phones
- Cause: color space/gamma mismatch or incorrect tags.
- Fix: deliver Rec.709, avoid extreme contrast, test on multiple phones, and ensure your export settings are consistent with your timeline color management.
Problem: Motion looks stuttery
- Cause: frame rate mismatch, dropped frames, or poor conversion from 60 to 30.
- Fix: match timeline and export fps, avoid mixed frame rates, and test a 60 fps delivery if the platform supports it.
Problem: Audio distorts after upload
- Cause: clipping, too-hot master, or aggressive limiting that triggers platform normalization artifacts.
- Fix: keep true peak below -1 dBTP, reduce limiter intensity, and re-check on phone speakers at low volume.
Deliverables You Should Keep for Each Short
To stay consistent and efficient, maintain a small set of deliverables per short:
- Upload master: H.264 MP4, 1080×1920, correct fps, high-quality bitrate.
- Archive master: a higher-bitrate H.264 or an intermediate codec file (if your storage allows) for future re-exports without generational loss.
- Thumbnail frame (if applicable): a high-quality still image extracted from the timeline, checked on a phone for clarity.
- Project notes: export settings used, fps, and any special fixes (noise reduction, color tweaks) so you can replicate results.