What an “Editing Workflow” Means for Vertical Shorts
An editing workflow is the repeatable sequence you follow from ingest to export so you can move fast without breaking quality. For vertical short-form, the workflow has three goals: (1) speed (you’ll edit many versions), (2) consistency (your look, loudness, and captions stay uniform), and (3) iteration (you can swap clips, captions, and music without rebuilding the whole timeline).
Across CapCut, Premiere Pro, and DaVinci Resolve, the same underlying stages apply: import and organize, build a rough cut, tighten timing, add graphics/captions, color and audio polish, quality check, export, and archive. The tools differ, but the logic stays the same. This chapter focuses on how to structure that logic inside each app, with practical steps and templates you can reuse.
Common Workflow Blueprint (Works in Any Editor)

1) Project Setup: Make Vertical the Default
Before you touch the timeline, decide your delivery specs. Typical vertical delivery is 1080×1920 (9:16). If you shoot 4K, you can still deliver 1080×1920 for speed and compatibility. Set frame rate to match your footage (often 30 or 60). Keep one “master project” template per style so you aren’t reinventing settings.
- Create a vertical sequence/timeline preset.
- Create bins/folders: Footage, VO, Music, SFX, Graphics, Captions, Exports.
- Decide naming conventions: YYYYMMDD_Project_ShortName_V01.
- Decide where assets live: a single project folder with subfolders (Footage, Audio, Graphics, Exports).
2) Ingest and Selects: Reduce Choices Early
Short-form editing gets slow when you keep every clip “just in case.” Make selects quickly: mark the best takes, reject the rest, and build from a smaller pool. If you have A-roll and B-roll, separate them. If you have multiple takes of the same line, pick one and commit.
- Skim footage at 1.5–2× speed.
- Mark in/out points for usable segments.
- Pull selects into a “Selects” timeline or bin.
- Label clips by purpose: “Reaction,” “Cutaway,” “Demo,” “Screen.”
3) Rough Cut: Assemble Without Polishing
In the rough cut, you’re only answering: “Does the story make sense?” Avoid color, fancy transitions, and micro-timing. Place your primary narrative clips in order, then add supporting cutaways where needed. Keep it ugly but complete.
- Listen to the audio with the screen off.
- Earn a certificate upon completion.
- Over 5000 courses for you to explore!

Download the app
4) Tighten: Timing, Trims, and Micro-Edits
This is where retention is won or lost, but the workflow focus is mechanical: trim dead air, tighten pauses, and remove repeated words. Use ripple trims so the timeline stays compact. If you do speed ramps or jump cuts, apply them consistently and keep them editable (avoid baking effects too early).
5) Graphics and Captions: Build a Reusable System
Even if you already have a caption style, your workflow should make it fast to apply. Use templates, presets, or styles. Keep captions on their own track/layer. If you do kinetic emphasis, do it with a repeatable method (e.g., duplicate style + change color/scale for keywords).
6) Color and Audio: Polish Late, Not Early
Do basic correction and loudness leveling after the cut is locked. If you grade early, you’ll waste time redoing shots you later remove. For audio, prioritize intelligibility: voice clarity, controlled peaks, and consistent loudness. Keep music and SFX on separate tracks so you can adjust quickly.
7) QC Pass: Watch Like a Viewer
Do at least two passes: one with sound on, one with sound off (to check readability and visual clarity). Also check the first frame, last frame, and any on-screen elements near edges. Scrub through for accidental black frames, missing captions, or clipped audio.
8) Export and Versioning: Plan for Variants
Shorts often need multiple exports: different platform specs, alternate caption sizes, or different music. Your workflow should support versioning without duplicating the entire project.
- Export a “Master” high-quality file.
- Export platform versions from the master or from separate export presets.
- Keep a changelog: V01, V02 (caption fix), V03 (music swap).
CapCut Workflow (Fast Iteration, Template-Driven)
CapCut is optimized for speed and built-in effects. The workflow advantage is rapid captioning, quick reframing, and easy template reuse. The risk is project sprawl and inconsistent settings if you don’t standardize.
CapCut Step-by-Step: From Import to Export

Step 1: Start with a vertical project preset
- Create a new project and confirm the canvas is 9:16.
- Set resolution and frame rate early (match your footage if possible).
Step 2: Import and organize
- Import your A-roll, B-roll, screen recordings, music, and SFX.
- Immediately favorite/star the best takes (or move them to the front of your media list).
Step 3: Build a rough cut with ripple behavior
- Place A-roll first in order.
- Use split and delete to remove mistakes; keep gaps closed so timing stays tight.
- Add B-roll above A-roll so you can toggle visibility without losing audio continuity.
Step 4: Captions (fast pass, then refine)
- Use Auto Captions to generate a baseline.
- Correct errors immediately while the audio is fresh in your mind.
- Apply a consistent caption style (font, size, background, highlight color).
- For emphasis words: duplicate the caption segment, shorten it to the keyword, and apply a highlight style.
Step 5: Motion and reframing
- Use keyframes for subtle push-ins on important moments.
- If you have horizontal footage, use Auto Reframe or manual position/scale to keep the subject centered.
- Keep motion consistent: one “language” of movement (e.g., slow push-ins only) to avoid visual noise.
Step 6: Audio leveling
- Normalize voice clips if needed, then fine-tune with volume keyframes.
- Lower music under voice; keep music consistent across the entire short unless intentionally changing.
- Add light compression/voice enhancement if available, but avoid over-processing.
Step 7: Color and finishing
- Apply a basic adjustment (exposure/contrast/temperature) for consistency.
- If using filters/LUTs, save them as a preset and apply consistently.
Step 8: Export presets and versions
- Export at 1080×1920, high bitrate.
- Save export settings as your default.
- Duplicate the project for variants (e.g., different caption size), but keep naming strict: ProjectName_V01, V02.
CapCut Workflow Tips That Prevent Rework
- Template everything: Create one “starter project” with your caption style, safe margins, and audio track layout.
- Keep captions on a dedicated track: so you can hide/adjust them quickly.
- Use adjustment layers (if available): for consistent color or effects across multiple clips.
- Limit effects: pick a small set you can apply quickly and consistently.
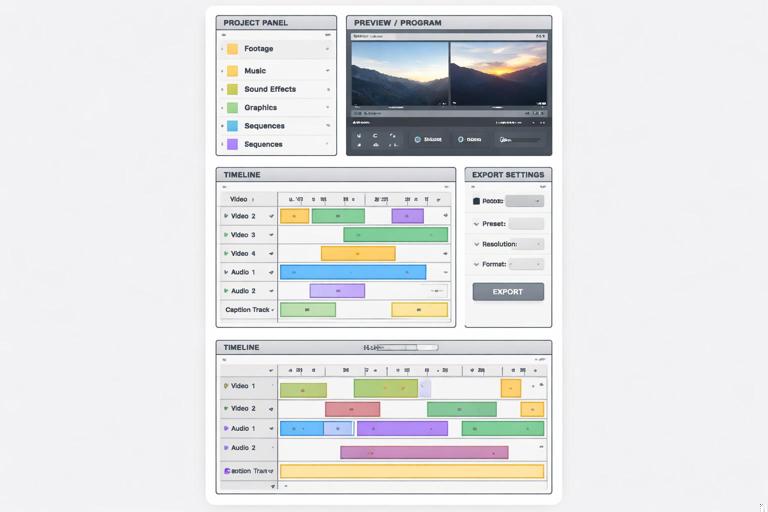
Adobe Premiere Pro Workflow (Precision, Repeatability, Team-Friendly)
Premiere Pro excels when you need reliable organization, precise trimming, and scalable versioning. It’s strong for creators who want a “system” that can grow: reusable sequences, adjustment layers, essential graphics templates, and export presets.
Premiere Step-by-Step: A Vertical Shorts Pipeline
Step 1: Create a vertical sequence
- File → New → Sequence.
- Choose a sequence preset close to your footage frame rate.
- In Sequence Settings, set Frame Size to 1080 horizontal × 1920 vertical.
- Name it: “01_Edit_Vertical_Master”.
Step 2: Project organization
- Create bins: 01_Footage, 02_Audio, 03_Music, 04_SFX, 05_GFX, 06_Captions, 07_Sequences, 99_Exports.
- Import media into the correct bins immediately.
- Use labels (colors) for A-roll vs B-roll.
Step 3: Selects and assembly
- Create a “Selects” sequence and pull your best moments in.
- Use Source Monitor in/out points and Insert/Overwrite edits.
- Then assemble into the Master sequence.
Step 4: Tight trimming with ripple tools
- Use Ripple Edit Tool (B) to remove dead space while keeping timing tight.
- Use rolling edits to adjust cut points without changing overall duration.
- Use J/L playback at faster speeds to review quickly.
Step 5: Reframing and scaling
- If footage is horizontal, use Auto Reframe Sequence (Sequence → Auto Reframe) to create a vertical version; review and fix tracking.
- For manual control, adjust Motion → Position/Scale in Effect Controls.
- Use keyframes for subtle push-ins; keep them consistent across the piece.
Step 6: Captions workflow
- Create captions from transcript (Text panel) if you have dialogue.
- Correct the transcript, then generate captions.
- Apply a Track Style so all captions share the same formatting.
- Keep captions in their own track above graphics.
Step 7: Graphics and reusable elements
- Build lower-thirds or callouts in Essential Graphics.
- Save as a Motion Graphics Template (MOGRT) for reuse across projects.
- Use an adjustment layer for global effects (sharpen, grain, subtle vignette) so you can toggle quickly.
Step 8: Audio polish
- Use Essential Sound to tag Dialogue, Music, SFX.
- Apply consistent dialogue processing (light compression, EQ, de-noise if needed).
- Keyframe music ducking under dialogue for consistent intelligibility.
Step 9: Color correction
- Use Lumetri Color for basic correction and a consistent look.
- Apply look via adjustment layer if it’s shared across clips.
- Do shot matching after the cut is locked.
Step 10: Export presets and versioning
- Use H.264 with a vertical preset you save (1080×1920, matching frame rate).
- Name exports systematically: Project_Short_V01_1080x1920.
- For variants, duplicate the sequence: “02_Edit_Vertical_CaptionsBig”, “03_Edit_Vertical_MusicAlt”.
Premiere Workflow Tips for High Output
- Use nested sequences for modularity: Put your main cut in a nest, then add captions/graphics on top in a “Delivery” sequence. This makes variants easier.
- Keyboard shortcuts matter: Map ripple delete, add edit, and nudge to speed up micro-trims.
- Keep a “Brand Pack” project: a separate Premiere project containing your MOGRTs, sound effects, and adjustment layers you can import.
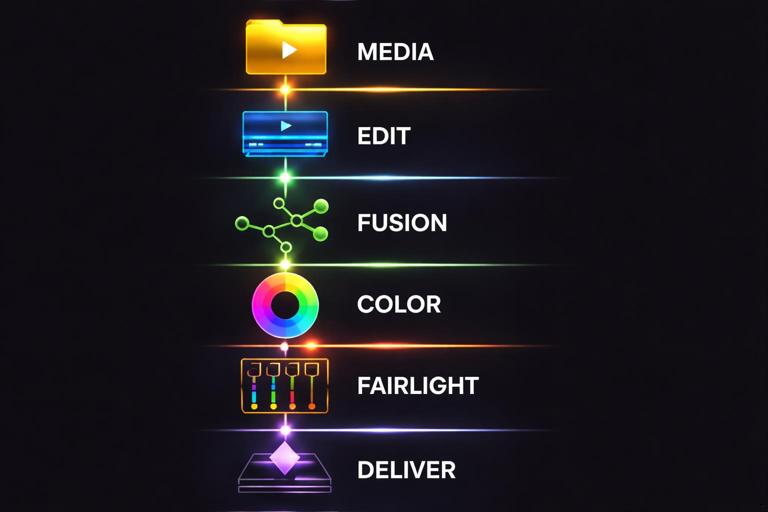
DaVinci Resolve Workflow (Color + Audio Power, Strong Finishing)
Resolve is ideal when you want a unified pipeline: editing, color grading, and advanced audio in one application. It can be fast once you standardize your page-by-page workflow: Media (ingest), Cut/Edit (assembly), Fusion (graphics if needed), Color (grading), Fairlight (audio), Deliver (export).
Resolve Step-by-Step: Vertical Timeline and Finishing
Step 1: Project settings for vertical
- Open Project Settings (gear icon).
- Set Timeline Resolution to 1080×1920.
- Set Timeline Frame Rate to match your footage (choose before editing).
- Set video monitoring to a vertical-friendly setup if available.
Step 2: Media organization
- In the Media page, import your folders.
- Create bins: Footage_A, Footage_B, Audio_VO, Music, SFX, Graphics, Exports.
- Use Smart Bins or metadata to group by camera, date, or scene.
Step 3: Assembly in Cut or Edit page
- Use the Cut page for fast assembly (especially if you like source tape).
- Or use the Edit page for traditional track-based editing.
- Build a rough cut first; keep it simple.
Step 4: Tight trims and speed changes
- Use ripple trims to remove gaps quickly.
- Use blade edits sparingly; prefer trim tools to keep edits adjustable.
- If using retiming, keep it consistent and avoid stacking too many effects until the cut is stable.
Step 5: Reframing and transform controls
- For horizontal sources, adjust Transform (Zoom/Position) in the Inspector.
- Keyframe subtle push-ins where needed.
- Use Resolve’s tracking tools if you need the frame to follow a subject, but only after the edit is close to locked.
Step 6: Captions and text workflow
- Create subtitles/captions in the Edit page (Subtitle track) or use text tools for stylized captions.
- Keep captions separate from other graphics so you can toggle and version easily.
- For consistent styling, create a few reusable text presets (font, outline, background) and duplicate them.
Step 7: Color page for consistent look
- Start with primary correction: exposure, contrast, white balance.
- Use a node structure you reuse every time (e.g., Node 1: balance, Node 2: contrast/sat, Node 3: look, Node 4: vignette/skin protection if needed).
- Group clips (or use shared nodes) to apply the same look across the whole short.
Step 8: Fairlight page for audio polish
- Organize tracks: Dialogue, Music, SFX.
- Use EQ to remove low rumble and harshness from dialogue.
- Use compression to control dynamics; keep dialogue consistent.
- Use automation or ducking so music stays under voice.
Step 9: Deliver page exports and presets
- Choose an H.264/H.265 preset and confirm 1080×1920 output.
- Set bitrate appropriate for your platform and quality needs.
- Save a custom preset named “VerticalShort_1080x1920”.
- Queue multiple renders for variants (caption on/off, different audio).
Resolve Workflow Tips That Save Hours
- Use Power Bins: store reusable assets (logos, sound effects, title cards) available across projects.
- Use compound clips strategically: group a section you want to treat as a unit, but don’t overuse (it can complicate later edits).
- Grade after picture lock: Resolve’s color tools are powerful; avoid grading clips you might remove.
Cross-Platform Workflow Patterns You Can Standardize
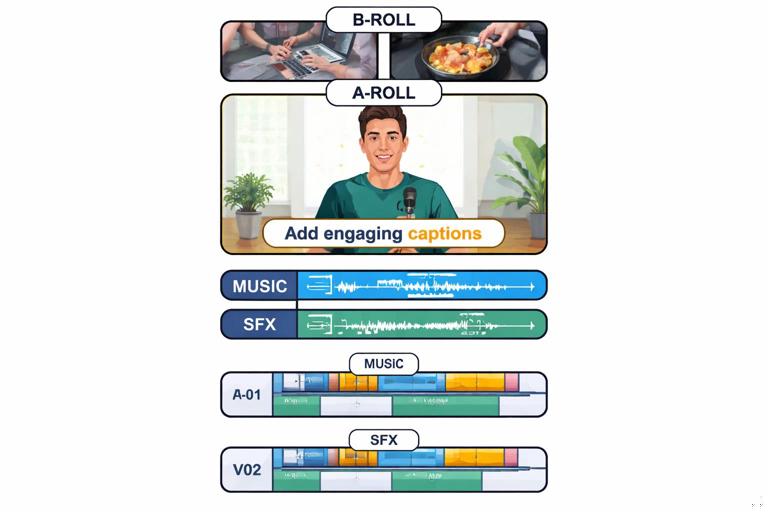
Track/Lane Layout Template
Whether you’re in CapCut layers, Premiere tracks, or Resolve tracks, keep a consistent layout so your brain doesn’t re-learn each project.
- V3: Titles/Callouts
- V2: Captions
- V1: Video (A-roll + B-roll)
- A1: Dialogue/VO
- A2: Music
- A3: SFX
Versioning Without Chaos
Make versions intentional. Don’t overwrite exports or keep unnamed duplicates.
- Project file: ProjectName_Edit_V01
- Sequence/timeline: 01_Master, 02_CaptionsLarge, 03_MusicAlt
- Export: ProjectName_V01_9x16_1080p.mp4
Checklist: Pre-Export QC (30–60 seconds)
- First frame is clean (no mid-blink, no accidental freeze frame).
- Captions have no typos and don’t cover critical visuals.
- No clipped audio peaks; dialogue is consistently audible.
- No black frames, missing media, or muted tracks.
- Export settings are correct: 1080×1920, correct fps, high quality bitrate.
Practical Example Workflow: One Short, Three Apps (Same Logic)
Scenario
You have: one main talking clip (A-roll), three cutaways (B-roll), one music bed, and a few sound effects. You need captions and a consistent look. The goal is to finish quickly and still be able to create a second version with different captions.
Execution Pattern
- Rough cut (10–15 minutes): assemble A-roll, insert B-roll above, remove mistakes.
- Tighten (10 minutes): ripple trims, remove micro-pauses, align cutaways.
- Captions (15–25 minutes): auto-generate (if available), correct, apply style, add emphasis words.
- Polish (10–20 minutes): basic color correction, dialogue leveling, music ducking, a few SFX.
- QC + export (5–10 minutes): sound-on pass, sound-off pass, export preset.
- Variant (5–15 minutes): duplicate timeline/project, adjust caption size/style, export V02.
Troubleshooting Workflow Bottlenecks
Bottleneck: Captions take too long
- Standardize one caption style and reuse it.
- Do a two-pass method: generate/rough correct first, then refine only after the cut is locked.
- Keep emphasis effects minimal and repeatable (one highlight style, not five).
Bottleneck: Reframing horizontal footage is inconsistent
- Decide one framing rule and apply it across the timeline (center subject, consistent headroom).
- Use auto reframe/tracking as a starting point, then manually fix only the problem shots.
- Keyframe only when necessary; avoid constant motion.
Bottleneck: Audio levels vary between projects
- Create a dialogue processing preset (EQ + compression) and reuse it.
- Keep music on its own track and set a typical baseline level, then duck under voice.
- Always do a final listen on phone speakers before export if possible.
Bottleneck: Too many exports and confusion
- Export a master file first, then derive platform versions.
- Use consistent naming and keep exports in a dedicated folder.
- Write a one-line changelog in a text file: what changed in V02 vs V01.