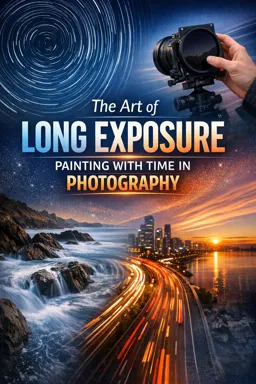
What “Long Exposure” Really Means
Long exposure is not defined by a specific shutter speed; it is defined by intent: you deliberately choose a shutter time long enough that motion or changing light becomes visible as a trace, blur, or transformation. In a “normal” exposure, moving subjects are often frozen or only slightly blurred. In a long exposure, time becomes a visible ingredient. The camera records not only what was there, but what happened during the exposure. This is why long exposure can make water look silky, clouds look stretched, crowds disappear, or traffic become ribbons of light.
Think of the sensor as a canvas and the shutter as the duration of the brushstroke. A short exposure is a quick dab; a long exposure is a sustained stroke that accumulates everything that happens while the shutter is open. Your job is to decide what you want time to do in the frame: describe motion, simplify chaos, reveal patterns, or create a calm, minimal scene.
Motion as a Design Element
Motion in long exposure is not just “blur.” It is a shape language. Different kinds of movement create different visual signatures, and learning to predict those signatures is the foundation of consistent results.
Types of Motion You Can “Draw” With
- Linear motion: cars, cyclists, boats, moving lights. This produces streaks or elongated forms that point the viewer’s eye.
- Oscillating motion: tree branches in wind, flags, hanging signs. This creates a fuzzy, vibrating blur that can feel energetic or messy depending on placement.
- Flowing motion: water, fog, crowds. This tends to average into smooth surfaces or ghosted figures.
- Rotational motion: ferris wheels, ceiling fans, spinning rides. This creates arcs, circles, and repeated patterns.
- Random motion: choppy water, handheld light painting, chaotic crowds. This can become texture, haze, or abstract layering.
When you plan a long exposure, identify the moving elements and decide whether you want them to become leading lines, soft texture, ghosts, or negative space. The same scene can be interpreted in multiple ways by changing shutter time and timing.
Time: The Hidden Variable You Control
Shutter speed is your time dial, but the effect is not linear. Doubling the time does not simply double the blur; it can change the character of the blur. For example, water at 1/4 second may show streaks and structure, while at 10 seconds it may become a nearly uniform mist. A crowd at 1 second may show recognizable people with motion blur, while at 30 seconds it may average into a mostly empty space with only a few ghosts.
- Listen to the audio with the screen off.
- Earn a certificate upon completion.
- Over 5000 courses for you to explore!

Download the app
A Practical “Time Map” for Common Effects
Use this as a starting point, then adjust based on how fast the subject moves and how close it is to the camera (closer motion blurs more for the same shutter time).
- 1/2 to 2 seconds: introduces motion while keeping some structure. Good for waves with texture, people walking with recognizable forms, handheld light trails that still look “drawn.”
- 2 to 8 seconds: stronger smoothing and longer streaks. Good for traffic trails, water smoothing, cloud drift on windy days, removing small distractions in crowds.
- 8 to 30 seconds: pronounced averaging. Water becomes glassy, crowds thin out, clouds stretch noticeably, reflections can simplify.
- 30 seconds to several minutes: time becomes dominant. Moving elements can vanish, shadows shift, light sources change, and the scene can feel surreal or minimal.
Instead of asking “What shutter speed should I use?” ask “How much time do I want to show?” Then test one exposure, evaluate the motion signature, and iterate.
Visual Intent: Choosing the Story Time Tells
Long exposure is most compelling when the blur supports a clear visual idea. Without intent, blur can look like an accident. With intent, blur becomes a compositional tool that clarifies the subject, simplifies clutter, or creates a mood.
Four Intent Frameworks You Can Apply in the Field
- Reveal flow: show direction and energy (traffic streams, river currents, cloud movement). Compose so the flow leads toward your subject.
- Simplify: remove detail by averaging motion (busy water, crowds, foliage). Use long time to reduce visual noise and emphasize shape.
- Contrast still vs moving: anchor the frame with something static (rocks, buildings, piers) and let motion wrap around it. This creates stability and drama.
- Transform reality: use time to create something the eye cannot see in a moment (ghosted people, disappearing objects, abstract light paths).
Before setting up, state your intent in one sentence, such as: “I want the pier to feel solid while the sea becomes a soft veil,” or “I want the streetlights to become lines that point to the tower.” This sentence guides your shutter time, framing, and timing.
Step-by-Step: Building a Long-Exposure Shot from Intent
Step 1: Identify the anchor
Choose the element that should remain sharp and stable. This is often architecture, rocks, a bridge, a shoreline, or a stationary person. The anchor gives the viewer a place to rest and makes motion look intentional rather than like camera shake.
Step 2: Identify the moving layers
List what moves in the scene: water, clouds, people, vehicles, foliage, reflections, light sources. Decide which moving layer is the “main brushstroke” and which should be minimized. For example, you might want cloud streaks but not messy tree blur; that affects your framing and timing.
Step 3: Decide the motion signature you want
Pick one: streaks, mist, ghosts, or texture. Then choose an initial shutter time from the time map. If you want water with texture, start shorter; if you want a smooth surface, start longer.
Step 4: Compose for motion direction
Motion has direction, and direction is composition. Place moving lines so they lead into the frame rather than out of it. For traffic trails, a curve that enters from a corner and leads to a subject is often stronger than a straight line that exits quickly. For clouds, align the streak direction to complement the main geometry (for example, streaks pointing toward a mountain peak).
Step 5: Time the exposure
Timing matters as much as duration. Wait for a clean moment: fewer pedestrians, a gap in traffic, a wave pattern you like, or a gust of wind that will move clouds. If the scene has repeating motion (waves, traffic lights), shoot multiple exposures to catch different patterns.
Step 6: Evaluate and iterate
After the first exposure, check two things: (1) Is the anchor sharp? (2) Does the motion look like the signature you intended? If the motion is too subtle, lengthen time; if it is too smeared and loses character, shorten time. Iterate in small steps (for example, 2s → 4s → 8s) until the motion reads clearly.
Understanding “Averaging” and Why Things Disappear
A key foundation is that long exposure averages changing information over time. If something occupies a pixel only briefly, it contributes little to the final image. This is why people can vanish in a long exposure if they keep moving and never stay in one place long enough. It is also why choppy water becomes smooth: the bright and dark ripples average into a midtone surface.
Practical Example: Making a Busy Plaza Look Calm
Imagine a plaza with a statue (static) and many pedestrians (moving). Your intent is to emphasize the statue and architecture while reducing the crowd. A longer shutter time increases averaging: pedestrians become faint ghosts or disappear. If some people stop, they may appear as solid figures, so you can either wait for fewer stops or shorten the exposure and take multiple attempts until the “stoppers” are gone.
Stillness vs Motion: The Core Long-Exposure Contrast
Long exposure often works best when the frame contains both stillness and motion. The stillness provides clarity; the motion provides energy or mood. If everything moves, the image can become a uniform blur. If nothing moves, the long exposure looks like a normal photo. The craft is in balancing the two.
How to Strengthen the Contrast
- Use strong edges for the anchor: buildings, rocks, railings, or a sharply defined silhouette.
- Place motion around the anchor: water flowing past rocks, clouds behind a tower, traffic around a monument.
- Separate tones: a dark anchor against a bright blurred sea, or bright light trails against a darker street.
When evaluating a shot, ask: “If I blur my eyes, do I still see the anchor clearly?” If not, you may need a stronger anchor shape, a different viewpoint, or a different shutter time.
Choosing Shutter Time by Subject Speed and Distance
The same shutter speed can look very different depending on how fast the subject moves and how close it is. Close, fast motion creates more blur. Distant, slow motion creates less blur. This is why cloud streaks may require longer times than traffic trails, and why a nearby stream can become silky at 1 second while distant ocean swell might need several seconds to show clear smoothing.
A Simple Field Heuristic
- If motion is close: start shorter than you think (for example, 1/2–2 seconds for water near the camera).
- If motion is far: start longer (for example, 10–30 seconds for distant clouds on a calm day).
- If motion is intermittent: shoot multiple frames; the “best” pattern may happen only occasionally (waves, passing cars).
Intent-Driven Examples You Can Practice Anywhere
Example 1: Traffic as leading lines
Intent: turn cars into lines that guide the viewer toward a subject (a building, sign, or skyline). Approach: choose a viewpoint where the road curves into the frame. Start around 2–8 seconds to capture continuous trails without overfilling the frame. Time the exposure when multiple cars enter the curve. If trails are too broken, increase time; if the frame becomes a bright mess, reduce time or wait for fewer cars.
Example 2: Water as mood (texture vs mist)
Intent: decide whether water should feel energetic (texture) or calm (mist). Approach: for texture, start around 1/2–2 seconds and look for visible streaks and wave structure. For calm, start around 8–30 seconds and watch the surface average into a smooth tone. Keep a static anchor like rocks or a pier to avoid the scene becoming too uniform.
Example 3: Crowds as ghosts
Intent: show the presence of people without focusing on individuals. Approach: start around 1–4 seconds in a busy area. People become semi-transparent, suggesting movement and time. If you want fewer recognizable faces, lengthen time; if you want more readable figures, shorten time. Compose with a strong static structure so the ghosts feel like a layer rather than the subject.
Example 4: Wind-blown foliage as controlled chaos
Intent: use blur as a frame or texture without destroying the subject. Approach: place the main subject away from the most wind-active branches. Start around 1/4–1 second to get gentle motion, and increase only if the blur remains pleasing. If foliage becomes a distracting smear, shorten time or change angle to reduce how much foliage fills the frame.
Pre-Visualization: Sketching the Final Look Before You Shoot
Pre-visualization means predicting what the camera will record over time. A practical way to do this is to watch the scene for 10–20 seconds and mentally “average” what you see. Ask: Which elements keep returning to the same place (they will appear stronger)? Which elements pass through quickly (they will fade)? Which elements change brightness (they may create uneven streaks)?
A Quick Pre-Visualization Checklist
- Anchor: what must stay sharp?
- Main motion: what motion should be most visible?
- Direction: where will the motion lead the eye?
- Duration: do you want texture, streaks, or full smoothing?
- Timing: when is the cleanest moment to start the exposure?
This checklist keeps you from choosing shutter speed randomly. It ties technical choices directly to visual intent, which is the foundation of long exposure as an expressive tool.
Common Foundation Mistakes (and How to Correct Them)
Blur that looks accidental
Symptom: the whole frame looks soft, and motion does not read as a deliberate shape. Correction: strengthen the anchor (choose a more solid subject, adjust framing), and ensure the camera is stable. Then choose a shutter time that creates a clear motion signature rather than a vague smear.
Motion overwhelms the subject
Symptom: light trails or water blur dominate and the intended subject is lost. Correction: shorten shutter time, recompose to give the subject more visual weight, or wait for less intense motion (fewer cars, smaller waves).
Not enough motion to justify the technique
Symptom: the image looks like a normal exposure. Correction: lengthen time, move closer to the motion, or choose a scene with more dynamic movement. Alternatively, change intent: instead of smoothing, aim for subtle ghosting or gentle streaks.
Messy, vibrating blur from wind
Symptom: trees and grass become distracting fuzz. Correction: reduce exposure time, change viewpoint to reduce the amount of foliage in frame, or use the blur intentionally as a border while keeping the main subject clear.
Putting It Together: A Repeatable Planning Template
Use this template in your notes app or as a mental routine. It turns long exposure from guesswork into a repeatable process.
1) Intent (one sentence): ____________________________
2) Anchor (what stays sharp): ________________________
3) Main motion (what becomes a trace): _______________
4) Motion signature (streak/mist/ghost/texture): _____
5) Starting time guess: ______________________________
6) Timing cue (when to start): _______________________
7) Iteration plan (shorter/longer if needed): ________
By filling in these lines before you shoot, you connect motion, time, and visual intent into one decision chain. That decision chain is the foundation of strong long-exposure work: you are not merely using a slow shutter, you are shaping how time appears in the photograph.